|
Title: [Guide] Dogie's Comprehensive Bitmain Antminer C1 Setup [HD] Post by: dogie on November 04, 2014, 04:36:45 PM Dogie's Miner Setup Guides:
Nicely formatted version available at dogiecoin.com (http://goo.gl/PJSrb8)! https://i.imgur.com/ptViCVd.png (http://goo.gl/PJSrb8) https://i.imgur.com/AXm1t8k.png Contents: 0a) What to Expect (#post_section0a) 0b) What You Need (#post_section0b) 1) Powering (#post_section1) 2a) Cooling (#post_section2a) 2b) Cooling Assembly (#post_section2b) 3) Case (#post_section3) 4) Configuration (#post_section4) 5) Troubleshooting (#post_section5) 6) Where to buy (#post_section6) https://i.imgur.com/AXm1t8k.png 0a) What to Expect (top) (#post_contents) Bitmain's AntMiner C1 combines two Antminer S3's into the same compact case of the S3. This is made possible by the addition of watercooling [purchased separately] which significantly lowers temperatures and noise levels. 64 BM1382 chips are spread across four hashing boards with each waterblock cooling two boards in a sandwich. C1s require assembly but do not require an external controller.
https://farm4.staticflickr.com/3945/15506651160_83580db706_b.jpg (https://farm4.staticflickr.com/3945/15506651160_766d890cb7_o.jpg) https://farm4.staticflickr.com/3953/15691673225_9189af3d7d.jpg (https://farm4.staticflickr.com/3953/15691673225_90b3f7aa6b_o.jpg) https://farm4.staticflickr.com/3946/15071711104_099152e614.jpg (https://farm4.staticflickr.com/3946/15071711104_5f7caaa1f2_o.jpg) https://farm4.staticflickr.com/3950/15693206722_06412a6edc.jpg (https://farm4.staticflickr.com/3950/15693206722_3865627e15_o.jpg) https://farm4.staticflickr.com/3952/15071539704_02fa44ea0b.jpg (https://farm4.staticflickr.com/3952/15071539704_f003705e53_o.jpg) https://farm9.staticflickr.com/8654/15702953350_fcfd3315b4_b.jpg (https://farm9.staticflickr.com/8654/15702953350_0ba867ea3e_o.jpg) https://farm4.staticflickr.com/3939/15505642639_150eca9375_b.jpg (https://farm4.staticflickr.com/3939/15505642639_d8604ff72a_o.jpg) https://i.imgur.com/AXm1t8k.png 0b) What You Need (top) (#post_contents) You will need a few accessories and a power supply to get started. *You will also need the custom C1 watercooling kit from here (http://goo.gl/QVcdL7). Click your flag to find everything* you need to get started at Amazon! https://i.imgur.com/nbE2zmI.jpg (http://goo.gl/pPrDHI) https://i.imgur.com/VrKwdav.jpg (http://goo.gl/YrsMQK) https://i.imgur.com/DKBxvTA.jpg (http://goo.gl/xng2H2) https://i.imgur.com/T4fRQnt.png (http://goo.gl/3NlnsZ) https://i.imgur.com/fyKxshp.png (http://goo.gl/YrsMQK) https://i.imgur.com/8Y0bFol.png (http://goo.gl/xng2H2) https://i.imgur.com/AXm1t8k.png 1) Powering (top) (#post_contents) C1's do not come with a power supply, and you will need a typical computer PSU with 8xPCI-E 6 pin power connectors. Strictly only 4 PCI-E connectors are required at stock speeds, however it will reduce cable temperatures by utilising all 8. We also need to tell the PSU to always be on, as there isn't a motherboard to do this. Cut a paper clip into a U and insert it into the green wire and either black wire to the side of the green wire. Tape it up for safety. The power supply will now be controlled by its switch on the rear socket. https://farm4.staticflickr.com/3940/15691698835_7f095007b6.jpg (https://farm4.staticflickr.com/3940/15691698835_7ac13f75f1_o.jpg) https://i.imgur.com/URnhwPH.jpg (https://i.imgur.com/URnhwPH.jpg) https://i.imgur.com/AXm1t8k.png 2a) Cooling (top) (#post_contents) The C1 requires external watercooling in order to be run. A customised $50+$30 kit is available to purchase from here (http://goo.gl/QVcdL7). This includes a pump, radiator, fans, fittings, tubing, cables and screws, but you will require 1L of coolant. A single 120mm Weili WD1202512SH fan cools the PCBs while three 120mm JSL JDH1238B fans cool the 360mm radiator. Each pair of hashing boards sandwiches an aluminium waterblock with an 8mm inner diameter. The front of the chips are covered by an aluminium heatsink using compressive springs to avoid potential chip damage. Please be careful when handling these heatsinks, they are extremely sharp. https://farm8.staticflickr.com/7509/15693335172_605f744596.jpg (https://farm8.staticflickr.com/7509/15693335172_b1daa7cab9_o.jpg) https://farm8.staticflickr.com/7569/15506134128_2b9dbaee54.jpg (https://farm8.staticflickr.com/7569/15506134128_2dc4629223_o.jpg) https://farm4.staticflickr.com/3942/15506438137_49ae9853ef.jpg (https://farm4.staticflickr.com/3942/15506438137_ea5ac1dc68_o.jpg) https://farm8.staticflickr.com/7462/15505775169_8ce1e576c0.jpg (https://farm8.staticflickr.com/7462/15505775169_8ff6c10d78_o.jpg) https://farm4.staticflickr.com/3946/15071711104_099152e614.jpg (https://farm4.staticflickr.com/3946/15071711104_5f7caaa1f2_o.jpg) https://farm4.staticflickr.com/3952/15071539704_02fa44ea0b.jpg (https://farm4.staticflickr.com/3952/15071539704_f003705e53_o.jpg) https://i.imgur.com/AXm1t8k.png 2b) Cooling Assembly (top) (#post_contents) Assembly of the cooling system takes about 20 minutes per miner and consists of 10 major stages. Please make sure you've completed each stage before you move on, and reread the instructions before proceeding to make sure you're not going to damage your Tube. These instructions assume you have purchased the customised $50+$30 kit from here (http://goo.gl/QVcdL7), as well as 1L of watercooling coolant. https://farm4.staticflickr.com/3956/15503991689_32c3e8ca2e_b.jpg (https://farm4.staticflickr.com/3956/15503991689_e9fe13c5aa_o.jpg) Step 1 We are going to start by preparing the radiator. This is a high density, 360mm aluminium radiator with three 120mm fans installed already. Locate the two plastic radiator stands, and slide them until the indicator on the top reads ~51mm. Screw the two screws in to hold the 51mm in place, being careful not to damage the plastic threads. https://farm4.staticflickr.com/3955/15072231383_a81bab676c.jpg (https://farm4.staticflickr.com/3955/15072231383_aaf005d4f3_o.jpg) https://farm4.staticflickr.com/3937/15689663401_9ab3b9f223.jpg (https://farm4.staticflickr.com/3937/15689663401_881671539f_o.jpg) https://farm8.staticflickr.com/7492/15689654001_f483579fce.jpg (https://farm8.staticflickr.com/7492/15689654001_00cc2b7c12_o.jpg) https://farm8.staticflickr.com/7560/15691464802_f688396278.jpg (https://farm8.staticflickr.com/7560/15691464802_25ac75f9fb_o.jpg) Step 2 Unscrew the two bottom corner screws on each end fan and discard the washers. Place the radiator stands between the fan grill and radiator on each side. Use the same screws as you removed to screw through the fan grill, radiator stand and into the radiator. Locate the two short, silver screws and screw in the other side of the radiator stand into the radiator. https://farm4.staticflickr.com/3949/15687928601_211cf1abe0.jpg (https://farm4.staticflickr.com/3949/15687928601_2075089507_o.jpg) https://farm4.staticflickr.com/3947/15504453058_c66c8ac6f0.jpg (https://farm4.staticflickr.com/3947/15504453058_05b6f1cbb0_o.jpg) https://farm4.staticflickr.com/3937/15505024110_7d82fd81bf.jpg (https://farm4.staticflickr.com/3937/15505024110_d4cca51fc0_o.jpg) https://farm4.staticflickr.com/3943/15504476808_b9c48169df.jpg (https://farm4.staticflickr.com/3943/15504476808_748bffe77d_o.jpg) Step 3 Next we will prepare the pump. This is a 15W pump with 3m of head pressure and 450 litres per hour of flowrate. Locate two fittings and screw them into the brass inserts. You'll need to tighten them slightly more than hand tight to prevent leaks occurring or the tube turning the fittings. https://farm8.staticflickr.com/7471/15072181183_aa508ac2a5.jpg (https://farm8.staticflickr.com/7471/15072181183_1f55b2eb67_o.jpg) https://farm8.staticflickr.com/7548/15689617071_c50a13efbc.jpg (https://farm8.staticflickr.com/7548/15689617071_e781f37637_o.jpg) https://farm8.staticflickr.com/7526/15505090420_dd635c336e.jpg (https://farm8.staticflickr.com/7526/15505090420_727eed1295_o.jpg) https://farm8.staticflickr.com/7479/15069963954_92440642ca.jpg (https://farm8.staticflickr.com/7479/15069963954_bba51c23e6_o.jpg) Step 4 Locate the tubing and cut three pieces from it, two of 70cm length and one of 40cm length. You can do this with standard scissors but try and make the ends flat. Step 5 The C1 is next to be prepared.
There are then various different ways to do the next stage depending on what type of fittings you have. https://farm8.staticflickr.com/7469/15689943705_8f52f44435.jpg (https://farm8.staticflickr.com/7469/15689943705_4a2d0436c2_o.jpg) https://farm4.staticflickr.com/3952/15504071919_1e66cb7329.jpg (https://farm4.staticflickr.com/3952/15504071919_110c9b196f_o.jpg) https://farm8.staticflickr.com/7534/15691613162_1d610091cc.jpg (https://farm8.staticflickr.com/7534/15691613162_35d30f920e_o.jpg) https://farm8.staticflickr.com/7515/15070644683_de89637903.jpg (https://farm8.staticflickr.com/7515/15070644683_2d39734602_o.jpg) Step 6a - Standard Fittings
https://farm6.staticflickr.com/5614/15689996055_7712792306.jpg (https://farm6.staticflickr.com/5614/15689996055_648ff057d1_o.jpg) https://farm8.staticflickr.com/7501/15070625353_cd2b15b87e.jpg (https://farm8.staticflickr.com/7501/15070625353_c568bff82b_o.jpg) https://farm6.staticflickr.com/5609/15505171090_deb273bde4.jpg (https://farm6.staticflickr.com/5609/15505171090_79e5c6ed73_o.jpg) https://farm8.staticflickr.com/7505/15504769857_2620e26dcf.jpg (https://farm8.staticflickr.com/7505/15504769857_5e017b88fa_o.jpg) Step 6b - 1/4" BSP Quick Release Fittings
https://farm4.staticflickr.com/3942/15669890861_8f9829b33c.jpg (https://farm4.staticflickr.com/3942/15669890861_e18c6384d4_o.jpg) https://farm8.staticflickr.com/7551/15051837184_76b029f26a.jpg (https://farm8.staticflickr.com/7551/15051837184_eb3dfddd45_o.jpg) https://farm4.staticflickr.com/3952/15666240306_63d348a91a.jpg (https://farm4.staticflickr.com/3952/15666240306_afccd69839_o.jpg) https://farm8.staticflickr.com/7555/15504543558_4cbb39d0fd.jpg (https://farm8.staticflickr.com/7555/15504543558_92f79da28b_o.jpg) https://farm4.staticflickr.com/3943/15505216120_1aca9c2ffe.jpg (https://farm4.staticflickr.com/3943/15505216120_24f4ff16fd_o.jpg) Step 6c - Quick Release Barb Fittings
https://farm8.staticflickr.com/7506/15486986010_8177a9c054.jpg (https://farm8.staticflickr.com/7506/15486986010_050dbc9282_o.jpg) https://farm8.staticflickr.com/7533/15486402628_5637da3ce2.jpg (https://farm8.staticflickr.com/7533/15486402628_222128b82e_o.jpg) https://farm4.staticflickr.com/3943/15504699598_802c73d094.jpg (https://farm4.staticflickr.com/3943/15504699598_ab87d6238a_o.jpg) https://farm8.staticflickr.com/7505/15690091645_248c88cae4.jpg (https://farm8.staticflickr.com/7505/15690091645_2fcd34028a_o.jpg) Step 7 Connect the short tube from the C1 to the outlet [the bottom, black fitting] on the pump using the process in Step 6)a. Connect the third long tube to the other port on the pump using the process in Step 6)a. Step 8 Connect the long tube coming from the C1 to whichever fitting on the radiator is the lowest. Connect the higher one to the pump. We have now completed the circuit so double check all spring clamps are in place and that the tubing is at or near to the end of the fitting. https://farm8.staticflickr.com/7563/15504199279_6752997066_b.jpg (https://farm8.staticflickr.com/7563/15504199279_9b8c8191ca_o.jpg) Step 9 Plug in a PCI-E cable into the PCB you plugged the fan cable into, and then the pump into the only connector it fits into on the fan cable. DO NOT TURN YOUR PSU ON YET. Do the paper clip mod to your PSU as detailed in section 1 (#post_section1). https://farm6.staticflickr.com/5601/15070163034_250fca2033.jpg (https://farm6.staticflickr.com/5601/15070163034_d2f3ddbf61_o.jpg) Step 10
https://farm4.staticflickr.com/3952/15071539704_02fa44ea0b.jpg (https://farm4.staticflickr.com/3952/15071539704_f003705e53_o.jpg) https://farm4.staticflickr.com/3954/15691696312_0c51609152.jpg (https://farm4.staticflickr.com/3954/15691696312_3321d73fa9_o.jpg) https://farm4.staticflickr.com/3951/15485898599_8278ea9b3a.jpg (https://farm4.staticflickr.com/3951/15485898599_4c21438909_o.jpg) https://farm8.staticflickr.com/7469/15505603849_005d295259.jpg (https://farm8.staticflickr.com/7469/15505603849_28bb1f8818_o.jpg) https://farm6.staticflickr.com/5613/15667806306_717ac64cc1_b.jpg (https://farm6.staticflickr.com/5613/15667806306_8f3402c9b6_o.jpg) https://farm4.staticflickr.com/3939/15505642639_150eca9375_b.jpg (https://farm4.staticflickr.com/3939/15505642639_d8604ff72a_o.jpg) Step 11 (optional) You can also purchase anti kink coils to prevent the tubing from kinking and getting blocked when placed at an angle or being twisted. They also look great under UV light. https://farm6.staticflickr.com/5607/15497642338_2f1a1300f7_b.jpg (https://farm6.staticflickr.com/5607/15497642338_8ba7d729e9_o.jpg) https://i.imgur.com/AXm1t8k.png https://i.imgur.com/AXm1t8k.png 3) Case (top) (#post_contents) The C1 is entirely enclosed in an extremely strong shroud that is not going to be damaged at all. The internal frame is minimal but solid and well designed. All fans have grills to complete what is possibly the most child and pet friendly miner on the market. C1's are stackable when placed on their side due to the top access required for the PCI-E cables. A shipped C1 weighs 6kg and the unit measures 320 mm x 155 mm x 167 mm without watercooling installed. https://farm4.staticflickr.com/3954/15505833929_eab3e9ebe6.jpg (https://farm4.staticflickr.com/3954/15505833929_7de57ab3ee_o.jpg) https://farm8.staticflickr.com/7509/15693335172_605f744596.jpg (https://farm8.staticflickr.com/7509/15693335172_b1daa7cab9_o.jpg) https://farm8.staticflickr.com/7471/15506939480_f9511c8559.jpg (https://farm8.staticflickr.com/7471/15506939480_08f1107667_o.jpg) https://farm4.staticflickr.com/3950/15667999586_c89f9bc85d.jpg (https://farm4.staticflickr.com/3950/15667999586_e5b2f2c03a_o.jpg) https://farm8.staticflickr.com/7466/15668008416_1c8ac8b72f.jpg (https://farm8.staticflickr.com/7466/15668008416_e39bd02f0e_o.jpg) https://farm4.staticflickr.com/3955/15071788084_385caaf599.jpg (https://farm4.staticflickr.com/3955/15071788084_5e467e53a5_o.jpg) https://i.imgur.com/AXm1t8k.png 4) Configuration (top) (#post_contents) The C1 is standalone and does not require an external controller. Wiring:
Configuration:
Alternative Subnet Change:
Antpool Register! (https://account.bitmain.com/sign_up) Code: Servers : stratum+tcp://stratum.antpool.com:3333 Code: Servers : stratum+tcp://stratum.btcguild.com:3333 Code: Servers : stratum+tcp://us1.ghash.io:3333 https://i.imgur.com/AXm1t8k.png https://i.imgur.com/AXm1t8k.png 5) Troubleshooting (top) (#post_contents)
https://farm6.staticflickr.com/5600/15693224072_5509afa19c.jpg (https://farm6.staticflickr.com/5600/15693224072_e05e1f5333_o.jpg) https://farm6.staticflickr.com/5601/15689760741_7fac4d3cb0.jpg (https://farm6.staticflickr.com/5601/15689760741_2248d75297_o.jpg) https://i.imgur.com/AXm1t8k.png Legal disclaimer: This information is for general guidance and does not constitute expert advice. We are not responsible if you, your property or a third party is injured or damaged as a result of any interaction with this information, and no warranty is provided. All text and images are covered by copyright. https://i.imgur.com/AXm1t8k.png 6) Where to buy (top) (#post_contents) https://i.imgur.com/nbE2zmI.jpg (http://goo.gl/WaqCro) https://i.imgur.com/VrKwdav.jpg (http://goo.gl/WaqCro) https://i.imgur.com/DKBxvTA.jpg (http://goo.gl/WaqCro) https://i.imgur.com/T4fRQnt.png (http://goo.gl/WaqCro) https://i.imgur.com/fyKxshp.png (http://goo.gl/WaqCro) https://i.imgur.com/8Y0bFol.png (http://goo.gl/WaqCro) https://i.imgur.com/AXm1t8k.png Title: Re: [Guide] Dogie's Comprehensive Bitmain Antminer C1 Setup [HD] Post by: Threader on November 04, 2014, 08:00:04 PM Extremely Beautiful Work. Well Done. Thank you.
Title: Re: [Guide] Dogie's Comprehensive Bitmain Antminer C1 Setup [HD] Post by: Swimmer63 on November 04, 2014, 08:14:08 PM You are the Guide Master.
Title: Re: [Guide] Dogie's Comprehensive Bitmain Antminer C1 Setup [HD] Post by: Beastlymac on November 05, 2014, 01:08:46 AM Why should somebody go with a C1 over two S3+? What would you rate the C1 setup as for a beginner who has never minded or setup liquid cooling before?
Title: Re: [Guide] Dogie's Comprehensive Bitmain Antminer C1 Setup [HD] Post by: Rabinovitch on November 05, 2014, 01:44:11 AM Enough, guys... Just another one guide. Let's better talk about C1 installation if anyone have any questions or notes...
Title: Re: [Guide] Dogie's Comprehensive Bitmain Antminer C1 Setup [HD] Post by: notlist3d on November 05, 2014, 02:51:03 AM My post install advice:
The starting IP should be 192.168.1.99 Get a nice screw driver you will be opening and closing case (10 screws per miner) to plug in pump, etc. Have a little bowl or something for all the screws it's easy to drop the small screws Test it with top of case off, to make sure it's working. If you have problems taking case on/off adds up. Title: Re: [Guide] Dogie's Comprehensive Bitmain Antminer C1 Setup [HD] Post by: DiCE1904 on November 13, 2014, 09:38:19 PM Bookmarked to use when mine gets here. Appreciate the work.
Title: Re: [Guide] Dogie's Comprehensive Bitmain Antminer C1 Setup [HD] Post by: dogie on November 13, 2014, 11:49:33 PM Bookmarked to use when mine gets here. Appreciate the work. No problemTitle: Re: [Guide] Dogie's Comprehensive Bitmain Antminer C1 Setup [HD] Post by: dogie on November 13, 2014, 11:51:58 PM Why should somebody go with a C1 over two S3+? What would you rate the C1 setup as for a beginner who has never minded or setup liquid cooling before? Density, cost, noise [unless you have very high ambient temps then the onboard fan runs same as S1]. Because its based on barb fitting its pretty easy for someone to learn watercooling with this. Cable lengths are preorganised for you which is where people would typically make a mistake. Then it just becomes like any other miner. Title: Re: [Guide] Dogie's Comprehensive Bitmain Antminer C1 Setup [HD] Post by: untenops on November 15, 2014, 01:54:52 AM Would it be possible to run the C1 at a lower rate by only powering some of the hashing boards? I have a S3 that had a board go bad in it and I was able to run it for a while on only one board until Bitmain was able to get me a new one. Here my main concern would be shutting down half the boards for a while during a day, when the circuit I will plugged into will need to power something else. 15 amp circuit, and this thing look like it will be drawing around half that, maybe a bit more.
Title: Re: [Guide] Dogie's Comprehensive Bitmain Antminer C1 Setup [HD] Post by: notlist3d on November 16, 2014, 01:09:30 AM Would it be possible to run the C1 at a lower rate by only powering some of the hashing boards? I have a S3 that had a board go bad in it and I was able to run it for a while on only one board until Bitmain was able to get me a new one. Here my main concern would be shutting down half the boards for a while during a day, when the circuit I will plugged into will need to power something else. 15 amp circuit, and this thing look like it will be drawing around half that, maybe a bit more. It's like a S3 cranked up really high on frequency. And more dense on blades to get the 1T. I am sure it is not recommended but it seems like you could lower frequency to S3 levels and use 1 per blade (2 blades have fan controller using on them so maybe takes more on them). Personally I like having all 8 powered. Title: Re: [Guide] Dogie's Comprehensive Bitmain Antminer C1 Setup [HD] Post by: MasterRadix on November 26, 2014, 08:08:42 PM Hi,
does this miner supports WiFi? Maybe with an USB to WiFi dongle? Title: Re: [Guide] Dogie's Comprehensive Bitmain Antminer C1 Setup [HD] Post by: abzalus on November 26, 2014, 09:52:38 PM I wonder if it's possible to link them, if you look at the bottom of the C1 the fitting look like you can link more than one to each other. Anybody try to remove the 2 caps at the bottom fitting?
Thanks Title: Re: [Guide] Dogie's Comprehensive Bitmain Antminer C1 Setup [HD] Post by: stonerider on November 26, 2014, 10:26:41 PM Where do you get the coolant? I have automotive anti-freeze coolant, is that doable? How much coolant do you need?
Title: Re: [Guide] Dogie's Comprehensive Bitmain Antminer C1 Setup [HD] Post by: notlist3d on November 26, 2014, 10:41:16 PM Where do you get the coolant? I have automotive anti-freeze coolant, is that doable? How much coolant do you need? If you click dogie's link to amazon it is sold there. I would not use automotive. And one of the bottles he links to will do 1 unit plus have 300 or so ml left. Title: Re: [Guide] Dogie's Comprehensive Bitmain Antminer C1 Setup [HD] Post by: dogie on November 27, 2014, 01:53:22 AM Where do you get the coolant? I have automotive anti-freeze coolant, is that doable? How much coolant do you need? Its in the OP Title: Re: [Guide] Dogie's Comprehensive Bitmain Antminer C1 Setup [HD] Post by: dogie on November 27, 2014, 01:53:55 AM I wonder if it's possible to link them, if you look at the bottom of the C1 the fitting look like you can link more than one to each other. Anybody try to remove the 2 caps at the bottom fitting? Thanks No, you link them by running two in series. Instead of going from the C1 to radiator, you go C1 to C1 to radiator. Title: Re: [Guide] Dogie's Comprehensive Bitmain Antminer C1 Setup [HD] Post by: locohammerhead on November 29, 2014, 03:42:51 AM Miner starts up then after about a minute shuts off and red light blinks. cooler pump is still running. The bitmain site shows you can hook up two 500 Watt PSUs which is what I had laying around. All 8 plugs are plugged in. I ordered a 1300 watt PSU and I think two 500s just can't handle the peak power pulls. Thoughts?
Title: Re: [Guide] Dogie's Comprehensive Bitmain Antminer C1 Setup [HD] Post by: dogie on November 29, 2014, 12:59:38 PM Miner starts up then after about a minute shuts off and red light blinks. cooler pump is still running. The bitmain site shows you can hook up two 500 Watt PSUs which is what I had laying around. All 8 plugs are plugged in. I ordered a 1300 watt PSU and I think two 500s just can't handle the peak power pulls. Thoughts? Depends what they were Title: Re: [Guide] Dogie's Comprehensive Bitmain Antminer C1 Setup [HD] Post by: locohammerhead on November 29, 2014, 02:55:12 PM I have the C1
Title: Re: [Guide] Dogie's Comprehensive Bitmain Antminer C1 Setup [HD] Post by: dogie on November 29, 2014, 04:45:05 PM I have the C1 I meant what were the PSUs :P Title: Re: [Guide] Dogie's Comprehensive Bitmain Antminer C1 Setup [HD] Post by: tbolt on November 29, 2014, 05:10:13 PM Title: Re: [Guide] Dogie's Comprehensive Bitmain Antminer C1 Setup [HD] Post by: locohammerhead on November 30, 2014, 12:42:51 AM I have the C1 I meant what were the PSUs :P lol sorry. Two raidmax cobra power 500 watt PSU RX-500AF-B Title: Re: [Guide] Dogie's Comprehensive Bitmain Antminer C1 Setup [HD] Post by: dogie on November 30, 2014, 09:43:30 AM I have the C1 I meant what were the PSUs :P lol sorry. Two raidmax cobra power 500 watt PSU RX-500AF-B Shitty PSU is shitty unfortunately, wait on your big one. Title: Re: [Guide] Dogie's Comprehensive Bitmain Antminer C1 Setup [HD] Post by: entr04y on December 01, 2014, 12:39:30 PM Do you have a source for the quick release fittings? Any idea how much the flow rate is restricted through those (if at all)?
Title: Re: [Guide] Dogie's Comprehensive Bitmain Antminer C1 Setup [HD] Post by: dogie on December 01, 2014, 02:17:32 PM Do you have a source for the quick release fittings? Any idea how much the flow rate is restricted through those (if at all)? Source? Any watercooling shop online. You'll probably find barb fittings easier than compression fittings, just need an 8mm ID. Flow is restricted slightly but it shouldn't be meaningful in our application. Title: Re: [Guide] Dogie's Comprehensive Bitmain Antminer C1 Setup [HD] Post by: MasterRadix on December 07, 2014, 11:45:03 AM Is there any way to fake the MAC address on a C1?
Title: Re: [Guide] Dogie's Comprehensive Bitmain Antminer C1 Setup [HD] Post by: GigaBit on December 08, 2014, 10:37:47 PM Hey, I have a few questions.
I'd rather not import coolant, would it just be aluminum safe coolant? Title: Re: [Guide] Dogie's Comprehensive Bitmain Antminer C1 Setup [HD] Post by: NotFuzzyWarm on December 09, 2014, 12:20:27 AM Where do you get the coolant? I have automotive anti-freeze coolant, is that doable? How much coolant do you need? An excellent source for everything dealing with liquid cooling is Koolance http://koolance.com/ (http://koolance.com/) They have coolant, tubing, much better pumps and reservoirs, and those nifty 'dripless' quick connect Doggie shows.Personally, I will be using 3/8" (8mm) ID tubing vs the 1/4" (6mm) ID because I will be using a longer run between the radiator and miner. Like 2 meters each way. Title: Re: [Guide] Dogie's Comprehensive Bitmain Antminer C1 Setup [HD] Post by: NotFuzzyWarm on December 09, 2014, 12:27:02 AM Hey, I have a few questions. Is not just a matter of aluminum safe. Automotive coolants are designed for, well, cars/trucks and the operating conditions their engines place on the coolant - and what the engines require from the coolant. In short, additives (generally silicates) are added which form a film on the cooling passages. Great for protecting an engine with large surfaces and cooling passages. Terrible for precision cooling needs.I'd rather not import coolant, would it just be aluminum safe coolant? Check koolance.com (http://koolance.com) for CPU grade coolants or just search for 'CPU liquid cooling'. You'll find lots of suppliers. Truth be told, the biggest thing CPU coolants provide aside from colors is algicides/antimicrobials to cut down on things wanting to grow in the nice warm coolant. If you keep an eye on it from time to time using either DI or distilled water is just fine assuming there is no copper or brass in the system. Title: Re: [Guide] Dogie's Comprehensive Bitmain Antminer C1 Setup [HD] Post by: dogie on December 09, 2014, 01:38:03 AM Where do you get the coolant? I have automotive anti-freeze coolant, is that doable? How much coolant do you need? An excellent source for everything dealing with liquid cooling is Koolance http://koolance.com/ (http://koolance.com/) They have coolant, tubing, much better pumps and reservoirs, and those nifty 'dripless' quick connect Dogie shows.Personally, I will be using 3/8" (8mm) ID tubing vs the 1/4" (6mm) ID because I will be using a longer run between the radiator and miner. Like 2 meters each way. Doesn't KL have an annoying minimum order value? Also the stock tubing is 8mm ID anyway. You get ~3m in the pack. Title: Re: [Guide] Dogie's Comprehensive Bitmain Antminer C1 Setup [HD] Post by: GigaBit on December 09, 2014, 02:28:05 AM Hey, I have a few questions. Is not just a matter of aluminum safe. Automotive coolants are designed for, well, cars/trucks and the operating conditions their engines place on the coolant - and what the engines require from the coolant. In short, additives (generally silicates) are added which form a film on the cooling passages. Great for protecting an engine with large surfaces and cooling passages. Terrible for precision cooling needs.I'd rather not import coolant, would it just be aluminum safe coolant? Check koolance.com (http://koolance.com) for CPU grade coolants or just search for 'CPU liquid cooling'. You'll find lots of suppliers. Truth be told, the biggest thing CPU coolants provide aside from colors is algicides/antimicrobials to cut down on things wanting to grow in the nice warm coolant. If you keep an eye on it from time to time using either DI or distilled water is just fine assuming there is no copper or brass in the system. Thanks! even if I don't buy there, I'll know what to buy. Sweet guide btw, will use it later once I get them. Title: Re: [Guide] Dogie's Comprehensive Bitmain Antminer C1 Setup [HD] Post by: dogie on December 09, 2014, 02:31:28 AM Hey, I have a few questions. Is not just a matter of aluminum safe. Automotive coolants are designed for, well, cars/trucks and the operating conditions their engines place on the coolant - and what the engines require from the coolant. In short, additives (generally silicates) are added which form a film on the cooling passages. Great for protecting an engine with large surfaces and cooling passages. Terrible for precision cooling needs.I'd rather not import coolant, would it just be aluminum safe coolant? Check koolance.com (http://koolance.com) for CPU grade coolants or just search for 'CPU liquid cooling'. You'll find lots of suppliers. Truth be told, the biggest thing CPU coolants provide aside from colors is algicides/antimicrobials to cut down on things wanting to grow in the nice warm coolant. If you keep an eye on it from time to time using either DI or distilled water is just fine assuming there is no copper or brass in the system. Thanks! even if I don't buy there, I'll know what to buy. Sweet guide btw, will use it later once I get them. No problem Title: Re: [Guide] Dogie's Comprehensive Bitmain Antminer C1 Setup [HD] Post by: NotFuzzyWarm on December 09, 2014, 02:48:25 AM Where do you get the coolant? I have automotive anti-freeze coolant, is that doable? How much coolant do you need? An excellent source for everything dealing with liquid cooling is Koolance http://koolance.com/ (http://koolance.com/) They have coolant, tubing, much better pumps and reservoirs, and those nifty 'dripless' quick connect Dogie shows.Personally, I will be using 3/8" (8mm) ID tubing vs the 1/4" (6mm) ID because I will be using a longer run between the radiator and miner. Like 2 meters each way. Doesn't KL have an annoying minimum order value? Also the stock tubing is 8mm ID anyway. You get ~3m in the pack. Title: Re: [Guide] Dogie's Comprehensive Bitmain Antminer C1 Setup [HD] Post by: GigaBit on December 14, 2014, 12:53:19 AM Few other questions if I may... ::)
Is the cooling kit stated in OP a step above from what Bitmain offers? I keep reading horror stories of epic proportions, about those SysCooling pumps failing left right and center. Definitely something I want to avoid, being the low-quality hatin' bastard that I am. There's a limit though... I priced a custom kit and went up to near U$300... not really feasible on a per unit basis. If I could get away with buying the cheaper kit, which is economical and then buying a more expensive pump, I'm still a step ahead. However, I need to get a reasonable expectation of the quality of the rad/fan, fittings and brackets of said "upgraded cooling kit"... Obviously I don't want to spend time buying and replacing pumps and/or rads; so, advice is greatly appreciated. Plus, when BitmainTech says 3.0M Head Pressure and 450L/h flow, how far above that can I go? Surely there's an overkill at some point, I'd like to know what the OK point is ;D Edit: Is it ok to use a pair of 650w PSU's? I guess one could power each card independently... however, I'm not 100% on that. Title: Re: [Guide] Dogie's Comprehensive Bitmain Antminer C1 Setup [HD] Post by: dogie on December 14, 2014, 01:35:35 AM Is the cooling kit stated in OP a step above from what Bitmain offers? Plus, when BitmainTech says 3.0M Head Pressure and 450L/h flow, how far above that can I go? Edit: Is it ok to use a pair of 650w PSU's? I guess one could power each card independently... however, I'm not 100% on that. It is the syscooling / Bitmain kit. You can go as far above it as you want, but you'll just be wasting electricity and costing more with an expensive pump. Pair of PSUs is fine, just don't plug two into one PCB. Title: Re: [Guide] Dogie's Comprehensive Bitmain Antminer C1 Setup [HD] Post by: TracerX on December 14, 2014, 05:33:01 AM Is there any way to fake the MAC address on a C1? Not easily, unfortunately. Are you needing to snake a firewall?Title: Re: [Guide] Dogie's Comprehensive Bitmain Antminer C1 Setup [HD] Post by: GigaBit on December 14, 2014, 06:29:51 PM Is the cooling kit stated in OP a step above from what Bitmain offers? Plus, when BitmainTech says 3.0M Head Pressure and 450L/h flow, how far above that can I go? Edit: Is it ok to use a pair of 650w PSU's? I guess one could power each card independently... however, I'm not 100% on that. It is the syscooling / Bitmain kit. You can go as far above it as you want, but you'll just be wasting electricity and costing more with an expensive pump. Pair of PSUs is fine, just don't plug two into one PCB. Much Thanks dogie :) I was looking at a Swiftec pump kit, to at least, serve as replacement; it's slightly faster but with nearly twice the recommended head pressure. Plus I read Swiftec makes a much more reliable pump and has better service than SysCooling. Or I could even use the SysCooling pumps as backups, we'll see what happens if I bite the bullet and invest in a reliable pump. If worse comes to worse, I can always put on stronger fans but those 28Nm from Bitmain are really cool to begin with. At least now with your help (and others of course), I know where I'm heading and got a good plan of attack. PS: I ordered a few bottles of IceDragon coolant... yes, it's shockingly expensive but the makers also claims you never need to replace it under normal use. Every time I invested in NanoTech products, the purchase exceeded my expectations; we'll see what happens, I'll update once I got a few C1's up and running. Right now, just re-writing my mining plan for adaptation to water cooling. Title: Re: [Guide] Dogie's Comprehensive Bitmain Antminer C1 Setup [HD] Post by: dogie on December 14, 2014, 07:01:43 PM Is the cooling kit stated in OP a step above from what Bitmain offers? Plus, when BitmainTech says 3.0M Head Pressure and 450L/h flow, how far above that can I go? Edit: Is it ok to use a pair of 650w PSU's? I guess one could power each card independently... however, I'm not 100% on that. It is the syscooling / Bitmain kit. You can go as far above it as you want, but you'll just be wasting electricity and costing more with an expensive pump. Pair of PSUs is fine, just don't plug two into one PCB. Much Thanks dogie :) I was looking at a Swiftec pump kit, to at least, serve as replacement; it's slightly faster but with nearly twice the recommended head pressure. Plus I read Swiftec makes a much more reliable pump and has better service than SysCooling. Or I could even use the SysCooling pumps as backups, we'll see what happens if I bite the bullet and invest in a reliable pump. If I were you, I'd just buy two C1 cooling kits. For $50 you have an exact replica backup set of watercooling. Those 360mm radiators cost $60 in the US anyway! Title: Re: [Guide] Dogie's Comprehensive Bitmain Antminer C1 Setup [HD] Post by: GigaBit on December 14, 2014, 08:24:56 PM Is the cooling kit stated in OP a step above from what Bitmain offers? Plus, when BitmainTech says 3.0M Head Pressure and 450L/h flow, how far above that can I go? Edit: Is it ok to use a pair of 650w PSU's? I guess one could power each card independently... however, I'm not 100% on that. It is the syscooling / Bitmain kit. You can go as far above it as you want, but you'll just be wasting electricity and costing more with an expensive pump. Pair of PSUs is fine, just don't plug two into one PCB. Much Thanks dogie :) I was looking at a Swiftec pump kit, to at least, serve as replacement; it's slightly faster but with nearly twice the recommended head pressure. Plus I read Swiftec makes a much more reliable pump and has better service than SysCooling. Or I could even use the SysCooling pumps as backups, we'll see what happens if I bite the bullet and invest in a reliable pump. If I were you, I'd just buy two C1 cooling kits. For $50 you have an exact replica backup set of watercooling. Those 360mm radiators cost $60 in the US anyway! LOL - You're absolutely right, great idea ;) That's a gem of a statement. I'm still gonna get Swiftec pumps, one at first to try them and compare but I'll overbuy SysCooling kits. It's true, even $60 is a good bargain for tricore rads in the US. Plus I can always put the SysCooling pumps for sale on eBay auctions, it might cover a part of the cost of the Swiftec ones ;) If they do in fact, outclass them. All I see is horror stories right, no one comes on to complain about the good stuff.... ;D Title: Re: [Guide] Dogie's Comprehensive Bitmain Antminer C1 Setup [HD] Post by: dogie on December 14, 2014, 08:30:57 PM All I see is horror stories right, no one comes on to complain about the good stuff.... ;D Have to remember that Bitmain typically sells on a scale of # units no one else comes close to in the current market, and so 1-5% of sales is a significant number of people / posts. Title: Re: [Guide] Dogie's Comprehensive Bitmain Antminer C1 Setup [HD] Post by: n3lz0n on December 16, 2014, 04:42:35 AM Hi,
Please advice if this is alright in terms of temperature? I don't want to stress my C1 http://puu.sh/dwCPP/5fced7a60b.png (the one on the left, the AC is pointing at it while the second one is about a meter away from the AC) my 2x C1 miners are hashing 800GH/s consistently........... Thanks! :) Title: Re: [Guide] Dogie's Comprehensive Bitmain Antminer C1 Setup [HD] Post by: dogie on December 16, 2014, 08:58:09 AM Hi, Please advice if this is alright in terms of temperature? I don't want to stress my C1 http://puu.sh/dwCPP/5fced7a60b.png (the one on the left, the AC is pointing at it while the second one is about a meter away from the AC) my 2x C1 miners are hashing 800GH/s consistently........... Thanks! :) .... You do have watercooling on right? Those temperatures are not right, stop mining. Title: Re: [Guide] Dogie's Comprehensive Bitmain Antminer C1 Setup [HD] Post by: GigaBit on December 23, 2014, 02:27:40 PM Hey Dogie...
So I got my C1 & Kit yesterday and as I had predicted, the pump is DOA lol :D I should have tested it before filling it with fluid, I lost a bit of that precious liquid. Everything else is bang on though; too bad I didn't get my Swiftec pump yet, hopefully today :( Not only that, Bitmain wants me to send a video showing the pump NOT working... Watch me send them an Asian porn video starring me... come on, for a $20 pump? Are people really this fucking cheap? Gimmie a break, unreal their stupidity, if piss poor customer service was an award, they would win hands down. Making eBay support look brilliant... Maybe for the average Joe Miner but I run a fucking company and expect my partners to be as sharp as me; that ain't Bitmain. Maybe I'll start selling my own custom made C1 cooling kits... one with a working pump; make a killing. Well, the SysCooling pump will work for a single pen holder or a dab tool holder; expensive one-use paperweight. Hey, hey check this out, I woke up this morning and got a message from SysCooling... It's all I think about when I get up... [2:20:22 AM] *****gna: hello [2:20:25 AM] *****gna: what can i do for you [6:38:39 AM] Gigas Gaming Inc.: Make me a coffee... I just read that again, I didn't even remember typing that... long night, short morning lol Now, time for a big fat dab. Peace... PS: Anyone tried taking apart those pumps? Title: Re: [Guide] Dogie's Comprehensive Bitmain Antminer C1 Setup [HD] Post by: dogie on December 23, 2014, 06:10:11 PM Watch me send them an Asian porn video starring me... come on, for a $20 pump? Are people really this fucking cheap? PS: Anyone tried taking apart those pumps? I think that's syscooling's requirement, I'll have a look. I took one apart and its as expected. Big dry coil and separate wet impeller. Title: Re: [Guide] Dogie's Comprehensive Bitmain Antminer C1 Setup [HD] Post by: HDutchie on December 26, 2014, 10:45:40 PM Is the cooling kit necessary?
Title: Re: [Guide] Dogie's Comprehensive Bitmain Antminer C1 Setup [HD] Post by: HDutchie on December 27, 2014, 03:51:13 AM Great work on the guide! I gave up on the gibberish instructions with the kit. I am noticing a massive amount of "discarded" shares...
https://i.imgur.com/BZ35Ne0.png Is this normal? Title: Re: [Guide] Dogie's Comprehensive Bitmain Antminer C1 Setup [HD] Post by: dogie on December 27, 2014, 12:12:28 PM Is the cooling kit necessary? 100%, yes. If you want something similar but without watercooling, pick up an S3 or S5. Great work on the guide! I gave up on the gibberish instructions with the kit. I am noticing a massive amount of "discarded" shares... Is this normal? Discards are entirely normal and shouldn't really be displayed at all as they're meaningless in regards to mining performance. Think of it as someone counting how many times you close your front door on the way to work, in a work performance report. Title: Re: [Guide] Dogie's Comprehensive Bitmain Antminer C1 Setup [HD] Post by: HDutchie on December 27, 2014, 07:24:49 PM Is the cooling kit necessary? 100%, yes. If you want something similar but without watercooling, pick up an S3 or S5. Great work on the guide! I gave up on the gibberish instructions with the kit. I am noticing a massive amount of "discarded" shares... Is this normal? Discards are entirely normal and shouldn't really be displayed at all as they're meaningless in regards to mining performance. Think of it as someone counting how many times you close your front door on the way to work, in a work performance report. Alright, great. Anything on overclocking yet? I did see a field for that but have no idea what voltage to select. Also, where' s the SSH? Also, any guides about the S5? Title: Re: [Guide] Dogie's Comprehensive Bitmain Antminer C1 Setup [HD] Post by: dogie on December 27, 2014, 07:57:20 PM Is the cooling kit necessary? 100%, yes. If you want something similar but without watercooling, pick up an S3 or S5. Great work on the guide! I gave up on the gibberish instructions with the kit. I am noticing a massive amount of "discarded" shares... Is this normal? Discards are entirely normal and shouldn't really be displayed at all as they're meaningless in regards to mining performance. Think of it as someone counting how many times you close your front door on the way to work, in a work performance report. Alright, great. Anything on overclocking yet? I did see a field for that but have no idea what voltage to select. Also, where' s the SSH? Also, any guides about the S5? I don't typically include overclocking as it varies unit to unit, voids your warranty and for 95% of users isn't applicable. I haven't seen much OCing data for the C1 but to be honest I don't expect there to be a huge amount of headroom. Hardware wise its not dissimilar to S3s which max out at 480-510, and we're already at 505x2. S5 is soonTM Title: Re: [Guide] Dogie's Comprehensive Bitmain Antminer C1 Setup [HD] Post by: HDutchie on December 27, 2014, 08:31:39 PM What about wireless? It's really cumbersome to drill holes for a neat looking ethernet cable...
Title: Re: [Guide] Dogie's Comprehensive Bitmain Antminer C1 Setup [HD] Post by: GigaBit on December 29, 2014, 10:31:39 PM Hi Dogie!
So I got my Swiftec pump today and... all I have to say is... Yeah Baby!! 8) Man, this thing has serious balls and works like a charm... except it cost me around C$200 to get it delivered to my door... I'll pay that any day though, I am more pleased with my pump purchase than my C1 purchase to be honest. Now, why wouldn't Bitmain want to keep its good name by associating with Swiftec instead of SysCooling? Idiots ask for cheap shit I guess, or Bitmain is just that dumb of a company; no other explanation. I am hooked on liquid cooled miners now... kinda like when I went from fan cooled sled to a liquid cooled triple... Kinda funny to re-live that experience through computing. :D That said, thanks Dogie, you guide helped a lot but you SHOULD steer your viewers towards Swiftec rather than SysCooling. No one should associate with garbage... pay more, you greedy fucks and get peace of mind ;D Really, Bitmain should be ashamed and SysCooling should seize business... seriously. The C1 was my dumbest investment of 2014... but probably the coolest 8) Title: Re: [Guide] Dogie's Comprehensive Bitmain Antminer C1 Setup [HD] Post by: dogie on December 30, 2014, 12:39:13 PM Now, why wouldn't Bitmain want to keep its good name by associating with Swiftec instead of SysCooling? One pump costs 10x more than the other, at least. The point being you could buy 5 SysCooling pumps (4 as spare) and still save half your money. Title: Re: [Guide] Dogie's Comprehensive Bitmain Antminer C1 Setup [HD] Post by: rpandassociates on January 03, 2015, 12:24:16 AM So I got my C1 in this afternoon,everythingis together no leaks Thanks for the guide. The instruction that came with the cooling kit (and the wiring harness) state to plug it into the boards PCI-e slot... what the hell? :) I see you are showing opening up the miner and pluggins it into the fan control on the hashing board.
Can you explain why you chose to power it there? wouldnt that regualate the pump and fan speed dependant upon temp? I am confused.... Well I cut the pci-e connector off the harness they sent and pigtailed it into the pci-e from the powersupply as I am pretty emphatic about connecting alll 8 pcie connectors :) I am using a 1300w evga supernova G2 the funny thing about this one is there are 6 pice leads and 2 of them have a double connector kind of like the lepa 850 i use on S3+ unit ----(6+2pcie)---(6+2pcie) so heres what i got connected PSU |-----------(pcie) Board 1 |-----------(pcie) Board 1 |-----------(pcie) Board 2 |-----------(pcie) Board 2 |-----------(pcie)----(6+2pcie)---(6+2pcie) Board 3 |-----------(pcie)----(6+2pcie)---(6+2pcie) Board 4 I am a little confuse about this PSU cable setup they advertised 8 x pcie 6+2 but when i get it there are only 6 plugins on the psu the last 2 those double cable :( As note did ordere a lepa 850w for a s3+ last week and its got the same cables and they advertise 4x pcie but only has 2 connectors on the psu for these double cables errr these damn PSU companies So 2 questions #1 the water system powering? #2 whats up with this damn psu and are these double cables okay? Title: Re: [Guide] Dogie's Comprehensive Bitmain Antminer C1 Setup [HD] Post by: IITravel01 on January 03, 2015, 12:35:33 AM The fan connector was on the original C1, they then updated it with the PCIe connector. I didn't use it myself and simply connected the fans to the power supply directly.
Title: Re: [Guide] Dogie's Comprehensive Bitmain Antminer C1 Setup [HD] Post by: rpandassociates on January 03, 2015, 12:54:32 AM what connector did you use from the PSU surely you didnt waste a pcie for it :) what other connectors run 12v off of the psu?
Title: Re: [Guide] Dogie's Comprehensive Bitmain Antminer C1 Setup [HD] Post by: fahq420 on January 03, 2015, 01:09:37 AM the kit they just sent me, had a pci-e plug that was shown to plug into the slot near the fan, i see no way of connecting any of this to the slot on the board as the videos show, also seem to be getting a low hash rate
your picture shows only 4 holes on time mine hAs like 8 in 2 rows so far its only hitting 800 gh/s i'll see what it does over night. Title: Re: [Guide] Dogie's Comprehensive Bitmain Antminer C1 Setup [HD] Post by: IITravel01 on January 03, 2015, 06:34:40 AM what connector did you use from the PSU surely you didnt waste a pcie for it :) what other connectors run 12v off of the psu? Just use a 4 pin moles power cable that comes with the power supply and a 4 pin molex to fan adapter that usually come with aftermarket fans or buy a fan controller. Title: Re: [Guide] Dogie's Comprehensive Bitmain Antminer C1 Setup [HD] Post by: dogie on January 03, 2015, 11:35:11 AM So I got my C1 in this afternoon,everythingis together no leaks Thanks for the guide. The instruction that came with the cooling kit (and the wiring harness) state to plug it into the boards PCI-e slot... what the hell? :) I see you are showing opening up the miner and pluggins it into the fan control on the hashing board. Can you explain why you chose to power it there? wouldnt that regualate the pump and fan speed dependant upon temp? I am confused.... Well I cut the pci-e connector off the harness they sent and pigtailed it into the pci-e from the powersupply as I am pretty emphatic about connecting alll 8 pcie connectors :) I am using a 1300w evga supernova G2 the funny thing about this one is there are 6 pice leads and 2 of them have a double connector kind of like the lepa 850 i use on S3+ unit ----(6+2pcie)---(6+2pcie) so heres what i got connected PSU |-----------(pcie) Board 1 |-----------(pcie) Board 1 |-----------(pcie) Board 2 |-----------(pcie) Board 2 |-----------(pcie)----(6+2pcie)---(6+2pcie) Board 3 |-----------(pcie)----(6+2pcie)---(6+2pcie) Board 4 I am a little confuse about this PSU cable setup they advertised 8 x pcie 6+2 but when i get it there are only 6 plugins on the psu the last 2 those double cable :( As note did ordere a lepa 850w for a s3+ last week and its got the same cables and they advertise 4x pcie but only has 2 connectors on the psu for these double cables errr these damn PSU companies So 2 questions #1 the water system powering? #2 whats up with this damn psu and are these double cables okay? My guide shows the original harness that plugged into a fan header on the C1. The new header plugs into a PCI-E connector on the C1 instead so you don't have to open the case. The C1 uses 8x PCI-E 6 pin connectors, NOT 8 pin so don't worry about that. Title: Re: [Guide] Dogie's Comprehensive Bitmain Antminer C1 Setup [HD] Post by: rpandassociates on January 03, 2015, 08:32:03 PM But isnt that a waste of a hashing board power plug :) seems kind of silly to plug it into the hashing board power port then only have one power feed to that board seriously whos the genious at syscool that thought that one up.. :)
I pigged tailed mine in but seen another picture on another board here a guy plugging it into the periph port on the psu so when i get a few minutes today thats the route I am going to take rather than having it pigtailed into the pcie cable :) Thats 15 more watts that board can have.. That the pump draws. Thus far I am enjoying this C1's hashing power and efficency however I have to say I am not impressed by its temperatures they are no that much lower than my S3+'s only a cpl degrees. Which is fine i guess but the problem I am finding I have my S3's lined up by the window and they push all the hot air out, this damn radiator doesnt push it that far and the exhaust drifts up before it reaches the window. if i put it right in the window it vent outside however the s3's exhaust blow into it and cause the temps to rise on the C1. Ugh need a bigger window haha. Gots to say all in all I think i would of been happier with the S5 for $100 more, the liquid cooling is a pain and when you figure in the fluid cost, if changed annually, well not sure I am real big on this liquid cooling. And if it ever springs a leak or the pump fails just to much extra hassle to worry about. Now the S5 looks nice sounds awesome but I give it a big thumbs down for the case design.Really it has no top!!! how long before my 4 yr old drops a hot wheels in there and shorts it out hahaha. Dust accumulation etc. They could atleast throw a mesh screen on it. Naturally i will be ordering a couple and will probably put a mesh on top. Not really digging the single fan either or the single heatsinks seems like they are cutting corners a bit to make more profit. I will wait until atleast batch 6 before purchasing with antminers track record the first batches are always problamatic :) Keep up the great work Dogie I always come to your guides when i get new hardware. They should hire you to write there manuals, and why cant they spend $.20 and print one out and ship it haha antminer irks me about that. I guess that .20 x 1 millon units ads up I get it all in the name of profits, but come on what happend to quality concerns customer service and such. I know I know China haha. Title: Re: [Guide] Dogie's Comprehensive Bitmain Antminer C1 Setup [HD] Post by: dogie on January 03, 2015, 09:28:26 PM But isnt that a waste of a hashing board power plug :) seems kind of silly to plug it into the hashing board power port then only have one power feed to that board seriously whos the genious at syscool that thought that one up.. :) Previously you had to open up the case which was annoying as hell. I pigged tailed mine in but seen another picture on another board here a guy plugging it into the periph port on the psu so when i get a few minutes today thats the route I am going to take rather than having it pigtailed into the pcie cable :) Thats 15 more watts that board can have.. That the pump draws. Pump and fans are about 30W. Be careful about the wiring when plugging directly into the PSU as the pins may not be the same as PCI-E. Its worth looking up your PSU's manual. if i put it right in the window it vent outside however the s3's exhaust blow into it and cause the temps to rise on the C1. Ugh need a bigger window haha. Gots to say all in all I think i would of been happier with the S5 for $100 more, the liquid cooling is a pain and when you figure in the fluid cost, if changed annually, well not sure I am real big on this liquid cooling. I doubt you'll still be running a C1 after a year. You might be able to play around with the stands to get the radiator to stand up on one end. Preferably you'd want the tubes at the top, but more practically you're going to get them at the bottom. Now the S5 looks nice sounds awesome but I give it a big thumbs down for the case design.Really it has no top!!! how long before my 4 yr old drops a hot wheels in there and shorts it out hahaha. Dust accumulation etc. They could atleast throw a mesh screen on it. Naturally i will be ordering a couple and will probably put a mesh on top. Not really digging the single fan either or the single heatsinks seems like they are cutting corners a bit to make more profit. Yup, S5s are not as kid friendly as S3s. The main driver is weight, shipping less metal around the world means lower delivery prices. Keep up the great work Dogie I always come to your guides when i get new hardware. They should hire you to write there manuals, and why cant they spend $.20 and print one out and ship it haha antminer irks me about that. I guess that .20 x 1 millon units ads up I get it all in the name of profits, but come on what happend to quality concerns customer service and such. I know I know China haha. Thanks. I do rewrite the manuals into English but I don't have much control as to their content. Yeah that's a hell of a lot of paper, although for something like the S5 it should be plug and play. PSU in, ethernet in, find IP. Title: Re: [Guide] Dogie's Comprehensive Bitmain Antminer C1 Setup [HD] Post by: fahq420 on January 05, 2015, 06:43:18 AM i have my radiator in the window with it cracked open a lil, there is snow on the ground.... and yet i get these temps..
i have a 1000 w evga g1 psu powering it. Chain# ASIC# Frequency Temp ASIC status 1 16 250 65 oooooooo oooooooo 2 16 250 77 oooooooo oooooooo 3 16 250 66 oooooooo oooooooo 4 16 250 77 oooooooo oooooooo the #'s before the oooooo are the temps.. something seems really wrong here. i filled it with some chillblast code blood coolant or something like that, do i need something different???? in the summer its gonna be hot as *&%*& Title: Re: [Guide] Dogie's Comprehensive Bitmain Antminer C1 Setup [HD] Post by: dogie on January 05, 2015, 01:09:15 PM i have my radiator in the window with it cracked open a lil, there is snow on the ground.... and yet i get these temps.. i have a 1000 w evga g1 psu powering it. the #'s before the oooooo are the temps.. something seems really wrong here. i filled it with some chillblast code blood coolant or something like that, do i need something different???? in the summer its gonna be hot as *&%*& Coolant wont make a difference, are you sure your pump is running? To where and how is it plugged in? Title: Re: [Guide] Dogie's Comprehensive Bitmain Antminer C1 Setup [HD] Post by: fahq420 on January 05, 2015, 06:32:25 PM it pulls liquid in,and the configuration seems to be the same as in your videos
Title: Re: [Guide] Dogie's Comprehensive Bitmain Antminer C1 Setup [HD] Post by: dogie on January 05, 2015, 07:06:19 PM it pulls liquid in,and the configuration seems to be the same as in your videos Can you take some pictures for me please? Title: Re: [Guide] Dogie's Comprehensive Bitmain Antminer C1 Setup [HD] Post by: fahq420 on January 05, 2015, 07:18:40 PM i don't have a camera but i triple checked the picture u posted with the tubes and thats what mine looks like. apparently there was a loop in my tube? i moved them around and the liquid started flowing.. and i had to put a little more in the reservoir. but now its all in the 40's. i'll post again if things go bad again (hopefully its nothing serious again)
it has now been over an hour and the temps are UNDER 40 so all is well, i guess i just need to make sure of certain things before i start freakin :D Title: Re: [Guide] Dogie's Comprehensive Bitmain Antminer C1 Setup [HD] Post by: dogie on January 06, 2015, 01:41:51 AM i don't have a camera but i triple checked the picture u posted with the tubes and thats what mine looks like. apparently there was a loop in my tube? i moved them around and the liquid started flowing.. and i had to put a little more in the reservoir. but now its all in the 40's. i'll post again if things go bad again (hopefully its nothing serious again) it has now been over an hour and the temps are UNDER 40 so all is well, i guess i just need to make sure of certain things before i start freakin :D Glad to hear it. You can buy some anti kink springs online if you think its liable to happen again. Title: Re: [Guide] Dogie's Comprehensive Bitmain Antminer C1 Setup [HD] Post by: GigaBit on January 07, 2015, 08:27:35 PM So after going to war with Bitmain and SysCooling, went with a Darkside LP360 radiator.
Thing is, no barbs came with it and SysCooling's radiator have built in barbs; SC radiator lasted about 6 days; so I have a dilemma. That said, my question is simple... I am missing one barb to complete the system and was wondering is it was possible to leave the return-to-res hoses hanging in the reservoir instead of tied held by a barb. In other words, I want to omit the barb fitting where there is no need for water tightness. (In my mind there isn't a need) Here's what I intend to do... Look at this reservoir from Swiftec: http://www.swiftech.com/mcp35xreservoir.aspx As you see, there are 2 holes for barbs on the sidewall, one on about 3/4 way up and one about an inch below it. Basically, I can fill up the reservoir up until the point about 1 cm below where the top barb on the sidewall is. Technically, it's just a missing barb but the part would not be submerged in liquid at all. As a temp solution of course, a barb is on it's way but Canada's a big fucking country will take time to get here. My main concern is damage to the pump and existing system components whilst running with a missing a component. My miner's been offline for a week now, I wanna put that sucker back online now I got a DECENT RADIATOR! Lastly, unreal how crappy SysCooling is, the only thing worth a crap in that kit is the harness, fans and the 1 spare barb lol I'll try it now just for shits and giggles and will update... surely liquid cooled miners won't go out of style. PS: My hoses have turned red from being beside my red PSU cables :-\ ;D Title: Re: [Guide] Dogie's Comprehensive Bitmain Antminer C1 Setup [HD] Post by: GigaBit on January 07, 2015, 09:07:02 PM So after going to war with Bitmain and SysCooling, went with a Darkside LP360 radiator. Thing is, no barbs came with it and SysCooling's radiator have built in barbs; SC radiator lasted about 6 days; so I have a dilemma. That said, my question is simple... I am missing one barb to complete the system and was wondering is it was possible to leave the return-to-res hoses hanging in the reservoir instead of tied held by a barb. In other words, I want to omit the barb fitting where there is no need for water tightness. (In my mind there isn't a need) Here's what I intend to do... Look at this reservoir from Swiftec: http://www.swiftech.com/mcp35xreservoir.aspx As you see, there are 2 holes for barbs on the sidewall, one on about 3/4 way up and one about an inch below it. Basically, I can fill up the reservoir up until the point about 1 cm below where the top barb on the sidewall is. Technically, it's just a missing barb but the part would not be submerged in liquid at all. As a temp solution of course, a barb is on it's way but Canada's a big fucking country will take time to get here. My main concern is damage to the pump and existing system components whilst running with a missing a component. My miner's been offline for a week now, I wanna put that sucker back online now I got a DECENT RADIATOR! Lastly, unreal how crappy SysCooling is, the only thing worth a crap in that kit is the harness, fans and the 1 spare barb lol I'll try it now just for shits and giggles and will update... surely liquid cooled miners won't go out of style. PS: My hoses have turned red from being beside my red PSU cables :-\ ;D So I got my temp solution... works best when I use the top port since the side port causes too much splash... Works like a charm and the 3 additional fans on a radiators makes everything a lot cooler. Swiftec MCP50x + res + Darkside LP360 + 6 fans = Sheer bliss Title: Re: [Guide] Dogie's Comprehensive Bitmain Antminer C1 Setup [HD] Post by: dogie on January 07, 2015, 09:47:28 PM I am missing one barb to complete the system and was wondering is it was possible to leave the return-to-res hoses hanging in the reservoir instead of tied held by a barb. In other words, I want to omit the barb fitting where there is no need for water tightness. (In my mind there isn't a need) Your proposed solution is fine as long as you're comfortable with the risks of leaks or things getting knocked over. Without a barb, the returning fluid will impart some force on the radiator. Title: Re: [Guide] Dogie's Comprehensive Bitmain Antminer C1 Setup [HD] Post by: IITravel01 on January 08, 2015, 06:22:14 PM I am missing one barb to complete the system and was wondering is it was possible to leave the return-to-res hoses hanging in the reservoir instead of tied held by a barb. In other words, I want to omit the barb fitting where there is no need for water tightness. (In my mind there isn't a need) Your proposed solution is fine as long as you're comfortable with the risks of leaks or things getting knocked over. Without a barb, the returning fluid will impart some force on the radiator. As the system heats up, doesn't it get under pressure? So won't this "leak" or just flow out unless you have a very large reservoir and lots of air in that reservoir? Title: Re: [Guide] Dogie's Comprehensive Bitmain Antminer C1 Setup [HD] Post by: dogie on January 08, 2015, 06:54:09 PM I am missing one barb to complete the system and was wondering is it was possible to leave the return-to-res hoses hanging in the reservoir instead of tied held by a barb. In other words, I want to omit the barb fitting where there is no need for water tightness. (In my mind there isn't a need) Your proposed solution is fine as long as you're comfortable with the risks of leaks or things getting knocked over. Without a barb, the returning fluid will impart some force on the radiator. As the system heats up, doesn't it get under pressure? So won't this "leak" or just flow out unless you have a very large reservoir and lots of air in that reservoir? His solution is better than an enclosed one for 'too much pressure', so that's not a problem. Typically the acrylic tubing is sufficient to balance any changes, and the air in the reservoir can be compressed. Title: Re: [Guide] Dogie's Comprehensive Bitmain Antminer C1 Setup [HD] Post by: rpandassociates on January 09, 2015, 10:30:06 PM check out this coolant system hahaha
https://www.youtube.com/watch?v=K_gCnvsM-QY Title: Re: [Guide] Dogie's Comprehensive Bitmain Antminer C1 Setup [HD] Post by: Beachguy on February 08, 2015, 12:11:07 AM I know it seems that you and Bitmain have had some sort of falling out....but your guide was so much help when I got my first C1...new from BM.
Bought another recently from an eBay seller. Well packed and setup, once I got through moving the red wire in pump/fans harness so it got 12 volts instead of 3 volts, I found I couldn't reset it. Lucky I found the router had assigned it 192.168.1.59.....that got me to log in, but root/root doesn't work. First, why am I not getting a reset? Next do you think the 192.168.1.59 is really its ip and not just what my router assigning it? I set my first one to 192.168.1.200 as a "fixed ip", no telling what it would show if it was just plugged into another router. There again, I got to the login screen with the 192.168.1.59. I've emailed the seller for login but I'd really rather reset. Conflicting info between Bitmain manual and your guide about resets and can't find much more on it. Thank you in advance. Title: Re: [Guide] Dogie's Comprehensive Bitmain Antminer C1 Setup [HD] Post by: dunand on February 08, 2015, 12:36:05 AM that got me to log in, but root/root doesn't work. Try root/admin Title: Re: [Guide] Dogie's Comprehensive Bitmain Antminer C1 Setup [HD] Post by: Beachguy on February 08, 2015, 12:47:07 AM not where the miner is right now but I will try it when I'm able.....is that the default on some?
Title: Re: [Guide] Dogie's Comprehensive Bitmain Antminer C1 Setup [HD] Post by: dogie on February 08, 2015, 01:53:52 AM I know it seems that you and Bitmain have had some sort of falling out....but your guide was so much help when I got my first C1...new from BM. No falling out, just some of the older products were contracted for a shorter time. I'm still in antminer threads for the S4 and U3 as required. Bought another recently from an eBay seller. Well packed and setup, once I got through moving the red wire in pump/fans harness so it got 12 volts instead of 3 volts, I found I couldn't reset it. Lucky I found the router had assigned it 192.168.1.59.....that got me to log in, but root/root doesn't work. not where the miner is right now but I will try it when I'm able.....is that the default on some? Should be root/root as default, you'll have to wait for him for a reply if you want to login. First, why am I not getting a reset? Next do you think the 192.168.1.59 is really its ip and not just what my router assigning it? I set my first one to 192.168.1.200 as a "fixed ip", no telling what it would show if it was just plugged into another router. There again, I got to the login screen with the 192.168.1.59. I've emailed the seller for login but I'd really rather reset. Conflicting info between Bitmain manual and your guide about resets and can't find much more on it. Thank you in advance. This is the first I've heard about reset problems in C1 firmware. You should just need to hold down the reset button on the controller for ~10 seconds until you see the lights flashing. I don't remember the specific pattern but you'll know when its done. Title: Re: [Guide] Dogie's Comprehensive Bitmain Antminer C1 Setup [HD] Post by: Beachguy on February 08, 2015, 03:10:29 AM Thank you for your response.
Bitmain manual says "red" light flash....only ones I see are through the cutouts for the power connectors and on the blades or does the Ethernet connection lights flash red? I can usually work my way through these kinds of things. Had to move one of the pcb pins from the 3 volt to the 12 volt position on the pump/fan connector at the psu plug. guess the position is different on this ev3a 1000 G2 psu I bought . update- thankfully heard from the seller, confirmed that was his ip address and he forwarded his user and pass. I'll finish tomorrow morning. I love these miners, so quiet. I really think folks with high temps didn't bleed the air out completely. my temps are always in mid 30's to 41 C. Title: Re: [Guide] Dogie's Comprehensive Bitmain Antminer C1 Setup [HD] Post by: DickyDck on March 04, 2015, 06:37:54 PM Heya, I have an odd situation, had my C1 for months now, since around December working great. Today all of a sudden I get no "X"s across the board, all "0"s but at default Frequency I am only getting average 500gh/s avg. where as before I was always getting over 900gh/s. Any ideas?
Title: Re: [Guide] Dogie's Comprehensive Bitmain Antminer C1 Setup [HD] Post by: dogie on March 06, 2015, 05:41:09 AM Heya, I have an odd situation, had my C1 for months now, since around December working great. Today all of a sudden I get no "X"s across the board, all "0"s but at default Frequency I am only getting average 500gh/s avg. where as before I was always getting over 900gh/s. Any ideas? Can you upload a screemshot of the status page please? Title: Re: [Guide] Dogie's Comprehensive Bitmain Antminer C1 Setup [HD] Post by: DickyDck on March 12, 2015, 09:27:04 PM Hi there, thanks for trying to help. When I got home I did a overall reset, turned it off for a few minutes and set everything back up with 2 notches above factory setting. I'm back at about 930gh/s average which is good enough for me. I appreciate you trying to help though! :)
Title: Re: [Guide] Dogie's Comprehensive Bitmain Antminer C1 Setup [HD] Post by: Gladimor on March 13, 2015, 01:07:40 AM You guys ever think that BitMain will be releasing an AntMiner C2 with the BM1384 chips? Maybe 2+ TH in a single unit?
Title: Re: [Guide] Dogie's Comprehensive Bitmain Antminer C1 Setup [HD] Post by: dogie on March 13, 2015, 07:11:57 AM Hi there, thanks for trying to help. When I got home I did a overall reset, turned it off for a few minutes and set everything back up with 2 notches above factory setting. I'm back at about 930gh/s average which is good enough for me. I appreciate you trying to help though! :) I think C1 boards have a higher attrition rate than S3 boards as they seem to drop chips and eventually boards much quicker. One of my C1s is down about 1.3 hashing boards while the other is [was] fine. Title: Re: [Guide] Dogie's Comprehensive Bitmain Antminer C1 Setup [HD] Post by: dogie on March 13, 2015, 07:13:40 AM You guys ever think that BitMain will be releasing an AntMiner C2 with the BM1384 chips? Maybe 2+ TH in a single unit? I don't think its likely on this generation as the exchange rate wasn't good at the start of the gen. You can still make unofficial 'C2s' with SysCooling's kits and either stock S5s or S5 kits if you can convince Bitmain to sell you some. Title: Re: [Guide] Dogie's Comprehensive Bitmain Antminer C1 Setup [HD] Post by: rpandassociates on March 13, 2015, 07:20:23 PM what is this? http://www.ebay.com/itm/Bitmain-s-NEWEST-ANTMINER-S3-450GH-265W-Hash256-Bitcoin-Miner-/231499804522?ssPageName=ADME:X:RTQ:US:1123
This guy is claiming its a S3++ A s3 with S5 chips Is this a scammer or something? Title: Re: [Guide] Dogie's Comprehensive Bitmain Antminer C1 Setup [HD] Post by: dogie on March 15, 2015, 09:23:16 AM what is this? http://www.ebay.com/itm/Bitmain-s-NEWEST-ANTMINER-S3-450GH-265W-Hash256-Bitcoin-Miner-/231499804522?ssPageName=ADME:X:RTQ:US:1123 This guy is claiming its a S3++ A s3 with S5 chips Is this a scammer or something? The S3++ is a real thing that is/was sold in mainland CN only. I can't verify the legitimacy of that particular listing however. Title: Re: [Guide] Dogie's Comprehensive Bitmain Antminer C1 Setup [HD] Post by: DickyDck on March 20, 2015, 03:56:51 PM OK, My C1 is acting up again. I turned it off and moved it into another room (I use these things as space heaters) and when I reconnected everything it won't hash. Reset it by holding in the button for about 30 seconds, I like to make sure it is reset, got into the web interface, entered in pool settings and everything, and now in the Miner status it doesn't show anything! I don't know how to upload pictures here unfortunately, but as far as I can tell the unit is fine, just isn't showing any ASIC status or hashing power.
Title: Re: [Guide] Dogie's Comprehensive Bitmain Antminer C1 Setup [HD] Post by: dogie on March 20, 2015, 05:48:20 PM OK, My C1 is acting up again. I turned it off and moved it into another room (I use these things as space heaters) and when I reconnected everything it won't hash. Reset it by holding in the button for about 30 seconds, I like to make sure it is reset, got into the web interface, entered in pool settings and everything, and now in the Miner status it doesn't show anything! I don't know how to upload pictures here unfortunately, but as far as I can tell the unit is fine, just isn't showing any ASIC status or hashing power. Upload to imgur, then put the image's URL in between the below tags. Code: [img]www.imageurl.com/image.png[/img] Title: Re: [Guide] Dogie's Comprehensive Bitmain Antminer C1 Setup [HD] Post by: Ecnad on March 31, 2015, 06:38:22 PM Asked about coolant choice in another thread but wanted to note to Dogie (whose guides I live by) that his Amazon coolant link is linking to an unavailable product so we can't buy it and if you use affiliate links (hope you do for all the work you put in) you aren't getting paid if I can't buy it :)
Title: Re: [Guide] Dogie's Comprehensive Bitmain Antminer C1 Setup [HD] Post by: dogie on March 31, 2015, 06:52:49 PM Asked about coolant choice in another thread but wanted to note to Dogie (whose guides I live by) that his Amazon coolant link is linking to an unavailable product so we can't buy it and if you use affiliate links (hope you do for all the work you put in) you aren't getting paid if I can't buy it :) Updated, thanks. Title: Re: [Guide] Dogie's Comprehensive Bitmain Antminer C1 Setup [HD] Post by: Ecnad on April 04, 2015, 07:44:26 PM Awesome guide as always! Got my new C1 up and running. Nice and quiet and currently averaging 1013GH at under 50°
Title: Re: [Guide] Dogie's Comprehensive Bitmain Antminer C1 Setup [HD] Post by: dogie on April 06, 2015, 01:47:19 AM Awesome guide as always! Got my new C1 up and running. Nice and quiet and currently averaging 1013GH at under 50° Glad to hear it, let us know if you have any problems. Title: Re: [Guide] Dogie's Comprehensive Bitmain Antminer C1 Setup [HD] Post by: talbengal on April 30, 2015, 08:01:55 PM Where can I get the 'specialist coolant' for the C1?
Title: Re: [Guide] Dogie's Comprehensive Bitmain Antminer C1 Setup [HD] Post by: notlist3d on April 30, 2015, 09:16:04 PM Where can I get the 'specialist coolant' for the C1? Amazon has it. I have ordered two different brands from them. Both have worked fine for me. I just highly suggest don't use regular water as some do. Title: Re: [Guide] Dogie's Comprehensive Bitmain Antminer C1 Setup [HD] Post by: dogie on April 30, 2015, 09:33:00 PM Where can I get the 'specialist coolant' for the C1? Amazon has it. I have ordered two different brands from them. Both have worked fine for me. I just highly suggest don't use regular water as some do. I like FeserOne, but on US Amazon its quite expensive at $20 /L delivered. And you'll want to get a litre. Title: Re: [Guide] Dogie's Comprehensive Bitmain Antminer C1 Setup [HD] Post by: talbengal on April 30, 2015, 09:55:19 PM Where can I get the 'specialist coolant' for the C1? Amazon has it. I have ordered two different brands from them. Both have worked fine for me. I just highly suggest don't use regular water as some do. I am in UK Title: Re: [Guide] Dogie's Comprehensive Bitmain Antminer C1 Setup [HD] Post by: talbengal on April 30, 2015, 09:58:17 PM Where can I get the 'specialist coolant' for the C1? Amazon has it. I have ordered two different brands from them. Both have worked fine for me. I just highly suggest don't use regular water as some do. I am in UK OK, found it: http://www.amazon.co.uk/gp/product/B000ZIZ43U?psc=1&redirect=true&ref_=od_aui_detailpages00 Title: Re: [Guide] Dogie's Comprehensive Bitmain Antminer C1 Setup [HD] Post by: philnjp on August 12, 2015, 11:04:26 AM Dogie a great resource - thanx
If I can be quick.. Bought 2 x C1. Saw operating happy with seller set at 192.168.1.71 and 72. Brought home, plugged 1st in to home router and found it straight away at 10.1.1.3 (I have no idea...) Set it up and it been happily mining for 24 hrs - took to work and it continued no prob. However - unable to find it on the network at all... The 2nd 1... Can not find it. Followed your instructions with connecting direct and changing IP - nothing. Tried at work where the standard network is 192.168.1 anyway - nothing. IP scanner looking for it - doesnt exist So I try to reset it - hold the button - nothing. Can hold it in for a minute no lights no change. On startup the miner fan goes to 100% and stays there. PSU fan not running... (cooler master V1000). Have swapped PSUs around no change. It would "appear" the miner is stuck in startup mode. Suggestions on how to unfreeze/reset it so I can get in? Many thanks Title: Re: [Guide] Dogie's Comprehensive Bitmain Antminer C1 Setup [HD] Post by: dogie on August 12, 2015, 11:42:14 AM Dogie a great resource - thanx If I can be quick.. Bought 2 x C1. Saw operating happy with seller set at 192.168.1.71 and 72. Brought home, plugged 1st in to home router and found it straight away at 10.1.1.3 (I have no idea...) Set it up and it been happily mining for 24 hrs - took to work and it continued no prob. However - unable to find it on the network at all... The 2nd 1... Can not find it. Followed your instructions with connecting direct and changing IP - nothing. Tried at work where the standard network is 192.168.1 anyway - nothing. IP scanner looking for it - doesnt exist So I try to reset it - hold the button - nothing. Can hold it in for a minute no lights no change. On startup the miner fan goes to 100% and stays there. PSU fan not running... (cooler master V1000). Have swapped PSUs around no change. It would "appear" the miner is stuck in startup mode. Suggestions on how to unfreeze/reset it so I can get in? Many thanks Download SD card imager (http://sourceforge.net/projects/win32diskimager/) and use it to flash the backup SD image in case of corruption. (http://goo.gl/BlhRdE) | That image is set to DHCP so visit your router to find the IP assigned. You can either do the same for the 1st miner or wait until you can access it and set it to DHCP. Title: Re: [Guide] Dogie's Comprehensive Bitmain Antminer C1 Setup [HD] Post by: SunnyIgor on November 20, 2015, 08:08:08 AM how is the controllerboard powerd?
through the blades? I have 1 dead blade..... Title: Re: [Guide] Dogie's Comprehensive Bitmain Antminer C1 Setup [HD] Post by: dogie on November 20, 2015, 08:38:55 AM how is the controllerboard powerd? through the blades? I have 1 dead blade..... Yes, through the blades. Title: Re: [Guide] Dogie's Comprehensive Bitmain Antminer C1 Setup [HD] Post by: SunnyIgor on November 20, 2015, 08:47:52 AM how is the controllerboard powerd? through the blades? I have 1 dead blade..... Yes, though the blades. got it to work I think I need 1 part called g337 2v I can than complete the miner. where do I get such thing https://i.imgur.com/tDBZsAo.jpg also is c1 unvolted throug gui or need pencil mod??? Title: Re: [Guide] Dogie's Comprehensive Bitmain Antminer C1 Setup [HD] Post by: redukt on February 20, 2016, 11:44:26 PM As far as pumps go, my stock Syscooling pump died last Fall and while searching for a suitable yet cheap replacement I found this pump + reservoir by Yosoo here: https://www.amazon.com/gp/aw/d/B00VHPADRW/ (https://www.amazon.com/gp/aw/d/B00VHPADRW/). Specs are as follows:
I've been very happy with my purchase. I simply unscrewed the tubing connectors from the old (original) pump and installed them in this new pump. Couldn't have been more painless unless the original hadn't broken to begin with! On another topic, is everyone who isn't underclocking just running at stock voltage and frequency of 250? Is there any gain in upping the frequency and / or voltage or is this guy pretty much running full tilt already? Title: Re: [Guide] Dogie's Comprehensive Bitmain Antminer C1 Setup [HD] Post by: notlist3d on February 21, 2016, 03:04:44 AM As far as pumps go, my stock Syscooling pump died last Fall and while searching for a suitable yet cheap replacement I found this pump + reservoir by Yosoo here: https://www.amazon.com/gp/aw/d/B00VHPADRW/ (https://www.amazon.com/gp/aw/d/B00VHPADRW/). Specs are as follows:
I've been very happy with my purchase. I simply unscrewed the tubing connectors from the old (original) pump and installed them in this new pump. Couldn't have been more painless unless the original hadn't broken to begin with! On another topic, is everyone who isn't underclocking just running at stock voltage and frequency of 250? Is there any gain in upping the frequency and / or voltage or is this guy pretty much running full tilt already? I recommended this pump about a year ago :) - https://bitcointalk.org/index.php?topic=841344.msg10410383#msg10410383 Your price is cheaper and no led kit. But it is a much better pump. I had 2 C1's and both syscooling pumps died one within a day and other I think within a week. But those pumps lasted for entire time I owed to selling miner's. Very good pumps though I liked them. I did not like the syscooling harness (batch 1). One of my two made sparks which is no good on a harness. So I also used a molex to fan adapter and my pump ran no matter what. Title: Re: [Guide] Dogie's Comprehensive Bitmain Antminer C1 Setup [HD] Post by: redukt on February 21, 2016, 04:27:22 AM As far as pumps go, my stock Syscooling pump died last Fall and while searching for a suitable yet cheap replacement I found this pump + reservoir by Yosoo here: https://www.amazon.com/gp/aw/d/B00VHPADRW/ (https://www.amazon.com/gp/aw/d/B00VHPADRW/). Specs are as follows:
I've been very happy with my purchase. I simply unscrewed the tubing connectors from the old (original) pump and installed them in this new pump. Couldn't have been more painless unless the original hadn't broken to begin with! On another topic, is everyone who isn't underclocking just running at stock voltage and frequency of 250? Is there any gain in upping the frequency and / or voltage or is this guy pretty much running full tilt already? I recommended this pump about a year ago :) - https://bitcointalk.org/index.php?topic=841344.msg10410383#msg10410383 Your price is cheaper and no led kit. But it is a much better pump. I had 2 C1's and both syscooling pumps died one within a day and other I think within a week. But those pumps lasted for entire time I owed to selling miner's. Very good pumps though I liked them. I did not like the syscooling harness (batch 1). One of my two made sparks which is no good on a harness. So I also used a molex to fan adapter and my pump ran no matter what. In that case, seconded! No high pressure craziness or plastic scraps to deal with ;) Title: Re: [Guide] Dogie's Comprehensive Bitmain Antminer C1 Setup [HD] Post by: DarkIlluminatus on April 28, 2016, 10:15:58 PM The power supply I intended to use for this machine has only 6 PCI-E connectors, will that be sufficient? It's a 1000W.
Title: Re: [Guide] Dogie's Comprehensive Bitmain Antminer C1 Setup [HD] Post by: notlist3d on April 28, 2016, 10:40:44 PM The power supply I intended to use for this machine has only 6 PCI-E connectors, will that be sufficient? It's a 1000W. I would spend the money to get one with 8 so you can have 2 in each one. You can always sell your PSU later on. Is 1000 W enough for a C1, yes it is. But if using it full speed I would want 8 personally (2 per board). You can always underclock on frequency if for some reason you have to remain with 6. And some might have tested it with 6 I just know I used 8 the entire time on my two and they were still a pain at times. So I would not cut corners with C1's. Title: Re: [Guide] Dogie's Comprehensive Bitmain Antminer C1 Setup [HD] Post by: dogie on April 28, 2016, 10:43:15 PM The power supply I intended to use for this machine has only 6 PCI-E connectors, will that be sufficient? It's a 1000W. We'd need to know the brand and model of the PSU to say definitively. If its single rail and 16AWG cabling then very likely yes. You can also pick up two 2xmolex to PCI-E cables for next to nothing if you want to be sure. Title: Re: [Guide] Dogie's Comprehensive Bitmain Antminer C1 Setup [HD] Post by: Athomson on November 30, 2016, 11:34:15 AM I have my C1 setup with a fixed IP and the latest firmware. I have put in the pool and user details but it does not have any shares accepted. Also slushpools dashnoard does not show it working at all. I have a R1 and a U3 working on the same pool but a different worker name but I cant see any issues. Is there anything that should be obvious that I missed?
Andy ??? Title: Re: [Guide] Dogie's Comprehensive Bitmain Antminer C1 Setup [HD] Post by: dunand on November 30, 2016, 11:58:13 AM Post a screenshot of your miner status page. We may be able to help you.
Title: Re: [Guide] Dogie's Comprehensive Bitmain Antminer C1 Setup [HD] Post by: Athomson on November 30, 2016, 05:42:06 PM Here is my status page, https://s19.postimg.org/mjn3y0mhf/C1Status.jpg
Sorry I have not got the hang of inserting pictures. After about 10-15 minutes the miner beeps and the red LED near the network socket comes on and soon after I turn off the C1 as I cant find the meaning of the RED LED. I have tried a fixed IP and DHCP. This is my net setup https://s19.postimg.org/o7u2i10b7/C1net.jpg Andy Title: Re: [Guide] Dogie's Comprehensive Bitmain Antminer C1 Setup [HD] Post by: dunand on November 30, 2016, 09:30:06 PM Is your fan spinning? The satus page show that it's not!
Title: Re: [Guide] Dogie's Comprehensive Bitmain Antminer C1 Setup [HD] Post by: Athomson on November 30, 2016, 09:45:52 PM The front fan is now 4pin plugged into the board, it shows up as Fan2 and runs at various speeds as you can see from my new status image https://s19.postimg.org/mjn3y0mhf/C1Status.jpg
Edit: I no longer get red LED was on solid (I read this about Antminers on the 'net, it should flash when mining) and put my pool and user detail in again, still the miner shows activity on the status page but no accepted shares or best share but discarded and stale seems to be going up. I also tried the alternate statum address for port 80 incase my ISP is blocking port 3333. I hope the C1 I have is not duff. I think I have the latest firmware (17-12-14), is there any pont in applying the upgrade again, just in case? Its still not mining, I dont know why. Any help where to look would be greatfully recieved. Andy ??? Title: Re: [Guide] Dogie's Comprehensive Bitmain Antminer C1 Setup [HD] Post by: lunokhod on January 18, 2017, 03:39:17 AM No, you link them by running two in series. Instead of going from the C1 to radiator, you go C1 to C1 to radiator. Is series linking multiple C1s still the way to go? I've got my hands on a couple of C1s to play with. I know they are way past state-of-the-art these days, but the price was right and I've got access to some cheap electricity so I thought the time is ripe for adding to my meager mining setup. I'm not doing it to make money... more for the fun of it I guess. The guy who had them before me used one pump/reservoir then a Y adapter feeding coolant to both C1s, then two radiators, another Y and then back to the pump/reservoir. Running them in series would certainly reduce the number of junctions in the coolant hoses which would make me sleep easier at night. :) Lunokhod. |
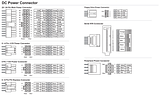