Site: https://app.mmpos.eu/
Join and talk to us at:
Discord link: https://discord.gg/P5J6Z5h
Telegram link: https://t.me/mmpos_intl
What is mmpOS?
Its a mining platform, optimised for stability and ease of use.
We provide a highly optimised ubuntu based linux os which runs our agent to handle overclocking, memory timings and miner management.
If you prefer Windows, we provide a standalone Windows agent too.
Everything is managed via an unified dashboard.
We are a paid solution with 8-14 devices free, forever.
To test our platform you additional to the free devices receive 180 credits to play with.
You pay per your daily device usage.
Supported hardware and requirements (mmpOS):
- To run mmpOS you need an at least 4GB usb stick (8GB recommended)
- Recommended memory is >= 4GB, although it works fine with 2GB for a couple of GPUs.
- SSD/HDD install is supported but not needed
Supported hardware and requirements (windows agent):
You are in charge of drivers and windows install. Also windows needs a SSD/HDD and more memory then mmpOS (linux)
Otherwise latest AMD and Nvidia driver is recommended. If you use AMD and modded bioses you need to apply the driver patch.
Compute-mode will be enabled automatically.
There is no additional software required except "atikmdag-patcher" if you use modded bioses on AMD Polaris.
Supported workers: (mmpOS)
Mixed rigs are supported, but as usual NVIDIA must be first in order (nvidia need to be in main 16x slot, via riser is fine)
We support different drivers to play with, but all listed cards should work with default installation.
Similiar to mixed rigs you can mix and match any generation of cards.
We support overall up to 22 GPUs per rig. (depending on PCIe slots and CPU/Motherboard)
AMD: Maximum of 13 GPUs (motherboard hard limit)
NVIDIA with display: Maximum of 13 GPUs (motherboard hard limit)
MIXED: 13 AMD or NVIDIA
NVIDIA without display(Mining editions): Tested with 19 P104-100 and 18 P106-100 on Asus mining expert B250.
GPUS:
AMD
Tonga: R9 280[X], R9 380[X].
Hawaii: R9 290[X],390[X].
Fiji: R9 Fury[X], R9 Nano
Polaris: RX460, RX470, RX480, RX550, RX560, RX570, RX580, RX590
Vega: All RX Vega56/Vega64 and Vega FE
Navi: RX 5500/5600/5700
Radeon VII ( Vega20 )
AMD Limited support
Tahiti: HD 7xxx series. While it runs fine, overclocking is not supported, use VBE to mod bios since SI don't support powerplay.
NVIDIA
Maxwell: Full support for NVIDIA 750Ti and 8xx, 9xx series[not very useful for mining].
Pascal: All 10x0 series
Volta: Never tested but should be supported.
Turing: All new RTX series are fully supported, including fan settings.
FPGAS:
SQRL Acorn: all available acorns should be supported tested with CLE 215+ and only miner for tribus has been included. If you happen to have different SQRL Acorn device you
have to setup your miner using custom.sh implementation.

CPUs:
All modern CPUs should be supported, although sensor support is included for Haswell, Sandy Bridge, Ivy Bridge and later for Intel and Ryzens for AMD.
Supported GPUs: (Windows)
Again you are in charge of the drivers, otherwise every card normally working on windows should work too.
Windows has some restrictions of cards per rig, if you have 8+ cards per rig, we recommend using mmpOS directly.
Features:
- Automatic memory timing tuning (SmartTune) on Vega, Pascal cards. Polaris with small boosting. Different levels and algo options for tuning.
- Overclocking and Power consumption control (either via voltage or watt limiting)
- GPU resetting on failure( must be enabled by user settings.ini - linux mmpOS only ).
- Automatic fan management (you set target temperature and fans will be adjusted automatically)
- Automatic update of miners (fixed version possible)
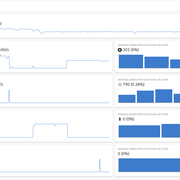
- Live and 30 day history of hashrates, temp/fans and other metrics
- Remote control for rig via teleconsole ( must not be used to update/upgrade system ).
Planned features:
- Farm support (create groups of rigs and grant others access to them)
CLI helper(mmpOS):
In case some more experienced users or more familar ones with basic linux cli knowledge wants to do additional tweaks or perform more advanced operations.
Once you login via ssh using standard user 'miner' and default password or preset one, you will be greeted with 'helpme' output.
There is one command that is used for debugging 'debugme'. If you find yourself in trouble you can present the output of it in our telegram or discord channels.
The more interesting commmand though is 'mmp'. With this small app you can do lots of powerful things. Type 'mmp help' to reveal its full potential.
We offer lots of 3rd party apps inside the heart of mmpOS.
- atiflash - used to flash AMD bioses.
- nvflash - used to flash NVIDIA signed bioses.
- amdmeminfo - reports extended GPU information for enthusiasts.
- amdmemtweak - powerful memory tweaking tool - available for enthusiasts( Make sure to disable SmartTune before using - use with caution ).
- OhGodATool - maybe the first available Polaris powerplay tweaker - available for enthusiasts( might break agent settings - use with caution ).
- MMP VegaTool - our own Vega10(Vega56/64) powerplay tweaker - available for enthusiasts( might break agent settings - use with caution ).
Who are we;
We are two guys who started this project early 2018 with the intention to prove mining can be easier and without spending too many hours awake in order to
keep an eye on your rigs's health.
Then, with the help of a few friends and supporters, gained more courage, knowledge and wisdom to give birth to mmpOS and release it to the public.
First use FAQ
Q: What to do after I have downloaded `mmp-latest.img.gz`?
A: After successful download of `mmp-latest.img.gz` depending on the operating system you're using you should do the following:
A1: Windows10 - Go to https://www.balena.io/etcher/ and download latest Balena Etcher. Install and start it, choose Source: `mmp-latest.img.gz` and destination your USB/HDD/SSD drive.
WARNING!!! Be careful not to select a drive that has valuable information on it! Double - Triple verify to which drive you're writing!
After successful write a small partition of 19MB will appear writable with assigned drive letter, if it doesn't appear unplug/plug the drive and confirm it appears.
NOTE1: Go to https://app.mmpos.eu/, log in with your account and navigate to `Rigs` menu, then click on Get mmpOS(where you downloaded the image), click on Autoconf,
fill in any of the optional fields(your rig desired hostname and rig desired password) and click on `Generate and download`.
A file named autoconf.txt will prompt for saving, place it in the small partition which appeard in device manager earlier.
Unplug drive and plug it in your Rig, power it on and monitor your dashboard for newly created rigs.
NOTE2: If for some reason no rig appears in dashboard, please plug monitor to your first GPU(PCIe x16 slot or iGPU on motherboard) and watch for errors.
If you are unaware whats going on with the boot process, please contact us as soon as possible to resolve your issue.
A2: Windows7 - Steps on Windows 7 are the same as Windows10 except for the small partition appearing, it is not always recognized by Windows7.
After successful write, if small exfat partition does not appear, please put USB drive on either Windows10 PC or use one of the 2 other methods to register rigs.
A3: Linux/Mac OSX - These operating systems have built in tools to write directly onto attached USB drives.
NOTE3: All commands must be executed with admin privileges, a.k.a root, Ubuntu and similar linux distros can use `sudo` as prefix to cmds.
Linux: wget -O - http://mirror.mmpos.eu/images/mmp-latest.img.gz | zcat | dd of=/dev/sd[X] bs=1M # Where sd[X] is your USB drive
WARNING!!! Be careful not to write to drive that has valuable information on it! Double - Triple verify to which drive you're writing!
Mac OS X: wget -O - http://mirror.mmpos.eu/images/mmp-latest.img.gz | zcat | dd of=/dev/disk[X] bs=1M # Where disk[X] is your USB drive
WARNING!!! Be careful not to write to drive that has valuable information on it! Double - Triple verify to which drive you're writing!
Follow `NOTE1` for both Linux and Mac OS X. If linux does not recognize exfat partition, refer to your distro packages and install exfat-utils and exfat-fuse.
First steps after successful boot.
Q1: What should I do when the rig boots for the first time?
A1: Wait for the rig to appear on dashboard either via its mac address as hostname or the hostname you set in autoconf.txt.
A2: If you haven't provided proper autoconf.txt then you should attach monitor and wait for rig to display the IP it has. If you are on the same subnet as the rig is you should go to Dashboard->Rigs->Add rig
and type the IP you see on the monitor. If registration is successful the new rig will appear in Rigs menu and you can continue with next steps.
A3: If you are not on the same subnet type `ALT+F2` and login with default credentials. Then simply type `mmp register YOUR-RIG-CODE` where YOUR-RIG-CODE is the one in Dashboard->Rigs->Add rig->Rig code.
Q2: What is the first thing I should do after I see my rig in Rigs menu?
A4: First thing is to go to Dashboard->Wallets and add your wallet for the desired currency(Coin) you wish to start mining. After you have added your wallet, next step is to move left to Dashboard->Pools.
Click on `Add pool` and choose the currency(Coin) you just added your wallet. Under `Hostname` you fill the pools stratum address without `stratum+tcp://` or similar additions, just the domain of the pool.
Under `Port` you fill the pool's stratum port. Next is setting up the `Username` part which can be different for different pools, usually most common macro setup is %wallet_address%.%rig_name%%miner_id% -
Refer to `Macro definitions` section for more information. Click save and move left to `Miner profiles` addition. Click `Add profile`, choose your currency(Coin) to which wallet belongs, choose the platform you are running:
Linux/mmpOS or Windows 10, choose your desired miner( For every currency(Coin) there may be several miners, if you are unsure ask in telegram/discord ). If you need to add additional command line parameters to the miner you can
do that by editing params in `Advanced` section of your miner profile. If that is setup correctly, click save and move to the left one more time. Click on `Rigs`, click on your newly created rig and click `Configure`.
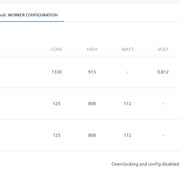
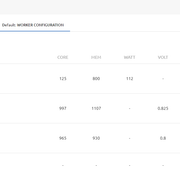
We are starting again from Right->Left. Click on `WORKER CONFIGURATION`, choose your device and click `Config`, set your custom device clocks/voltages/powerlimits(If unsure ask in telegram/discord).
You can save each setting using our `Global presets` by clicking on `Presets` save icon, load icon for loading a predefined preset. Click Update and move to the left to `MINER CONFIGURATION`. Set your desired
Target temperature, set your desired fan adjustment time and click `Update`. Move to the left in `GENERAL` section, name your rig if you want and from the dropdown menu `Miner profiles` select your precreated profile.
Click `Update` and monitor the status of your rig(Refer to FAQ section).
Frequently asked questions
Q1: How to mod timings on my GPUs? Where are AmdMemoryTweak and OhGodAnEnEthlargementPill?
A1: They are in `/opt/mmp/bin` directory part of `mmp-extra` package.
A2: We provide our own solution for automatic memory performance adjustment called `Smart Tune`, instead of putting values yourself we've already done 4 presets for each memory hard algorithm.
A3: If you still want to use them despite our solution, feel free to disable `Smart Tune` and use `custom.sh` to load your settings.
Q2: How to flash my NVIDIA or AMD Polaris bios?
A4: When you login via ssh type `mmp help`, we have provided atiflash and nvflash utilities for managing vbioses in cmd line.
Q3: Why can't I just upload/download GPU vbios via dashboard?
A5: Because its lowlevel task which usually puts at risk your hardware, we prefer you keeping your eyes constantly on that specific task.
Q4: Can I use custom miner or modified supported miner?
A6: Currently custom miners are not yet supported, we plan to introduce that feature in recent future.
A7: Depends on modification you can go copy miner binary over supported one in `/opt/mmp/miners/supported-miner/miner.bin` and use dashboard to launch it.
Keep in mind that if there is current miner update it will overwrite your modification.
Q5: Can I mine with Nicehash, Mining Rig Rentals and other similar pools?
A8: Yes you can, there are specific miner/pool settings for them to use but it is 100% possible.
A9: We do not provide BTC wallet support because BTC is not mined by GPUs/CPUs but you can use the coin responding to NH/MRR/MPH algorithm - for example choose ETH for Dagger-hashimoto and name it: ETH-NiceHash
and put your Bitcoin address.
Macro definitions of dashboard variables
Pool macros:
%pool_protocol% - Enables or disables SSL support for pools
%pool_server% - Equals stratum/pool server. ex. eu1.ethermine.org
%pool_port% - Equals stratum/pool server port. ex. 4444
Example: %pool_server%:%pool_port% = eu1.ethermine.org:4444
Example1 Claymore noSSL: %pool_protocol%%pool_server%:%pool_port% = eu1.ethermine.org:4444
Example2 Claymore SSL: %pool_protocol%%pool_server%:%pool_port% = ssl://eu1.ethermine.org:4444
User macros:
%user% = Pool->Username->%wallet_address%.%rig_name%%miner_id%
%wallet_address% = Wallets->Address
%rig_name% = Rigs->Name
%miner_id% = Miner identification in multiminer(1,2..)
wallets->address = 0x1234567891011121314151617181920212223
rigs->name = myRig1
Example Claymore noSSL: %pool_protocol%%pool_server%:%pool_port% -ewal %user% = eu1.ethermine.org:4444 -ewal 0x1234567891011121314151617181920212223.myRig1
%password% = Pool->Pool needs password(default x)
Example Claymore noSSL: %pool_protocol%%pool_server%:%pool_port% -ewal %user% -epsw %password% = eu1.ethermine.org:4444 -ewal 0x1234567891011121314151617181920212223.myRig1 -epsw x
Api Port:
%api_port% - depends on miner it usually determines to which port our agent should listen for miner API reports.
Non miner specific macros:
%gpu_idxs% - adds comma after each GPU Index - 0,1,2,3...
Example: If you have 6 GPUs and want to enable dual threads for specific miner, instead of typing --opencl-devices 0,0,1,1,2,2,3,3,4,4,5,5 , you can replace with %gpu_idxs%,%gpu_idxs%
Miner specific macros:
%grinpro_amd% - specifies amd indexes for GrinPro miner. Ex amd:0,amd:1
%grinpro_nvidia% - specifies nvidia indexes for GrinPro miner. Ex 0,1
Miner specific settings in URI mode:
Special characters in variables
You can use the %xx (xx=hexvalue of character) to pass special values. Some examples:
Code Character
%25 %
%26 &
%2e .
%2f /
%3a :
%3f ?
%40 @
Rig problems and solutions.
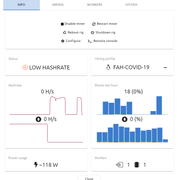
Q1: What is the difference between OK, Miner down and Rig down status?
A1: When status `OK` is seen it means rig has successfully started mining and you should see hashrate and shares coming from it.
A2: When status `Miner down` is seen it means agent is running but miner is down and is not performing properly.
Q2: How can I see why there is status `Miner down`?
A3: Usually when there are misconfigured parameters sent to miner cmd line lots of notifications indicating `Miner restarted` will appear in dashboard. If that is the case, please review your miner command line parameters.
A4: When there is no notifications other than `Miner down` you should login via ssh and type `debugme` and send the link output to one of our associates in telegram or discord to review the issue.
If you are more experienced in linux cli you can monitor logs in /var/log/mmp/agent.log and /var/log/mmp/miner.log and try to resolve the issue yourself. You can also issue `dmesg` command and seek for hardware faults.
Q3: What does `Rig down` mean?
A5: It means that either your rig is offline by unknown reason or agent has no access to the dashboard(No agent<->dashboard communication).
A6: If you have local access to the rig but still remains `Rig down`, login via ssh and type `debugme` and send the link output to one of our associates in telegram or discord to review the issue.
Q4: Why there is no display on my local monitor?
A7: Usually happens when native resolutions aren't supported on your monitor. There shouldn't be a problem to run headless though.
Q5: What does `Low hashrate` notification message mean?
A8: It means last iteration of hashrate gathering is lower than the previous which triggers that alarm. Usually happens when one or more GPUs crash.
Q6: How to find out which GPU crashed?
A9: Thats a tricky task, you can do that by logging via ssh right after rig has booted and monitoring via `miner` command alias.
A10: You can disable miner and system watchdog if and wait for `Low hashrate` alert and then login via ssh and type `debugme` and send the link output to one of our associates in telegram or discord to review the issue.
Q7: What if I see other issues that are not listed here?
A11: These are usually most common issues you will see. If by any chance you have other issues, do not hesitate to contact us via our official telegram group or discord server.