|
Dragonfund (OP)
|
 |
August 14, 2021, 12:40:50 PM
Last edit: August 14, 2021, 01:43:28 PM by Dragonfund |
|
Disclaimer: Persistence is turned off by default. make sure you write down your seed or activate persistence to keep your seed on Tailsos.This tutorial is only for Windows users, although similar steps can be followed by Mac users who want to create a bitcoin storage wallet on TailsOs using a USB flash drive and the Electrum integrated wallet. I'll make a table of contents for easy learning and for those who want to skip forward some steps.
Table of Contents
Introduction Bitcoin is both store value and money. Its very essential protect your money from anyone who may in one way or the other bring harm to your Bitcoin investment. The best way to protect your bitcoin is to hold them in your wallet where only you can have access anytime and anywhere without any form of restriction. However, bitcoin wallet vary, there is two type of bitcoin wallet, the cold wallet and hot wallet. The hot wallet is basically connected to the internet while the cold wallet is never connected to the internet until it is ready to be spent.
The hot wallet is mostly used by individuals who conduct transactions and spend money from their wallet on a regular basis, whereas the cold wallet is used by long-term investors to secure their investment. Cold wallets offer an advantage over hot wallets in that they are never linked to the internet, thus your chances of being hacked are extremely minimal. Cold wallets protect you from hacks like as malware and keyloggers, which can capture and send your personal information to another user.
While a hot wallet may be downloaded from any reliable website, a cold wallet is made by several respectable firms who provide comparable wallets but charge different prices. This is the main objective of this tutorial. We are going to create a bitcoin cold storage wallet for free that is both offline and secure.
REQUIRE SOFTWARE Basically, in this tutorial, we are making a cold storage bitcoin wallet, and in order to do so, we will need some new software program, which I will go over in more depth for optimum security since software installation is required with a quick explanation.1. TailsOS: Tails is an open source operating system that offers its users with utmost security by leveraging the Tor network to avoid censorship and allow you to browse the internet without anybody observing your actions. It is free and can be verified by anybody, with a unique interface that deletes all traces on your computer after you have finished using them and does not retain information on your hard disk.
Tails is a simple and complex program in that all actions performed on it are broadcasted to the Tor network, which subsequently encrypts and anonymizes your connection by broadcasting your data across multiple servers. These servers are managed privately by individuals from different locations.
Tails has an inbuilt programs/applications which we will be using later after verification and installation in our computer.2. balenaEtcher: This is an open Source system software that enable one to free burn image( operating system) into computer without any form of interruption. It is safe, very fast and works on any USB flash with quick validation to ensure there is well package image before installation. 3. Quickhash: Its a hashing tool used for confirming the originality of a file. Its often used to test how valid a file is and if they have not be clone in one way or the other. After hashing the file, it simply tells you how secure it is on your device before installation on your device.
DOWNLOAD AND INSTALLATION STEP 1. We need a TailsOS which we are going to download from the Tails OS official website, it's up to 1.22gb and should take up to 30 minute depending on your network speed and note that, you are downloading Tails for USB stick.  STEP 2. Download balenEtcher from the official website, the page should look exactly as the image below STEP 2. Download balenEtcher from the official website, the page should look exactly as the image below

After successful download, kindly install and then proceed to next step.STEP 3. Download Quickhash from the official website, select and download quickhash for window version. After a successful download, the downloaded file should come in zip format, extract the file and open Quickhash GUI application.
 

You should have something like this on your interface at end of the day.

In other to hash the TailsOS, you need to know the indicated numbers on the image above.
1. Indicate that we are selecting a file.
2. Indicate the Secure hash algorithm. In our case, we will be using SHA256.
3. File image been hash
4.Computed hash from the file image.
5.Expected hash i.e hash from the website
STEP 4. In this step, we will be testing the originality and authenticity of the file by hashing with quickhash and validate the hashed with the official website. We want to know if this file is actually official TailsOS from the official website.
Open quickhash and and select the downloaded image file from your computer, you will have should have something below as soon as the hashing is complete.
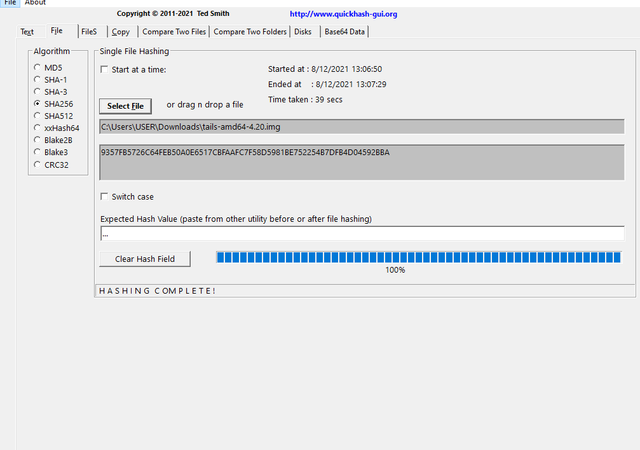
We need to compare the hash result from quickhash and the one from the website for originality. To do so, simply go to TailsOS Json to copy the SHA256 hash. The hash get updated every time a new update is added to the TailOS. It's possible by the time you are viewing this, a new version of TailsOS should be out and SHA256 value may be different with the image below. While i was testing TailsOS, I already copied my SHA256 which may also vary from yours but everything remain the same. Kindly copy and paste it in the expected hash (5) in Quickhash.

You should have something similar to the image below with a popup notification that says Expected hash MATCHES the computed file hash!
This shows that our image file is safe and ready to be burn(etch) into our USB flash.

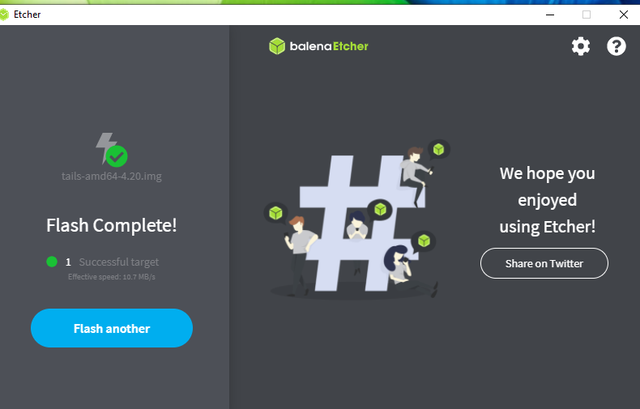
STEP 5. Insert USB flash into your computer, Open balenEther and locate your downloaded TailsOS and burn it in your USB flash. By default, balenEtcher will automatically detect your inserted flash but its good to manually check for confirmation.

You should have a successful result after etching the image file as the image below.
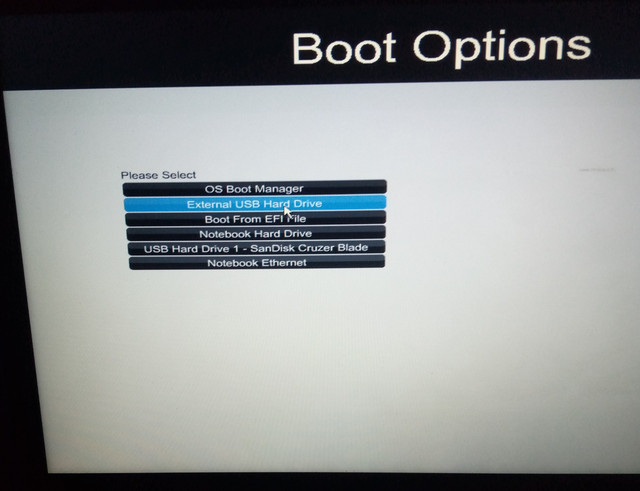
STEP 6. Now that we are finally done with hashing and Etching, our file should be ready for our computer. Boot the TailsOS image into the computer with the following steps:
-NB: Make sure that your computer is disconnected from internet.
-Shutdown your computer and make sure the USB is plugin.
- Turn on your computer.
- press and hold the ESC or F12 depending on your computer.
- When the boot menu appears, select select F9 and choose TailsOS USB drive.
- Your computer will now boot into TailsOS.
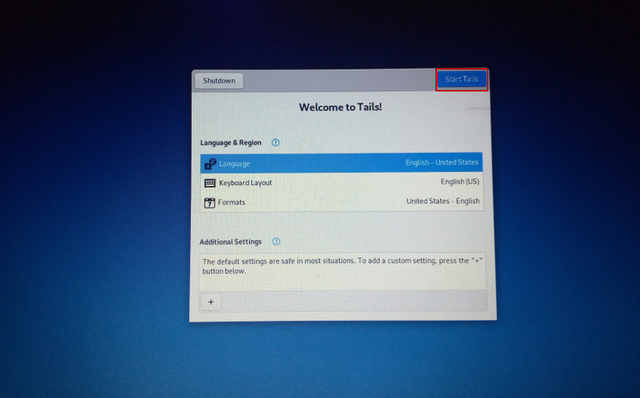
Select English as default, click Next and proceed with installation.
It's time to launch your Electrum wallet, navigate to the application menu. select Internet and open Electrum Bitcoin wallet.

By default, Persistence will be disabled from your electrum wallet. This feature is great and it better remain disable because we don't want to save anything our computer for privacy.

Create a name to your wallet and click next. you may choose to live it as default_wallet.

The next step has a cool feature for users who wish to create a multi-signature cold wallet. This is why Electrum wallet is mostly used by Bitcoin holders, it has other great features. Select standard wallet, choose seed type as Segwit because you may want to save transaction fee when making transactions, and click Next.
 
This is where you are going to need a pen and a paper to put down your seed phrase. write down your generated seed on paper and safekeep it in a place where you can have access to anytime. copy the seed, create and confirm password for your wallet.

Then, finally you have successfully make a cold storage Bitcoin wallet that is free from internet, it's safe and ready to be use anytime. It's has not been connected to the internet and from the image below, we have achieved our primary goal, to create a bitcoin cold storage wallet for free that is both offline and secure.
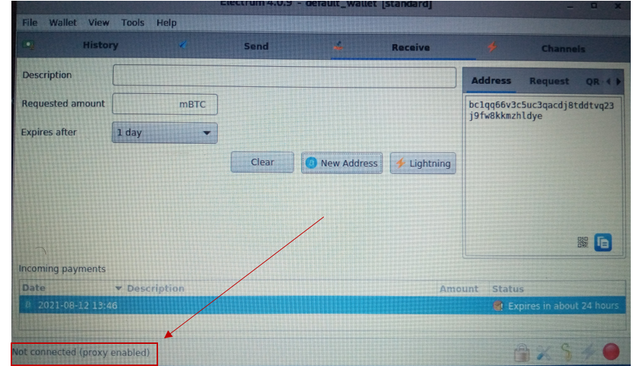
The arrow in the image above should indicate Not connected. That's the only way your wallet is safe.
Significance of finding 1. We were successful in verifying, authenticating, and burning TailsOS.
2. We were also able to create a free and secure offline cold bitcoin wallet that is not connected to a computer.
3. Anyone can further explore TailsOS other apps such as Tor Browser to access website with full privacy and anonymity.
Reference
|


