Bitcoin Forum
April 26, 2024, 10:43:36 AM *
News: Latest Bitcoin Core release: 27.0 [Torrent]
 
   Home   Help Search Login Register More  
Pages: [1] 2 3 4 5 6 7 8 9 10 11 12 13 14 15 16 17 18 19 20 21 22 23 24 25 26 27 28 29 30 31 32 33 34 35 36 37 38 39 40 41 42 43 44 45 46 47 48 49 50 51 ... 108 »
  Print  
Author Topic: Official FutureBit Moonlander 2 Driver and Support Thread  (Read 71398 times)
jstefanop (OP)
Legendary
*
Offline Offline

Activity: 2090
Merit: 1396


View Profile
November 18, 2017, 12:33:54 AM
Last edit: May 19, 2018, 11:33:05 PM by jstefanop
Merited by Wusolini (20), wttbs (10), klintay (7), suchmoon (2), VoskCoin (2), Bitfort (2), HagssFIN (1), kurbeks (1)
 #1

THIS IS THE SUPPORT THREAD: Keep this thread on topic!
All order related questions go here: https://bitcointalk.org/index.php?topic=2141261.0
All other questions, general info, and talk about hubs keep it here: https://bitcointalk.org/index.php?topic=2125643.0
__________________________________________________

Update 5/14/18

Finally got around to launching our site...check it out at futurebit.io!

If you are new and looking for a quick start guide to get your Moonlander 2 up and running as quickly as possible head to https://www.futurebit.io/getting-started/

----------------------------------------------------------------------

Update 12/14/17

Please download the new driver release which has numerous bug fixes and enhancements

https://github.com/jstefanop/bfgminer/releases/tag/bfgminer-5.4.2-futurebit2-beta2

----------------------------------------------------------------------
Welcome to the FutureBit Moonlander 2 Support thread! Now that Moonlanders have already started shipping out its time to have some fun with them! First of all a massive thanks to everyone that pre-ordered...you guys made this possible once again, and this was an even bigger success than the first version. Many old timers and alot of new people will get into mining and Litecoin because of you!

This post is split up into four main sections. Below you will find instructions for the bfgminer software and downloads, an overview of the hardware and instructions on tuning, hardware assembly guide, and FAQ at the end.

PLEASE READ THE WHOLE POST AND FAQ SECTION BEFORE ASKING QUESTIONS....the answer to your question or why your stick is not running is most likely answered below!


Depending on the distributor you ordered from, you will either receive your Moonlander 2 fully assembled or in "kit" form. Please skip down to the second post for Assembly instructions if you received your Moonlander not pre-assembled. Do not attempt to plug in or run your stick without the proper heatsinks and fan working.

BFGMINER 5.4.2 Instructions

I have built a native bfgminer driver binaries with support all major systems and architectures. Please follow the GitHub release link below, which has binaries for each system attached.

bfgminer download: https://github.com/jstefanop/bfgminer/releases/tag/bfgminer-5.4.2-futurebit2-beta2

You will also need to install the latest version of Silicon Labs VPC drivers for Win/Mac OS link below. If you downloaded this driver below, make sure you update to the latest version, as the Moonlander 2 uses a new UART chip and the old driver will not work will with it.

UART VPC Driver: https://www.silabs.com/products/development-tools/software/usb-to-uart-bridge-vcp-drivers

MAC OS 10.13 HIGH SIERRA USERS: Sililabs drivers will NOT work with the newest version of OS X, and you cannot run the stick with this version until Sililabs provides a driver update! EDIT: Workaround here https://bitcointalk.org/index.php?topic=2420357.msg25153407#msg25153407

Once you have installed the drivers and extracted bfgminer binary for your system just plug in the miner to a USB port and double click on the Start_Moonlander2 file on your Mac/PC. The driver will auto-detect the board and start hashing at the default frequency (for linux you need to execute the .sh file in terminal with sudo command i.e. sudo start_moonlander2.sh).

Just edit that same file with a text editor to change pools, add bfgminer options, and change frequency. You can also use the -c flag and load it with your own config file.

Keep in mind that most scrypt pools are optimized for larger ASICs, so pool difficulty might be high and will take a long time to find a share. The new driver works differently than the old Moonlander, and will continuously return shares lower than pool diff, so you can easily monitor that the device is hashing without waiting for an actual share to be submitted to the pool. If you want your shares to be submitted faster make sure you are connected to a var diff port or one that offers a fixed difficulty of 512 or lower.

If everything is setup and running correctly you should see something similar to this:


If you are new to mining, the most important stats on this screen are what is in between the dashed lines. These are your per device statistics, so if we follow along from left to right for MLD 0, the first number (3.27 mh/s) is your 2 minute average hashrate, second number is your overall average hashrate since miner start (3.30 mh/s), and the last number (3.19) is the pool hashrate based on your submitted shares. A:25 shows your number of shares accepted by the pool, R:0 shows number of shares rejected (usually due to a stale share), and last number HW:0 shows the number of hardware errors reported by the ASIC. This is probably the most important value and will be explained in more detail in the tuning section below.

Keep in mind that the first two numbers is the actual hashrate the device is hashing at (it uses the low level nonce counters to keep track of hashrate and is very accurate), so this number will always be higher than your pool hashrate, because it does not take account of inefficiencies of lost shares due to stale network shares or hardware errors. So your pool hashrate is your net effective rate the device is hashing at.

Frequency:

The MoonLander 2 can run on a very wide range of speed and efficiency, and leaves a lot of tuning up to you guys. Make sure you read up on the Hardware section below where I go more in-depth on frequency and voltage tuning. The Moonlander 2 has a default frequency setting of 600mhz, and can range from 384mhz to up to a cap of 954mhz.

To change the frequency edit the start_moonlander2 file in your driver folder and change the number in "--set MLD:clock=600" to the desired frequency.

Please note that this version of the miner has a fixed list of frequencies available to use below.
List of available frequencies: 384, 450, 480, 540, 576, 600, 612, 625, 636, 648, 660, 672, 684, 700, 720, 744, 756, 768, 796, 832, 852, 876, 900, 924, 954


HARDWARE:

The Moonlander 2 consists of a single Scrypt ASIC at its core that operates between 2.5 mh/s up to 5.5 mh/s and consumes between 2-10 watts of power.

The  power design in the Moonlander 2 is different than the original and the ASIC is powered by two adjustable DC-DC buck supplies. One for memory voltage, and one for core voltage. I was originally going to include a fixed memory controller, but the ASICs provide and even greater degree of tinkering and power efficiency gains by including an adjustable memory voltage as well!

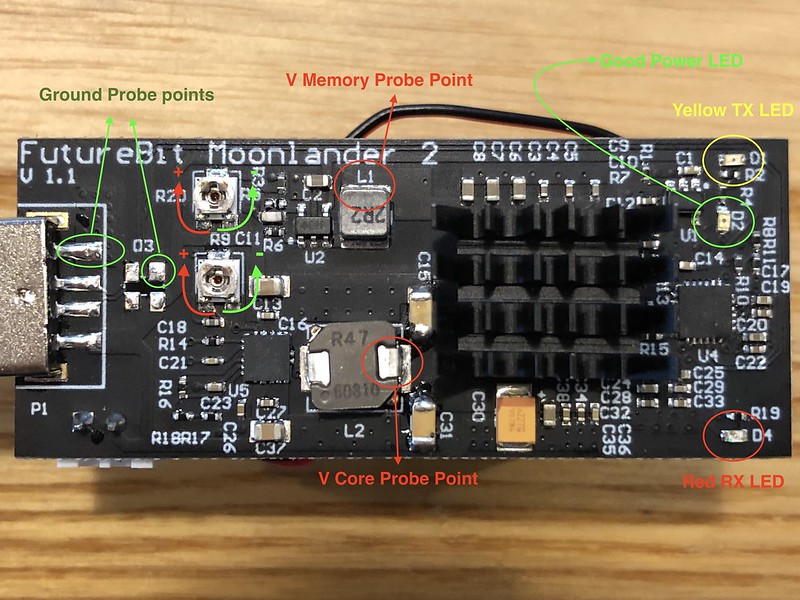
It also features communication LEDs so you can visually see whats going on with the board. The yellow LED flashes when communication is being sent to the ASIC, and the red LED flashes when the ASIC is responding. Lots of red flashes is a good thing, it usually means the ASIC has found a share and is hashing correctly Smiley

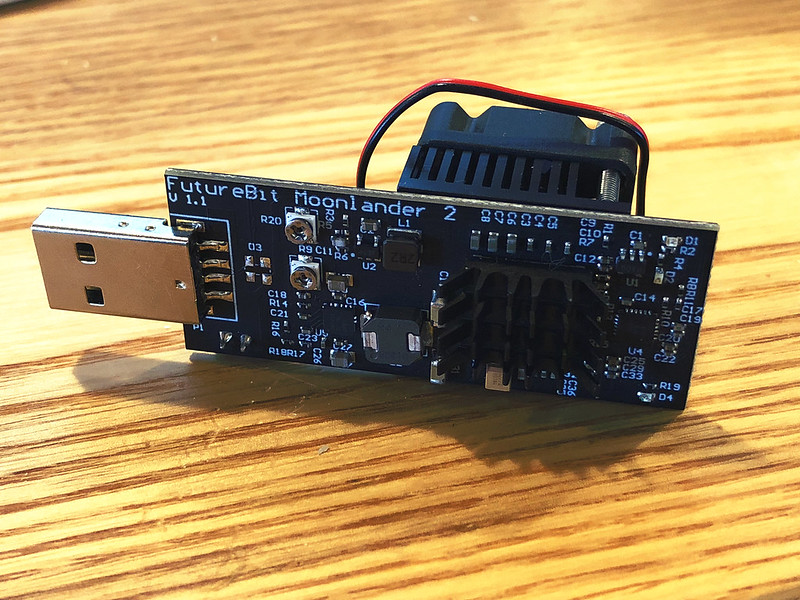
The board is mounted to the heatsink with a strong thermal adhesive, since this ASIC is designed to dissipate heat through its bottom side. The Moonlander 2 features a completely redesigned thermal solution this time around, with a completely custom designed push pin heatsink and fan built in. This is a first of its kind of USB miners, and allows a wider range of operation without needing clumsy external fan or coming up with crazy expensive ways to keep these cool Smiley

Even with a fan built in, you can still overheat your Moonlander at higher frequencies. I do not recommend running these past 800mhz unless you can closely monitor temps (if you have a IR temp gun check the top ASIC heatsink, it should not be any hotter than 80C).

Below is a visual of the board for reference .


Voltage Adjustment:

There are two pots that control the two main voltages feeding the ASIC. Top pot controls the memory voltage (when looking at the board with USB port facing left), and bottom controls core voltage. You adjust the voltage by turning the Pot clockwise or counterclockwise with a fine flat head or philips screwdriver. The pots are VERY sensitive, the whole voltage range is within HALF a turn in either direction from the stock position. You must do micro adjustments if you want to do very fine tuning. For example going from .75 - .8 v might take as little as a little torque pressure on the screwdriver even if you don't feel it actually twist.

Make sure you have place the stick horizontal and the USB end is facing LEFT (ie you can read FutureBit Moonlander normally on the board).

To turn the voltage UP turn the pot CLOCKWISE, to turn it DOWN, COUNTERCLOCKWISE.

DO NOT turn the pots more than 180 degrees in either direction, they have no stops and if you go past their lowest or highest setting you could damage them

To check the voltage use a multimeter and contact the ground wire to either of the two ground terminals (circled and labeled ground in the picture), and the positive wire to the outputs of the two inductors (circled and labeled VCORE, and VMEMORY). Be extra careful not to short anything as a single short anywhere on the board while its powered will most likely fry it. If you don't have a multimeter, you can wing voltages by following the diagrams below for Pot positions. Use the flat edge of the pot screw as the pointing direction (DO NOT OVERVOLT at the high end if you don't have a multimeter to double check what the voltage is).


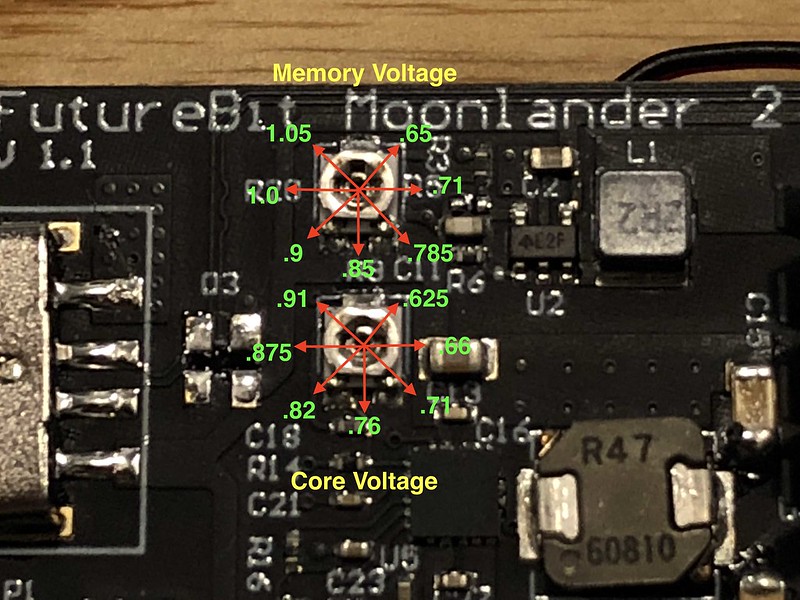
The sticks are shipped to you guys with the stock voltage settings of the pots (which is the flat end of the Pot pointing down). The Core voltage is at around .75v, which is good for up to around 800mhz stable, and ranges from ~.6 -> ~.95v . The memory voltage is set to ~.85v, and ranges from ~.625 -> ~1.05v (more on memory voltage in tuning section below).

DO NOT go past .9v on the core voltage, you will most likely damage the ASIC if you run at high voltages and high clocks for prolonged periods of time.

Tuning:

Now to the fun part. Your goals here can vary from trying to get the absolute maximum hash rate (at the expense of power), to the absolute lowest hasrate/watt, or find a nice sweet spot. If your not the tinkering type and just want the best settings for the Moonlander, I have found that about .725v and  756 MHz is the "sweet" spot for this ASIC in terms of efficiency.

Tuning any switching transistor based processing unit revolves around supplying enough current so the transistors on the chips actually switch on and off correctly within their cycle times. The main voltage that will effect performance and the tuning outlined below is the Core Voltage.

The higher the frequency or “switching time” the less time a transistor has to “charge” so you need more current (ie turn up the voltage). If these requirements are not met the transistors don't function properly and you have what you know as a “Hardware Error”

So if you lets say leave the stick at its stock .75 volt setting and try to run it at 900mhz, it will either not start, or it will produce almost 100% hardware errors. So you need to gradually dial up the core voltage until these errors are reduce to a good level.

To get started what you need to know is the optimal hash rate the ASIC will operate at for a given frequency. This ASIC has 64 cores and assuming all cores are active (you might have a couple dead cores which is acceptable) the optimal hash rate is:

5.66 KH/s per Mhz

So lets say your running at 832 Mhz, under ideal conditions the stick will operate at 832 * 5.66 = 4.7 MH/s

This is the target hash rate for a given frequency, and you can adjust the core voltage to meet that. A "quick" way to tune these on the fly is by using the --benchmark flag as a startup option in bfgminer. This sets a really low target for the ASIC, and it will be returning dozens of shares back a second (you should see the red LED continuously flash). This allows you to very quickly see what your Hardware Error rate is, and you can adjust the pot while its hashing until the errors stop or have slowed down to one or two every second (this will give under 1% error under "normal" hashing).

Keep in mind “zero” hardware errors isn't always the best setting. If your getting a hardware error it does not necessarily mean your missing out on valid shares. A good reference point is to keep HW errors to under 2-3%.

Memory Voltage

I included a Pot for memory voltage mostly for efficiency gains by undervolting memory. Adjusting memory voltage should be a one time thing, you set it at the lowest setting it will start hashing. There is no benefit in increase memory voltage at higher clocks, as this wont increase your hash rate or bring down hardware errors (this is entirely dependent on core voltage). Either your device will work at a certain memory voltage or it wont, so the goal is to bring the voltage down to the lowest possible setting that the stick will still hash at.

The stock value for memory is supposed to be .9v, but my tests showed all ASICs operate fine at .85v which is what they ship at. Most ASICs will work fine down to ~.76 v. Keep in mind that while you save power and heat with lower memory voltage it has an effect to destabilize the ASIC, so if you see the ASIC not starting up, or stops hashing frequently its probably because you set the memory voltage too low (some ASICs might even need to go to .9v or higher memory voltage to operate reliably, just comes down to ASIC lottery).


I think that covers the basics and hope you guys have fun with these...check out the FAQ section below for common questions/issues.

Project Apollo: A Pod Miner Designed for the Home https://bitcointalk.org/index.php?topic=4974036
FutureBit Moonlander 2 USB Scrypt Stick Miner: https://bitcointalk.org/index.php?topic=2125643.0
Even if you use Bitcoin through Tor, the way transactions are handled by the network makes anonymity difficult to achieve. Do not expect your transactions to be anonymous unless you really know what you're doing.
Advertised sites are not endorsed by the Bitcoin Forum. They may be unsafe, untrustworthy, or illegal in your jurisdiction.
1714128216
Hero Member
*
Offline Offline

Posts: 1714128216

View Profile Personal Message (Offline)

Ignore
1714128216
Reply with quote  #2

1714128216
Report to moderator
1714128216
Hero Member
*
Offline Offline

Posts: 1714128216

View Profile Personal Message (Offline)

Ignore
1714128216
Reply with quote  #2

1714128216
Report to moderator
1714128216
Hero Member
*
Offline Offline

Posts: 1714128216

View Profile Personal Message (Offline)

Ignore
1714128216
Reply with quote  #2

1714128216
Report to moderator
jstefanop (OP)
Legendary
*
Offline Offline

Activity: 2090
Merit: 1396


View Profile
November 18, 2017, 12:34:29 AM
Last edit: November 30, 2017, 09:44:17 PM by jstefanop
 #2

If you received your Moonlander 2 in Kit form (i.e. unassembled), please follow the below instructions to ensure proper operation of your USB miner!

For each Moonlander you ordered you should have received the following parts (see pic below):

1 USB Stick
1 Main Heatsink
1 Small Top Heatsink
1 DC 5v Fan
2 M2.5 screws


STEP 1A

First step in assembly is optional, but this will decrease your ASIC temps by about 2-5 degrees C on average. The back side of the PCB has a large array of via holes underneath the ASIC, these are thermal vias and help transfer heat away from the ASIC into the main heatsink. The holes are hollow, so it helps to fill them up with thermal material (like heatsink paste/compound).

The goal here is to scrap some thermal material back and forth until your force the material down into the via holes and fill them up. DO NOT leave a layer of thermal material like you would with a CPU, since the heatsink has its own thermal interface tape, and performance will be reduce if you leave excesses thermal material on the board. You just want to fill in as much of the via holes as possible and scrap off the rest.


STEP 1

Attach the main heatsink to the backside of the PCB. To help with heatsink adhesion, it helps to rub the backside of the heatsink before you attached it to make sure the thermal tap is adhered well to the heatsink (WITH the blue protective film on). Remove the blue protective film on the heatsink, and carefully line up the heatsink with the PCB. You want the sides to be flush with he sides of the PCB, and want to position the heatsink so its directly beneath the ASIC. Its ok if some of the heatsink is touching the black solder mask.

After attached you need to put about 15 pounds of pressure for 15 seconds to make sure the thermal material has bonded well with the PCB surface. To do this, put pressure on top of the ASIC itself with your thumb or blunt object like the back of a pen.

Do not put pressure on any other part of the PCB or touch any other PCB components. You could bend the PCB and damage it


STEP 2

Attach the fan onto the heatsink using the two supplied M2.5 screws. Make sure the fan label is facing DOWN as your attaching it. DO NOT over-tighten the screws, simply screwing them on until they stop is enough. If you over-tighten them the fan might bind and not spin and/or vibrate louder. If you have rubber washers it helps to use them between the screw and the fan for noise/vibration dampening.

Attach the fan cable into the JST port on the PCB, make sure you have inserted in the right direction, otherwise the fan wont start. Route the cable so its away from the fan inlet, and can't get caught in the spinning fan.


STEP 3

Remove the protective film on the top heatsink, and attach it on top of the ASIC. The heatsink is about the same size as the ASIC, so make sure you center it on the ASIC, none of the ASIC should be exposed. This heatsink does not require much pressure to attached, simply push it on for a few seconds should be enough.

Make sure heatsink is not in contact with any of the capacitors surrounding the ASIC, this could short the board and damage your stick.


Thats it! Enjoy your new miner you just assembled. Before starting it up double check the fan spins as soon as you plug it in/provide power. The fan is designed to work 100% of the time, so do NOT start mining without the fan spinning.

Project Apollo: A Pod Miner Designed for the Home https://bitcointalk.org/index.php?topic=4974036
FutureBit Moonlander 2 USB Scrypt Stick Miner: https://bitcointalk.org/index.php?topic=2125643.0
jstefanop (OP)
Legendary
*
Offline Offline

Activity: 2090
Merit: 1396


View Profile
November 18, 2017, 12:34:39 AM
Last edit: June 07, 2018, 05:35:06 PM by jstefanop
 #3

FAQ

Q: My moonlander does not start up, or stops hashing after a while
While its normal for the ASIC to stop working randomly after extended periods of time, you should have no issues running them for days. If you see that you have to restart them ever few hours or sooner, or it does not start hashing at all on startup its most likely because of two main reasons:
1) Your hub/USB port is not providing enough power for the given frequency/voltage. Try lowering your frequency and core voltage so less power is drawn, or use a port/hub that can provide at least 2A of continues current.
2) You have set your memory voltage too low. While lowering memory voltage can reduce power draw, it also can increase instability in the device which will cause it to need to be restarted often. Trying increasing memory voltage to .9v for best reliability.

Q:Why does my X hub not work with my Moonlanders?
Most USB 2.0 and a lot of 3.0 powered USB hubs will NOT work with these sticks. Powered USB hubs need to meet two requirements to reliably support the high current these sticks draw. First they need to have a clean high quality power supply that can output at least 1A PER port. To run the sticks at full speed you need at least 2A per port. Second they need to comply with USB standards which ALOT of cheap HUBs don't...which causes a lot of EMI issues and disconnects. Unfortunately its trial and error to figure this out. From my testing the Superbpag 7 port hubs seems to be the best for this type of application and provides lots of power per port and works under all three OSes. Eyeboot also makes great hubs for these.

Q: Bfgminer detects my moonlander but nothing happens when it connects to my pool
Don't forget that even though this is a very powerful scrypt miner for its size, its still "slow" when compared to other ASICS which most pools are optimized for these days. Some pools have a scrypt difficulty default of 4k or higher, in which case it could take up to an hour for your moonlander to find and submit a share. Even if you don't see a share submission, you'll know your stick is hashing correctly right away because the ASIC diff on device is set really low, so you should be able to see ~ 2 red LED flashes a second. If you want a faster pool submission rate (again slow shares DOES NOT effect profitability, since each share is just worth more), set your diff to 1k or lower, contact your pool operator for what diffs they have set for each port.

Q: When I connect to my pool bfgminer disables it with the following error: Pool 0 misbehaving (coinbase check), disabling!
Bfgminer by default operates with strict coinbase checks, which most mutlipools don't adhere too, to disable this check simply add #skipcbcheck at the end of the pool URL like so:
stratum+tcp://prohashing.com:3333/#skipcbcheck

Q: Im using windows and nothing happens when i click the start_moonlander.bat file
Your anti-virus software most likely deleted bfgminer.exe when you extracted it. Make sure you setup a rule so it does not do this.

Q: What frequencies can I set my moonlander?
The moonlander 2 has a list of hard coded frequencies to ensure maximum performance for a given frequency. Below is a list of valid frequencies you can use currently:
Quote
384, 450, 480, 540, 576, 600, 612, 625, 636, 648, 660, 672, 684, 700, 720, 744, 756, 768, 796, 832, 852, 876, 900, 924, 954
You can change the frequency by editing the Start_Moonlander.bat under windows or .sh file under Mac and editing the number after "--set MLD:clock="

Q: How can I run different sticks to different pools/coins?
If you want to mine one stick to one pool/coin and another stick to a different pool/coin you will have to setup two separate bfgminer instances. You do this by having separate startup scripts (the start_moonlander.bat/.sh file). In each one specific the different pool, then modify the -S all options to point to different sticks. For example if you have to sticks at COM0 and COM1, change "-S all" to "-S \\.\COM0" in one file, and "-S \\.\COM1" in the second. If you have more sticks, just keep adding "-S \\.\COMx" to specify the number to sticks you want the specific bfgminer instance/pool to run. This formate is for windows, for linux it will be /dev/ttyUSBx and Mac OS it will be cu.SLAB_USBtoUARTx.

Q: How can I set frequency to a particular stick in a mutistick setup under bfgminer?
If you want to specify frequencies for each individual miners you can point which frequency gets set to which miner by changing the global --set MLD:clock=144
to --set MLD@/dev/ttyUSB0:clock=600  (note I haven't really tested if you can keep the global option and lets say just set one stick to a different frequency...if you do it this way you might have to specify frequencies for each miner port individually even if some of them are the same, since the global option might override individual frequencies).

So if you have two sticks and want two different frequencies your options might look like this:

Code:
./bfgminer --scrypt -o stratum+tcp://us.litecoinpool.org:3333 -u jstefanop.1 -p 1,d=256 -S MLD:/dev/ttyUSB0 -S MLD:/dev/ttyUSB1 --set MLD@/dev/ttyUSB0:clock=600 --set MLD@/dev/ttyUSB1:clock=648

Q: My Moonlander 2 is not working with Mac OS 10.13
New security features in Mac OS 10.13 prevent the sililabs UART driver from loading. Until they provide a fix, please use the following workaround:

The workaround is to disable the SIP, installed the driver then enable the SIP.
-Shut down the Mac, start with Cmd-R depressed to boot to the Recovery Partition that will display the System Utilities.
-Open the Terminal and issue the command csrutil status and you will see SIP is enabled. To disable the SIP issue the command csrutil disable and then restart the Mac.
-You can then download and install the latest driver from Silicon Labs, you have the new USB to UART driver installed, and should work with the moonlander now
-Shut down and boot to the System Utilities and issue the command csrutil enable and restart.
-The csrutil disable and csrtil enable can only be issued from the Terminal while booted to Recovery Partition. Yes, this is a PITA but it works.

Project Apollo: A Pod Miner Designed for the Home https://bitcointalk.org/index.php?topic=4974036
FutureBit Moonlander 2 USB Scrypt Stick Miner: https://bitcointalk.org/index.php?topic=2125643.0
jstefanop (OP)
Legendary
*
Offline Offline

Activity: 2090
Merit: 1396


View Profile
November 18, 2017, 12:34:49 AM
 #4

RESERVED

Project Apollo: A Pod Miner Designed for the Home https://bitcointalk.org/index.php?topic=4974036
FutureBit Moonlander 2 USB Scrypt Stick Miner: https://bitcointalk.org/index.php?topic=2125643.0
aarons6
Legendary
*
Offline Offline

Activity: 1736
Merit: 1006


View Profile
November 18, 2017, 03:29:40 AM
 #5

can this driver run the v1 moonlanders? if not can i enable both drivers when i compile bfgminer?
Bitfort
Sr. Member
****
Offline Offline

Activity: 952
Merit: 339

invest trade and gamble wisely


View Profile
November 18, 2017, 07:31:39 AM
 #6

Eeeeextraordinary.
I can't wait to get mine ML2.

MY HINTs
◄M► MINING
◄G► GAMBLING
◄E► EXCHANGE

◄E► (KCS) Kucoin-Staking, Auto-Lending, Trading-Bot
◄E► (BNB) Binance-Staking, Savings, 10% RefBack
◄E► (TRX) Poloniex-Staking, Lending, Fee Discount
◄E► (LEO) Bitfinex-Staking, Auto-Lending

◄G► Betfury-Faucet, Dividend Earnings (BFG holders, mine BFG by playing)
◄G► Bitvest -  Faucet, Bankroll Invest
◄G► CryptoGames-Faucet, Lotto
◄G► PrimeDice-Faucet

◄M► Prohashing (Multipool)-Payout in any coin, get 0.50% bonus for 30 days
◄M► MiningRigRentals (Marketplace)-buy hashrate or rent your miners
◄M► Viabtc  (Pool)-payout to Coinex (exchnage) without fees


charlie137
Full Member
***
Offline Offline

Activity: 1204
Merit: 220


(ノಠ益ಠ)ノ


View Profile WWW
November 18, 2017, 01:52:10 PM
 #7

hope will get mines, damn bitmart  Lips sealed
thank you so much for this exciting project!!

/__      ___ (  /    
\\--`-'-|`---\\ |      AXErunners
 |' _/   ` __/ / 
 '._  W    ,--'     
    |_:_._/
mittooss
Member
**
Offline Offline

Activity: 154
Merit: 10

DEm1CKDTViM1y9YmEcBaktNLWVx8rwuQUm


View Profile
November 18, 2017, 02:11:24 PM
 #8

Seems to be a great concept
jstefanop (OP)
Legendary
*
Offline Offline

Activity: 2090
Merit: 1396


View Profile
November 19, 2017, 12:43:38 AM
 #9

can this driver run the v1 moonlanders? if not can i enable both drivers when i compile bfgminer?

No, its specifically just for Moonlander 2. Every other driver has been stripped to avoid issues during launch, and will make support and my debugging life easier. Once people have received and started using their sticks ill merge the driver into the luke-jr's main branch and add MLD 1 support. For now you'll just have to run two instances of bfgminer if you want to run them on the same computer.

Project Apollo: A Pod Miner Designed for the Home https://bitcointalk.org/index.php?topic=4974036
FutureBit Moonlander 2 USB Scrypt Stick Miner: https://bitcointalk.org/index.php?topic=2125643.0
Lafu
Legendary
*
Offline Offline

Activity: 2954
Merit: 3038


View Profile
November 19, 2017, 02:25:43 AM
 #10

Great news thx for update hope they come soon to me  !!!!

Regards  Lafu

JeremyB
Sr. Member
****
Offline Offline

Activity: 812
Merit: 270


View Profile
November 19, 2017, 11:02:54 PM
 #11

Thanks for the instructions!
Looking forward to receiving mine and try them.
markcarline2
Newbie
*
Offline Offline

Activity: 42
Merit: 0


View Profile
November 21, 2017, 07:28:37 PM
Last edit: November 21, 2017, 08:33:51 PM by markcarline2
 #12

I have three questions:

1) The example script - "start_moonlander2.sh" shows the line:

Code:
./bfgminer --scrypt -o stratum+tcp://us.litecoinpool.org:3333 -u jstefanop.1 -p 1,d=128 -S ALL --set MLD:clock=600

and i wonder - what is the
Code:
,d=128
part ? or is that just part of your password ?

2) When I try and execute the script on a Pi3 it says:

Code:
./bfgminer: error while loading shared libraries: libjansson.so.4: cannot open shared object file: No such file or directory

EDIT: I fixed this with running the following:
Code:
sudo apt-get install autoconf autogen libtool uthash-dev libjansson-dev libcurl4-openssl-dev libusb-dev libncurses-dev git-core

3) Is there a way we can compile our own?  The instructions are normally something like:

Code:
sudo apt-get update
sudo apt-get install autoconf autogen libtool uthash-dev libjansson-dev libcurl4-openssl-dev libusb-dev libncurses-dev git-core libevent-dev
git clone https://github.com/jstefanop/bfgminer.git
cd bfgminer
./autogen.sh
./configure CFLAGS="-O3" --enable-scrypt
make

but i think the configure needs options and not 100% sure the prereq are correct - Do you have them?

I'm going to reimage my Pi from the lastest image and try this again so we have some clean notes for the original post Smiley

Thanks in advance!
Astrali
Full Member
***
Offline Offline

Activity: 281
Merit: 130

Crypto Addicted


View Profile WWW
November 21, 2017, 10:23:55 PM
 #13

I have three questions:

1) The example script - "start_moonlander2.sh" shows the line:

Code:
./bfgminer --scrypt -o stratum+tcp://us.litecoinpool.org:3333 -u jstefanop.1 -p 1,d=128 -S ALL --set MLD:clock=600

and i wonder - what is the
Code:
,d=128
part ? or is that just part of your password ?

on question 1)

this is password parameters for the pool.
many pool are using this way to submit settings to the pool.
-p    password coming after
1   <-- dont know, but must be readable on us.litecoinpool.org
,d=128    <-- the ,  is the delimeter (split) of 2 arguments in password and d=128 means he prefers a difficulty of 128. Most pools accept the prefered difficulty if it is within pools acceptable diff range.

A miner normally dont need a secure password for the worker, cause it wouldnt hurt to much if anyone else would generate shares in his names - indeed he would even earn on that Grin

hope i could have help you out Wink

Greetings - Astrali

Join the mining! pool.cryptopowered.club    Smiley   || Need a miner? Rent one! MiningRigRentals
RdStrcklnd
Jr. Member
*
Offline Offline

Activity: 70
Merit: 1


View Profile
November 21, 2017, 10:32:47 PM
 #14

Any chance someone can write up a step-by-step guide for getting these working on a Raspberry Pi 3B? I'm a Linux novice and most of what I see assumes a certain level of know how. I was hoping to set it up wirelessly on Minera, but at this point I'm so confused I'll take what I can get... Thanks in advance!
markcarline2
Newbie
*
Offline Offline

Activity: 42
Merit: 0


View Profile
November 21, 2017, 10:34:10 PM
 #15

I can, but won't be for a few days or the weekend - I might have my moonlander then
Astrali
Full Member
***
Offline Offline

Activity: 281
Merit: 130

Crypto Addicted


View Profile WWW
November 21, 2017, 11:22:30 PM
Last edit: November 22, 2017, 07:57:41 PM by Astrali
Merited by jstefanop (10), Welsh (8), suchmoon (4), Bitfort (1)
 #16

Any chance someone can write up a step-by-step guide for getting these working on a Raspberry Pi 3B? I'm a Linux novice and most of what I see assumes a certain level of know how. I was hoping to set it up wirelessly on Minera, but at this point I'm so confused I'll take what I can get... Thanks in advance!

so you need the a foolproof copy n paste "just get it to work" description?

i'll write a short version for you that is most probably not perfect - but will most probably work.


Login to your raspberry pi with putty. (if this already is a problem - let me know). - you can as well login locally if you got keyboard and screen attached!

install neccesary library files (thanks to jstefanop for providing this info)
Code:
sudo apt install libjansson-dev libcurl4-openssl-dev


Code:
mkdir miner
 this will create a directory in your home directory for bfgminer.
Code:
cd miner
now you are in the new folder with the name "miner"

Code:
wget https://github.com/jstefanop/bfgminer/releases/download/bfgminer-5.4.2-futurebit2/bfgminer_5.4.2-futurebit2_linux_armv6.tar.gz
this will download the precompiled (ready to run) bfgminer from jstefanop.

now lets unpack this tar.gz file - this is a zipped tarball (something like a .zip file in windows - atleast similar)

Code:
tar xzfv bfgminer_5.4.2-futurebit2_linux_armv6.tar.gz
now theres running lots of text of the files being unpacked into a folder.

lets go into the new unpacked folder!
Code:
cd bfgminer_5.4.2-futurebit2_linux_armv6

here is the complete bfgminer including a short startup script from jstefanop.

now you can either edit the existing start script by using editor of your choice - i am using nano.
Code:
nano start_moonlander2.sh
and change the pool, the username (after -u) the password (after -p) and save the file again
Code:
CTRL + o
or
Code:
STRG + o
depending on keyboard layout.

now thats its saved - quit the editor.
Code:
CTRL + X
or
Code:
STRG + x

you are ready to do a test run!
Code:
./start_moonlander2.sh
now bfgminer will start (hopefully).

if you dont want to edit existing config you can as well try this:
Code:
echo ./bfgminer --scrypt -o stratum+tcp://us.litecoinpool.org:3333 -u jstefanop.1 -p 1,d=128 -S ALL --set MLD:clock=600 >startmoonlander.sh
in this line you change the pool - the username - the password option.
this will create a new file called "startmoonlander.sh" with your options - which can be modified later.

this file cant be used right now cause it is not executable. lets change that!
Code:
chmod +x startmoonlander.sh

and now you can try your new startup script!
Code:
./startmoonlander.sh

if you encounter any errors - describe them as good as possible or show us a screenshot and i bet - we will find a solution!

Greetings - Astrali


Join the mining! pool.cryptopowered.club    Smiley   || Need a miner? Rent one! MiningRigRentals
RdStrcklnd
Jr. Member
*
Offline Offline

Activity: 70
Merit: 1


View Profile
November 21, 2017, 11:58:06 PM
 #17

Thanks Astrali, that's perfect! I have a screen and keyboard for my Pi, but I was using it with RetroPie so I'll need to start fresh. Are these steps for a fresh Rasperian install?

Thanks again  Grin
jstefanop (OP)
Legendary
*
Offline Offline

Activity: 2090
Merit: 1396


View Profile
November 22, 2017, 02:00:29 AM
 #18

thanks for that writeup Astrali, when I think I got the "basic" instructions down but keep forgetting there are some people that never used linux before  Grin

and yes like I mentioned in the download links you'll need to install the required dependancies on a fresh system to run the compiled linux binaries. You only need

Code:
sudo apt install libjansson-dev libcurl4-openssl-dev

If you have never used linux before Id start off with just getting these to run on either windows or mac, since its just a download and double click the startup script to get running on those systems. Then you can start playing around in linux.

Project Apollo: A Pod Miner Designed for the Home https://bitcointalk.org/index.php?topic=4974036
FutureBit Moonlander 2 USB Scrypt Stick Miner: https://bitcointalk.org/index.php?topic=2125643.0
markcarline2
Newbie
*
Offline Offline

Activity: 42
Merit: 0


View Profile
November 22, 2017, 07:35:58 AM
 #19

Great work jstefanop et al.

I wondered if we could have the steps that you did to compile on the pi?
buzzkillb
Sr. Member
****
Offline Offline

Activity: 1021
Merit: 324


View Profile
November 22, 2017, 10:06:03 AM
 #20

Anyone in the US, any hints on what hubs can be found for under $100 to work with a few of these?  Cool
Pages: [1] 2 3 4 5 6 7 8 9 10 11 12 13 14 15 16 17 18 19 20 21 22 23 24 25 26 27 28 29 30 31 32 33 34 35 36 37 38 39 40 41 42 43 44 45 46 47 48 49 50 51 ... 108 »
  Print  
 
Jump to:  

Powered by MySQL Powered by PHP Powered by SMF 1.1.19 | SMF © 2006-2009, Simple Machines Valid XHTML 1.0! Valid CSS!