|
I'd love to get some fan part numbers, but there are several cooling mods possible already.
|
|
|
|
Hey guys, I have a quick question regarding the boards in the S2. I have one card that needs to be removed to RMA back to Bitmain, and was hoping someone here has done the math on which card slot the chain #1 card coincides with. Is chain 1 closest to the PSU in the unit, or is it furthest from the PSU?
Cheers.
I believe its the one furthest away as that's always the hottest card. |
|
|
|
Set your Ants to DCHP, it'll make your life much easier. And why are you running them through a stratum proxy - that would explain a lot. mehh, i cant find on the internet more cables to plug a second S1 on the same PSU (seasonic X-750 gold) as I'm already using both provided PCI-e 6pins//8pins for the first S1  any idea on how to do it? or should i just go buy another PSU? Just buy another one, it'll save you a headache later. Get a CX 750. |
|
|
|
does all PSUs need to be paperclip empowered? edit: and i dont get, i have a seasonic 750 80plus gold: why this PSU is so low rated in your analysis Its all a relative scale, so 60 doesn't necessarily mean its a bad power supply, but that there are potentially other better buys out there. |
|
|
|
No, either or. You don't have to run the backpane at all, its probably easier just to wire the blades directly.
It works with power in booth ends. How is it harmful? It might be worth it compared to building something else to make them stand... Unfortunately I only got the green 4-pin adapters for 2 of the blades or I would run then without power in the backplane yes. Ok nevermind again, I think the problem is drawing two much power on 2 PCI-e outlets in the PSU. (They have 2 connectors each) I used a third PCI-e module and now it can power everything with backplane only. Thank you for the guide and the help. Now all that remains is to get the PSU to run without a MB. But in worst case I will just go find a old MB in the garbage room and jumper the power on it I guess ... PS. I did contact the manufacturer of the PSU. They refuse to give support on "inappropriate use" of the PSU of course but they did hint something about not starting if there isn't a "realistic" load on the PSU. I think this PSU is just to expensive to be fooled by only having a load on the 12V slots? They're "4 pin, 5.08mm pitch" screw terminals if you want to buy more - literally cost pennies. Yes its possible and happens on Cubes. The bigger PSUs have more overload protection technology that often triggers with bitcoin miners, which immediately go POW FULL LOAD when you power them on. |
|
|
|
Can I help at all? Take it off your hands? (where r u? Postage might be an issue but let me know?)
Who? |
|
|
|
My be quiet! Dark Power Pro P10 630W will not start with the paper clip installed and a couple of fans installed. Or with paper clip fans and a blade.
Any ideas? I am sure it is connected green to black on the 20+4 pin.
I connected it to an ancient MB and it worked. But not with the paperclip only.
EDIT: Ok for the moment I solved it by just putting 10 year old computer with everything disconnected from the MB and the 20+4 pin from the PSU into there.
I have 4 PCI-e connectior into the backboars which didn't work running 6 blades but it did work with 5. I did put to of the supplied molex 4-pin adapters into 2 of the blades and on there own harddrive 4-pin from the PSU. This seems to be working now. Is it ok to have the power connected on top of the blade while they are also in the powered backplane?
No, either or. You don't have to run the backpane at all, its probably easier just to wire the blades directly. |
|
|
|
I am running two ants on a Corsair CS750 PSU, these are both overclocked to 200GHS and absolutely stable. Push pull fan also inplace and powered off additional fan header on the S1
My two cubes are on an el cheapo Aywun A1 850W PSU
You'll be running that 750 over spec, expect to RMA it well within its warranty. |
|
|
|
|
Screw diameter doesn't really matter as all the holes are passthrough for a long, generic threaded bolt with a nut on the end.
|
|
|
|
I want to make my own clone whatvis the steps and what is best PCB fab .
Thank you
It's nearly impossible to beat Chinese factory, give up please.  This. If you don't have your own chips, you'll never compete on price. Find a way to add value or novelty. |
|
|
|
your website is not accepting my addres in EU Bulgaria.
I did a lot of orders with avalon in tha past
We are sorry, will check this issue ASAP. PS: System will reject addresses with wrong ZIP codes, would you please kindly check if the ZIP codes is right. I would have thought Marto knows his own zip. |
|
|
|
|
Updated OP with some additional info.
|
|
|
|
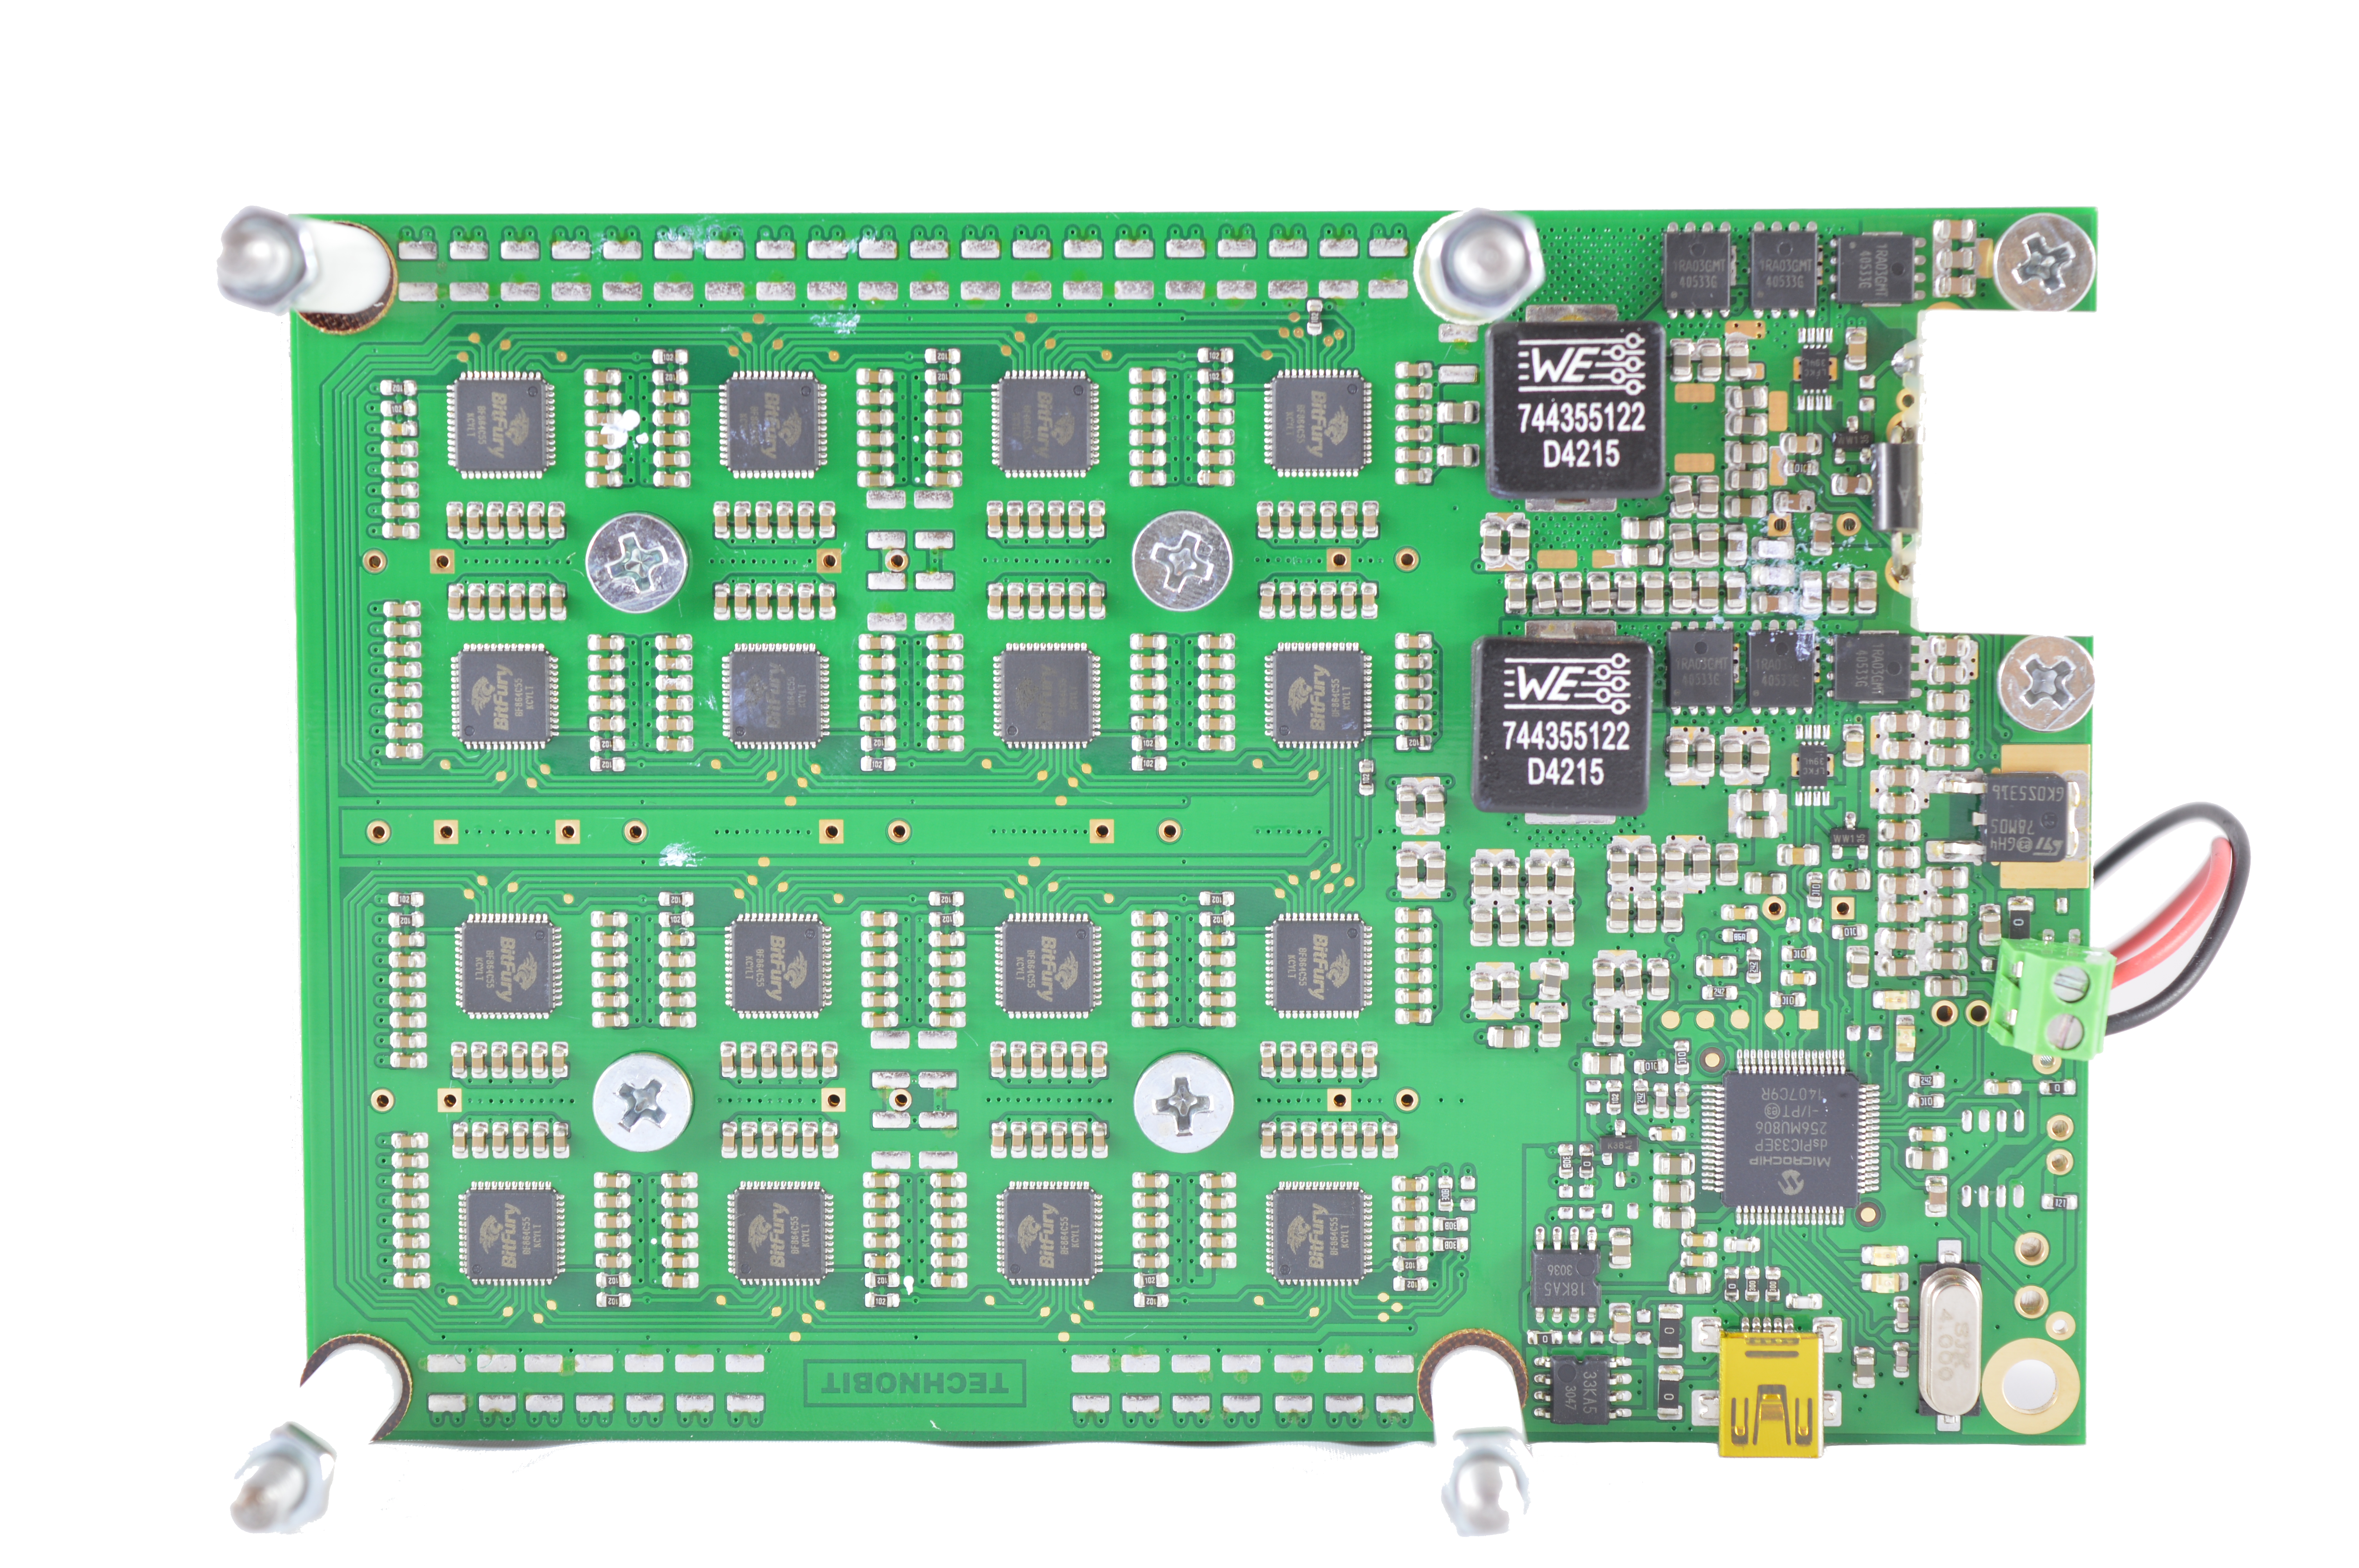
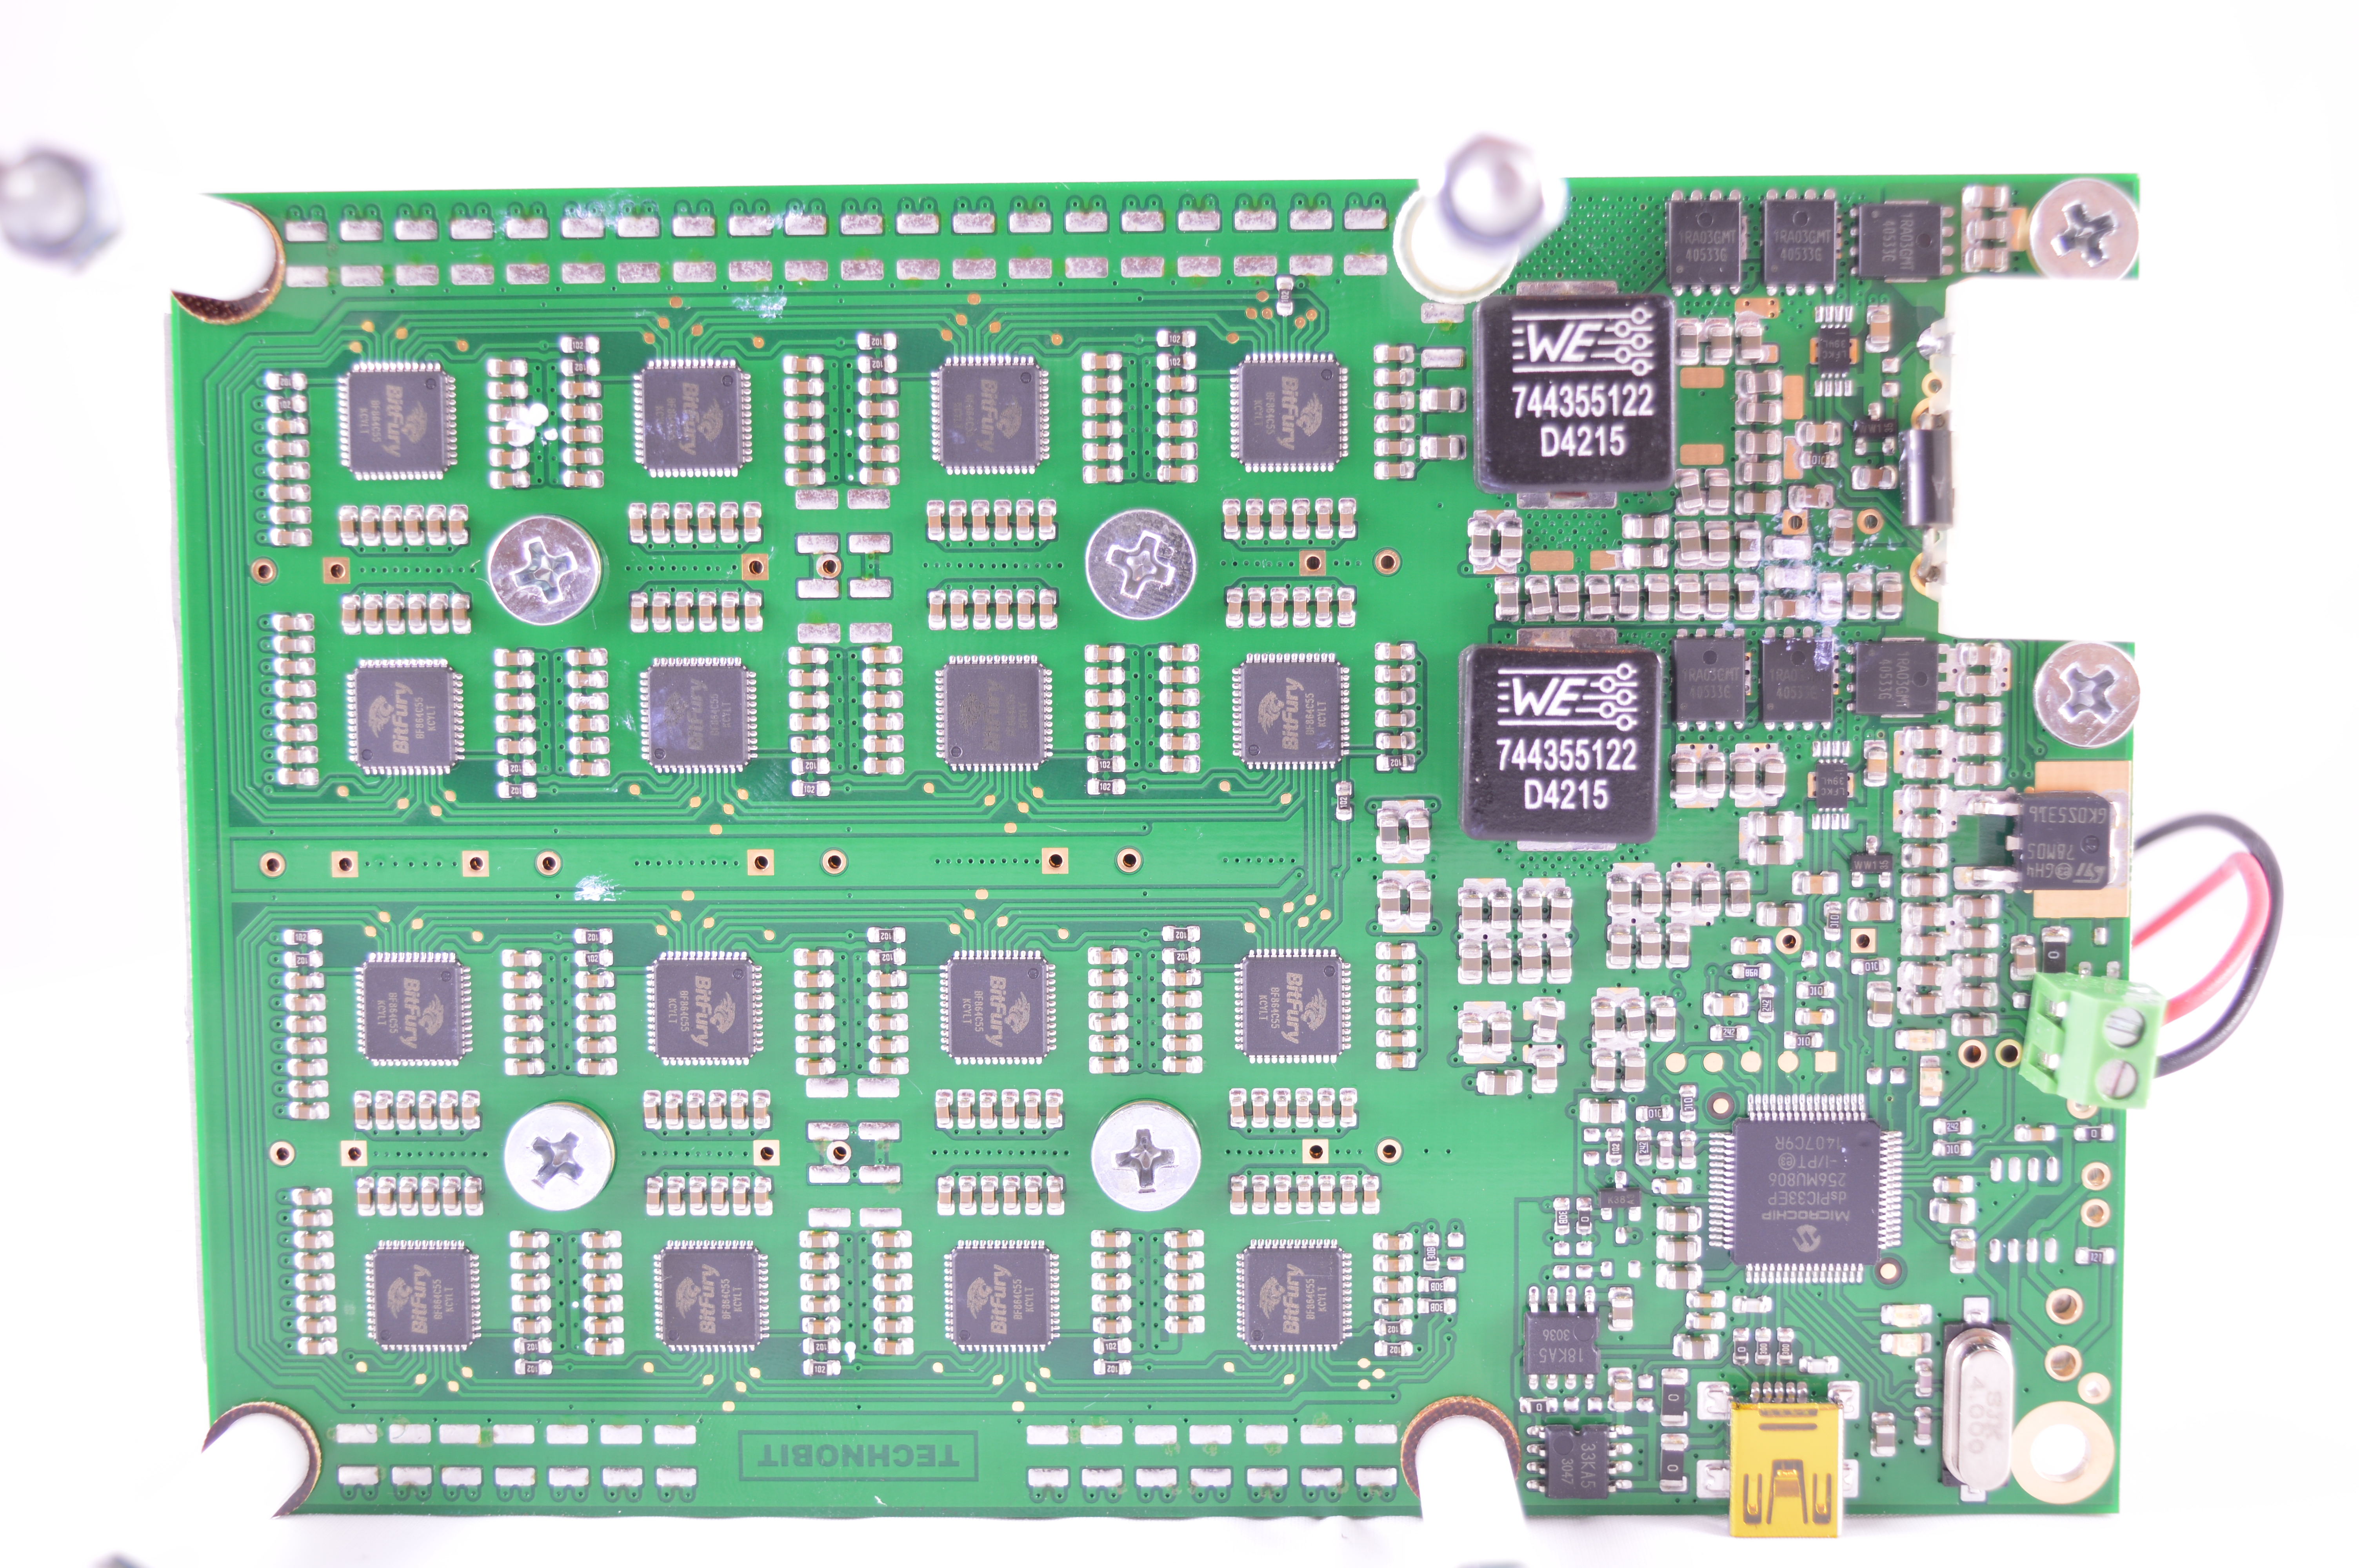
Dogie's Miner Setup Guides:Nicely formatted version available at dogiecoin.com!  Contents Contents: 0a) What to Expect0b) What You Need1) Powering2) Cooling3) Case4a) Configuration (TL-MR3020)4b) Configuration (Windows PC)4c) Configuration (RaspberryPi)5) Troubleshooting6) Where to buy0a) What to Expect (top)The Technobit HEX16B is a blade style ASIC mining board utilising 16 Bitfury Gen 2 chips. An external controller is required - this can be a TL-MR3020 router with custom WRT firmware, a Raspberry Pi with Raspian or a windows based PC. Per mining board: | Chips | 16x Bitfury Gen 2s | | Hashrate | ~60GH | | Power.Consumption | 85W |
   0b) What You Need (top) 0b) What You Need (top)You will need one of the following sets: Using a TP-LINK as controller (recommended): OR using a PC as controller: OR using a Raspberry Pi as controller: AND - A power supply (see next section)
1) Powering (top)As with all blade style miners, the HEX16B does not come with a power supply. You will need a typical computer PSU with: - 1x molex per mining card
- At least 10A on the/each 12V rail per mining card
I would recommend the following PSUs: For 5 miners:
(Click.your.flag) |        | For 8 miners:
(Click.your.flag) | |
We need to tell the PSU to always be on, as there isn't a motherboard to do this. - Cut a paper clip into a U and insert it into the green wire and to either black wire either side of the green wire. Tape it up for safety.
- Plug 2x PCIE 6 pin into each blade. I would recommend running each PCI-E connector from a different cable rail when overclocking.
- Plug the PSU into the mains.
- The power supply will now be controlled by its switch on the rear socket.
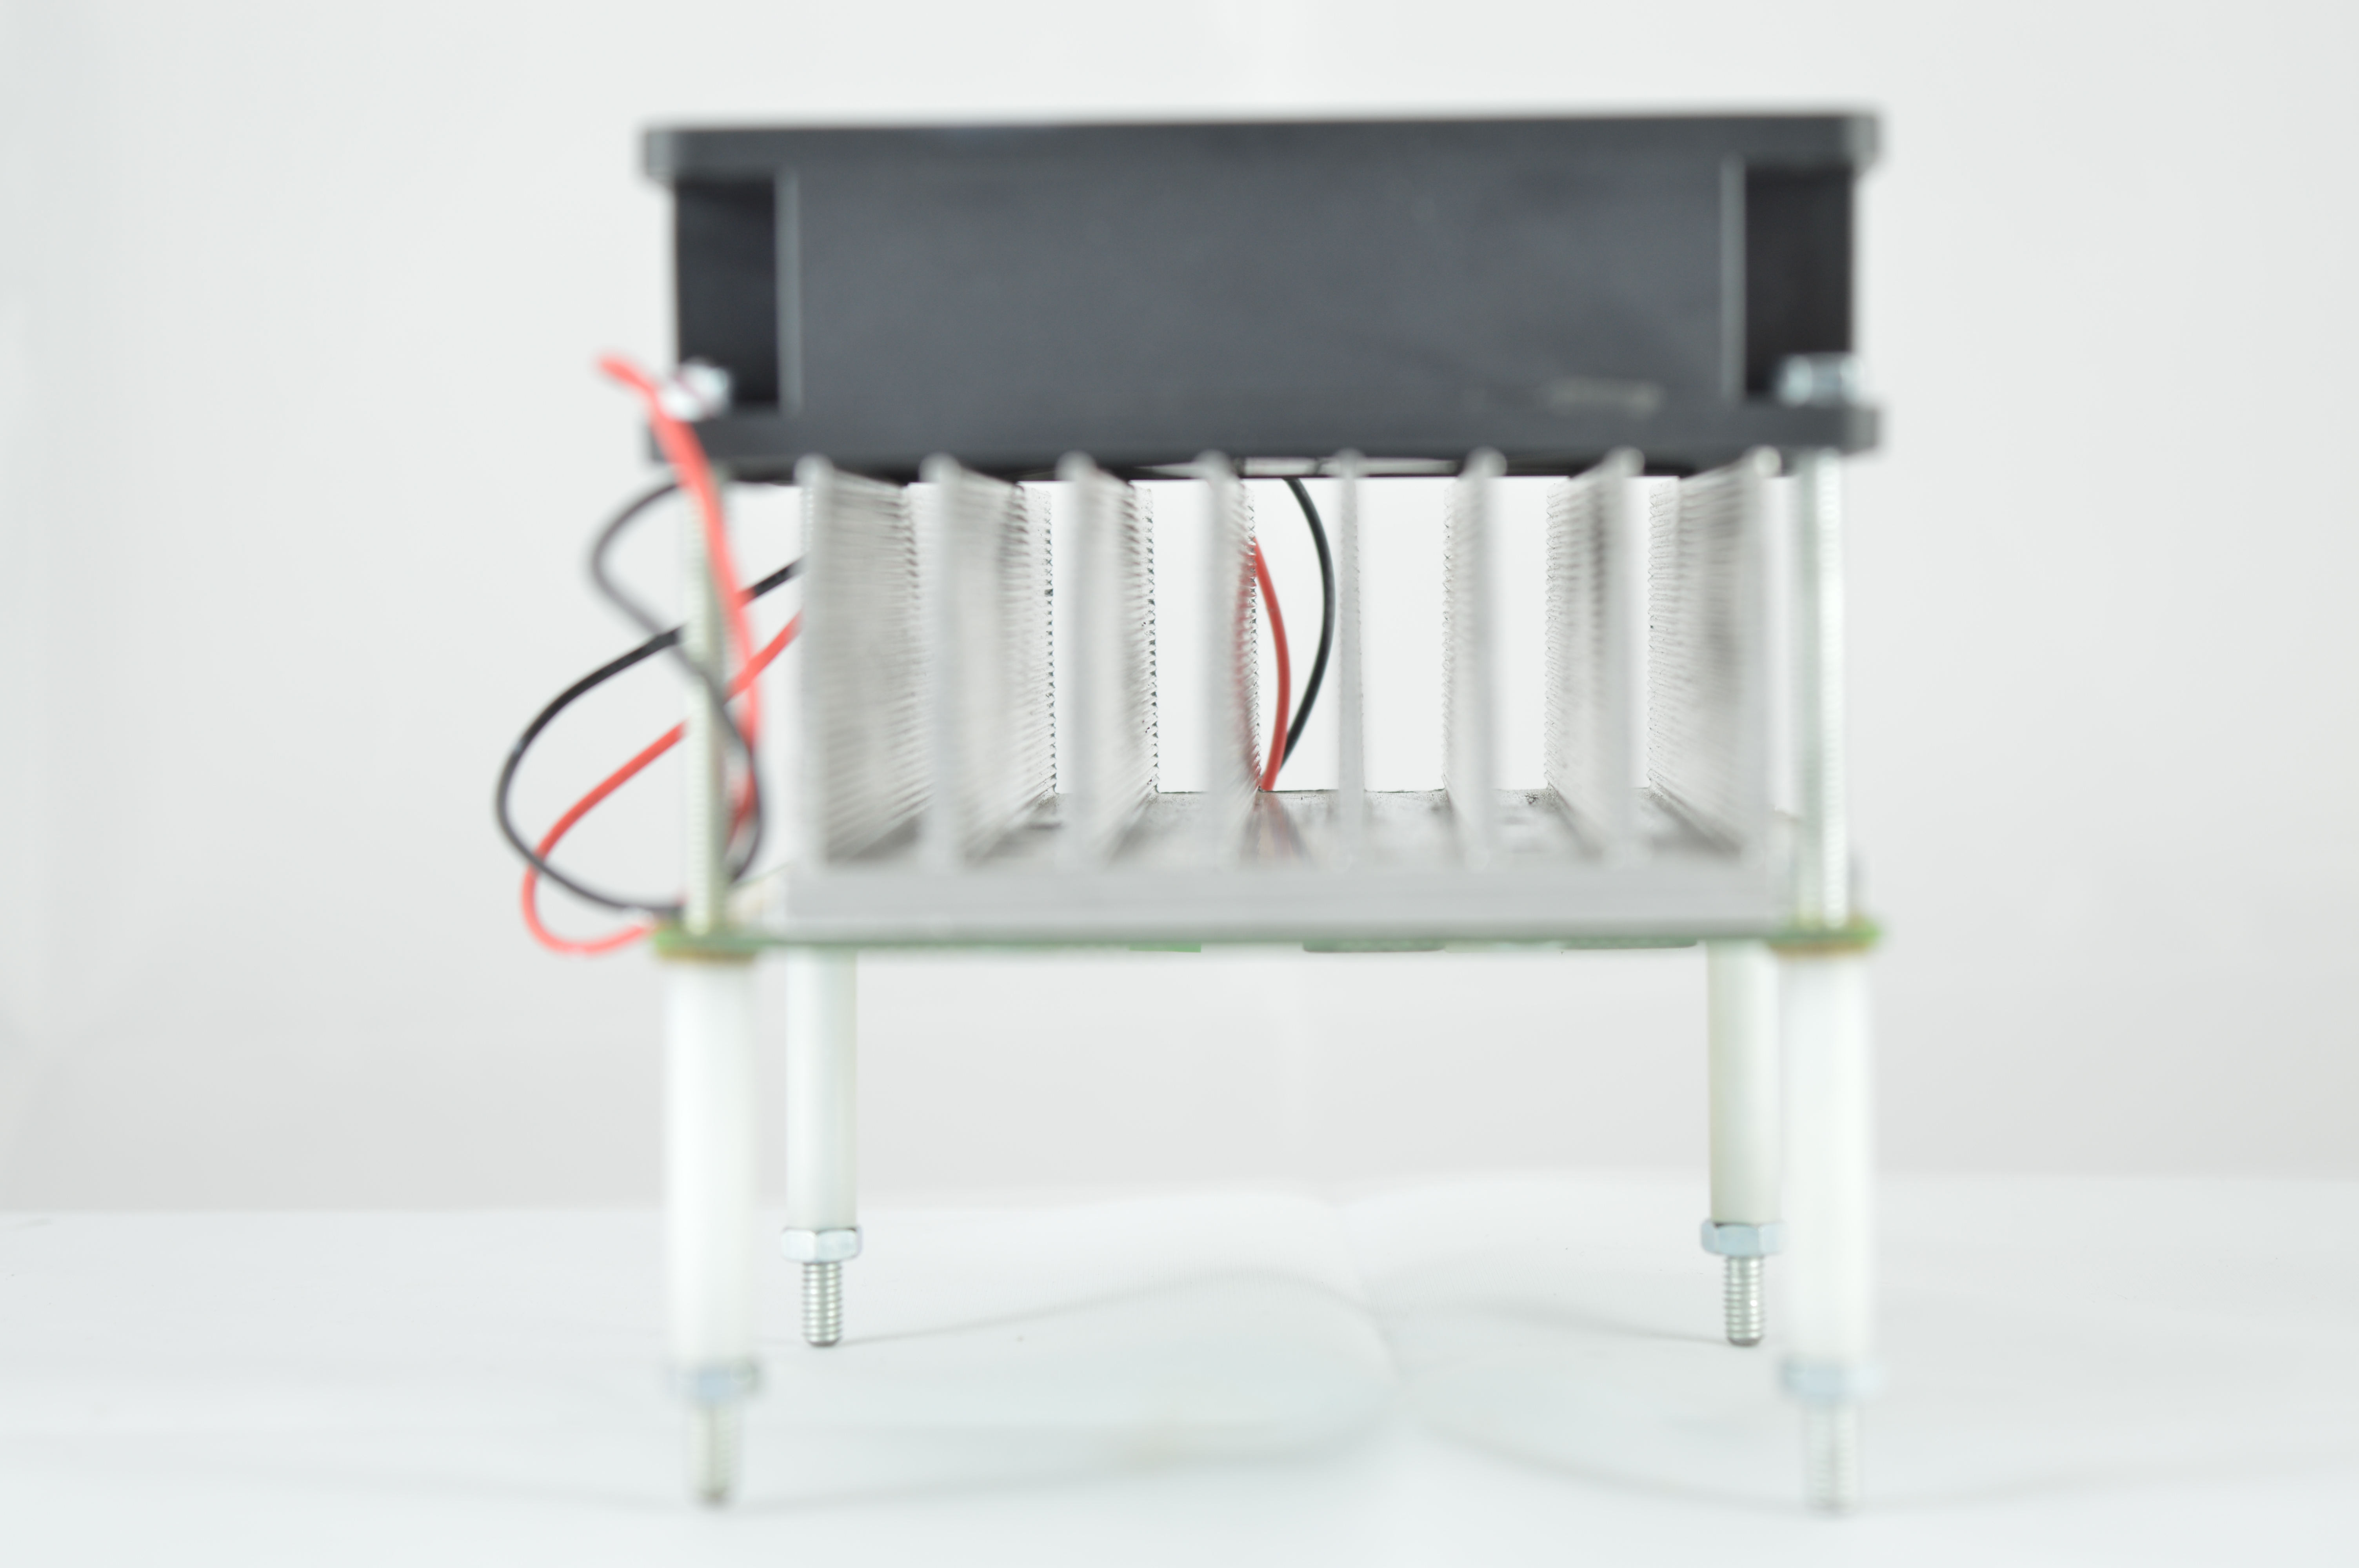
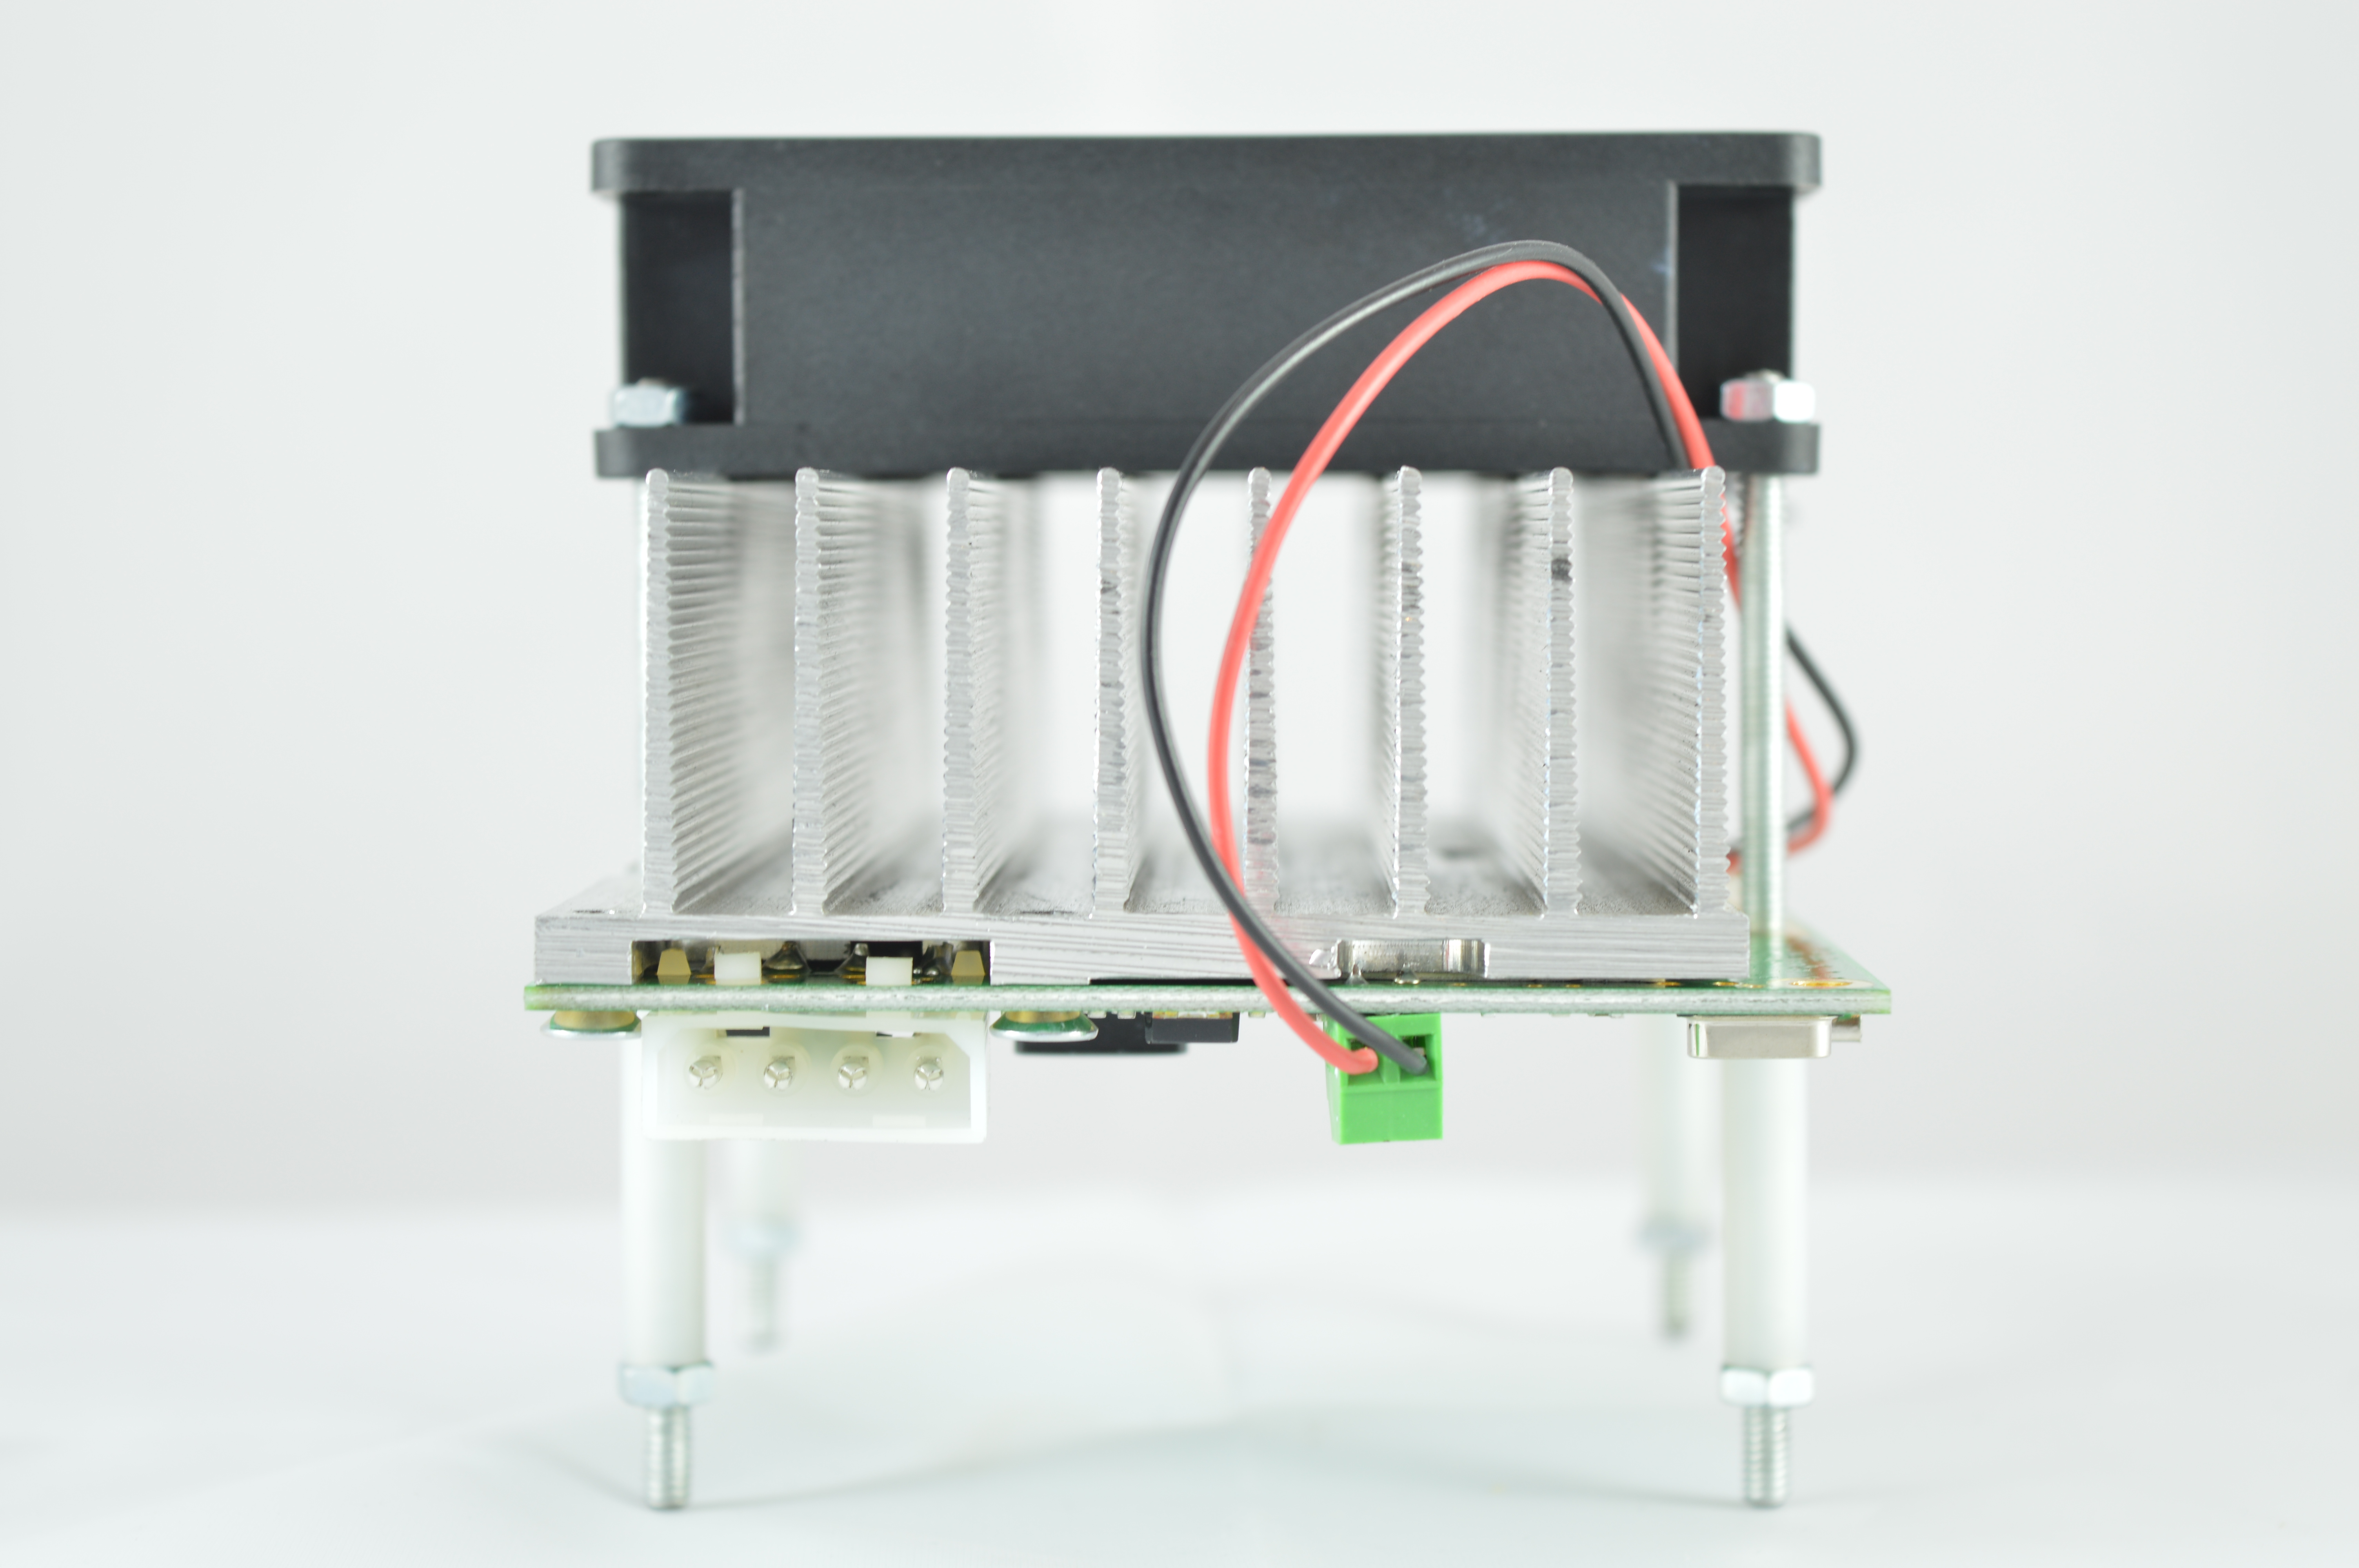
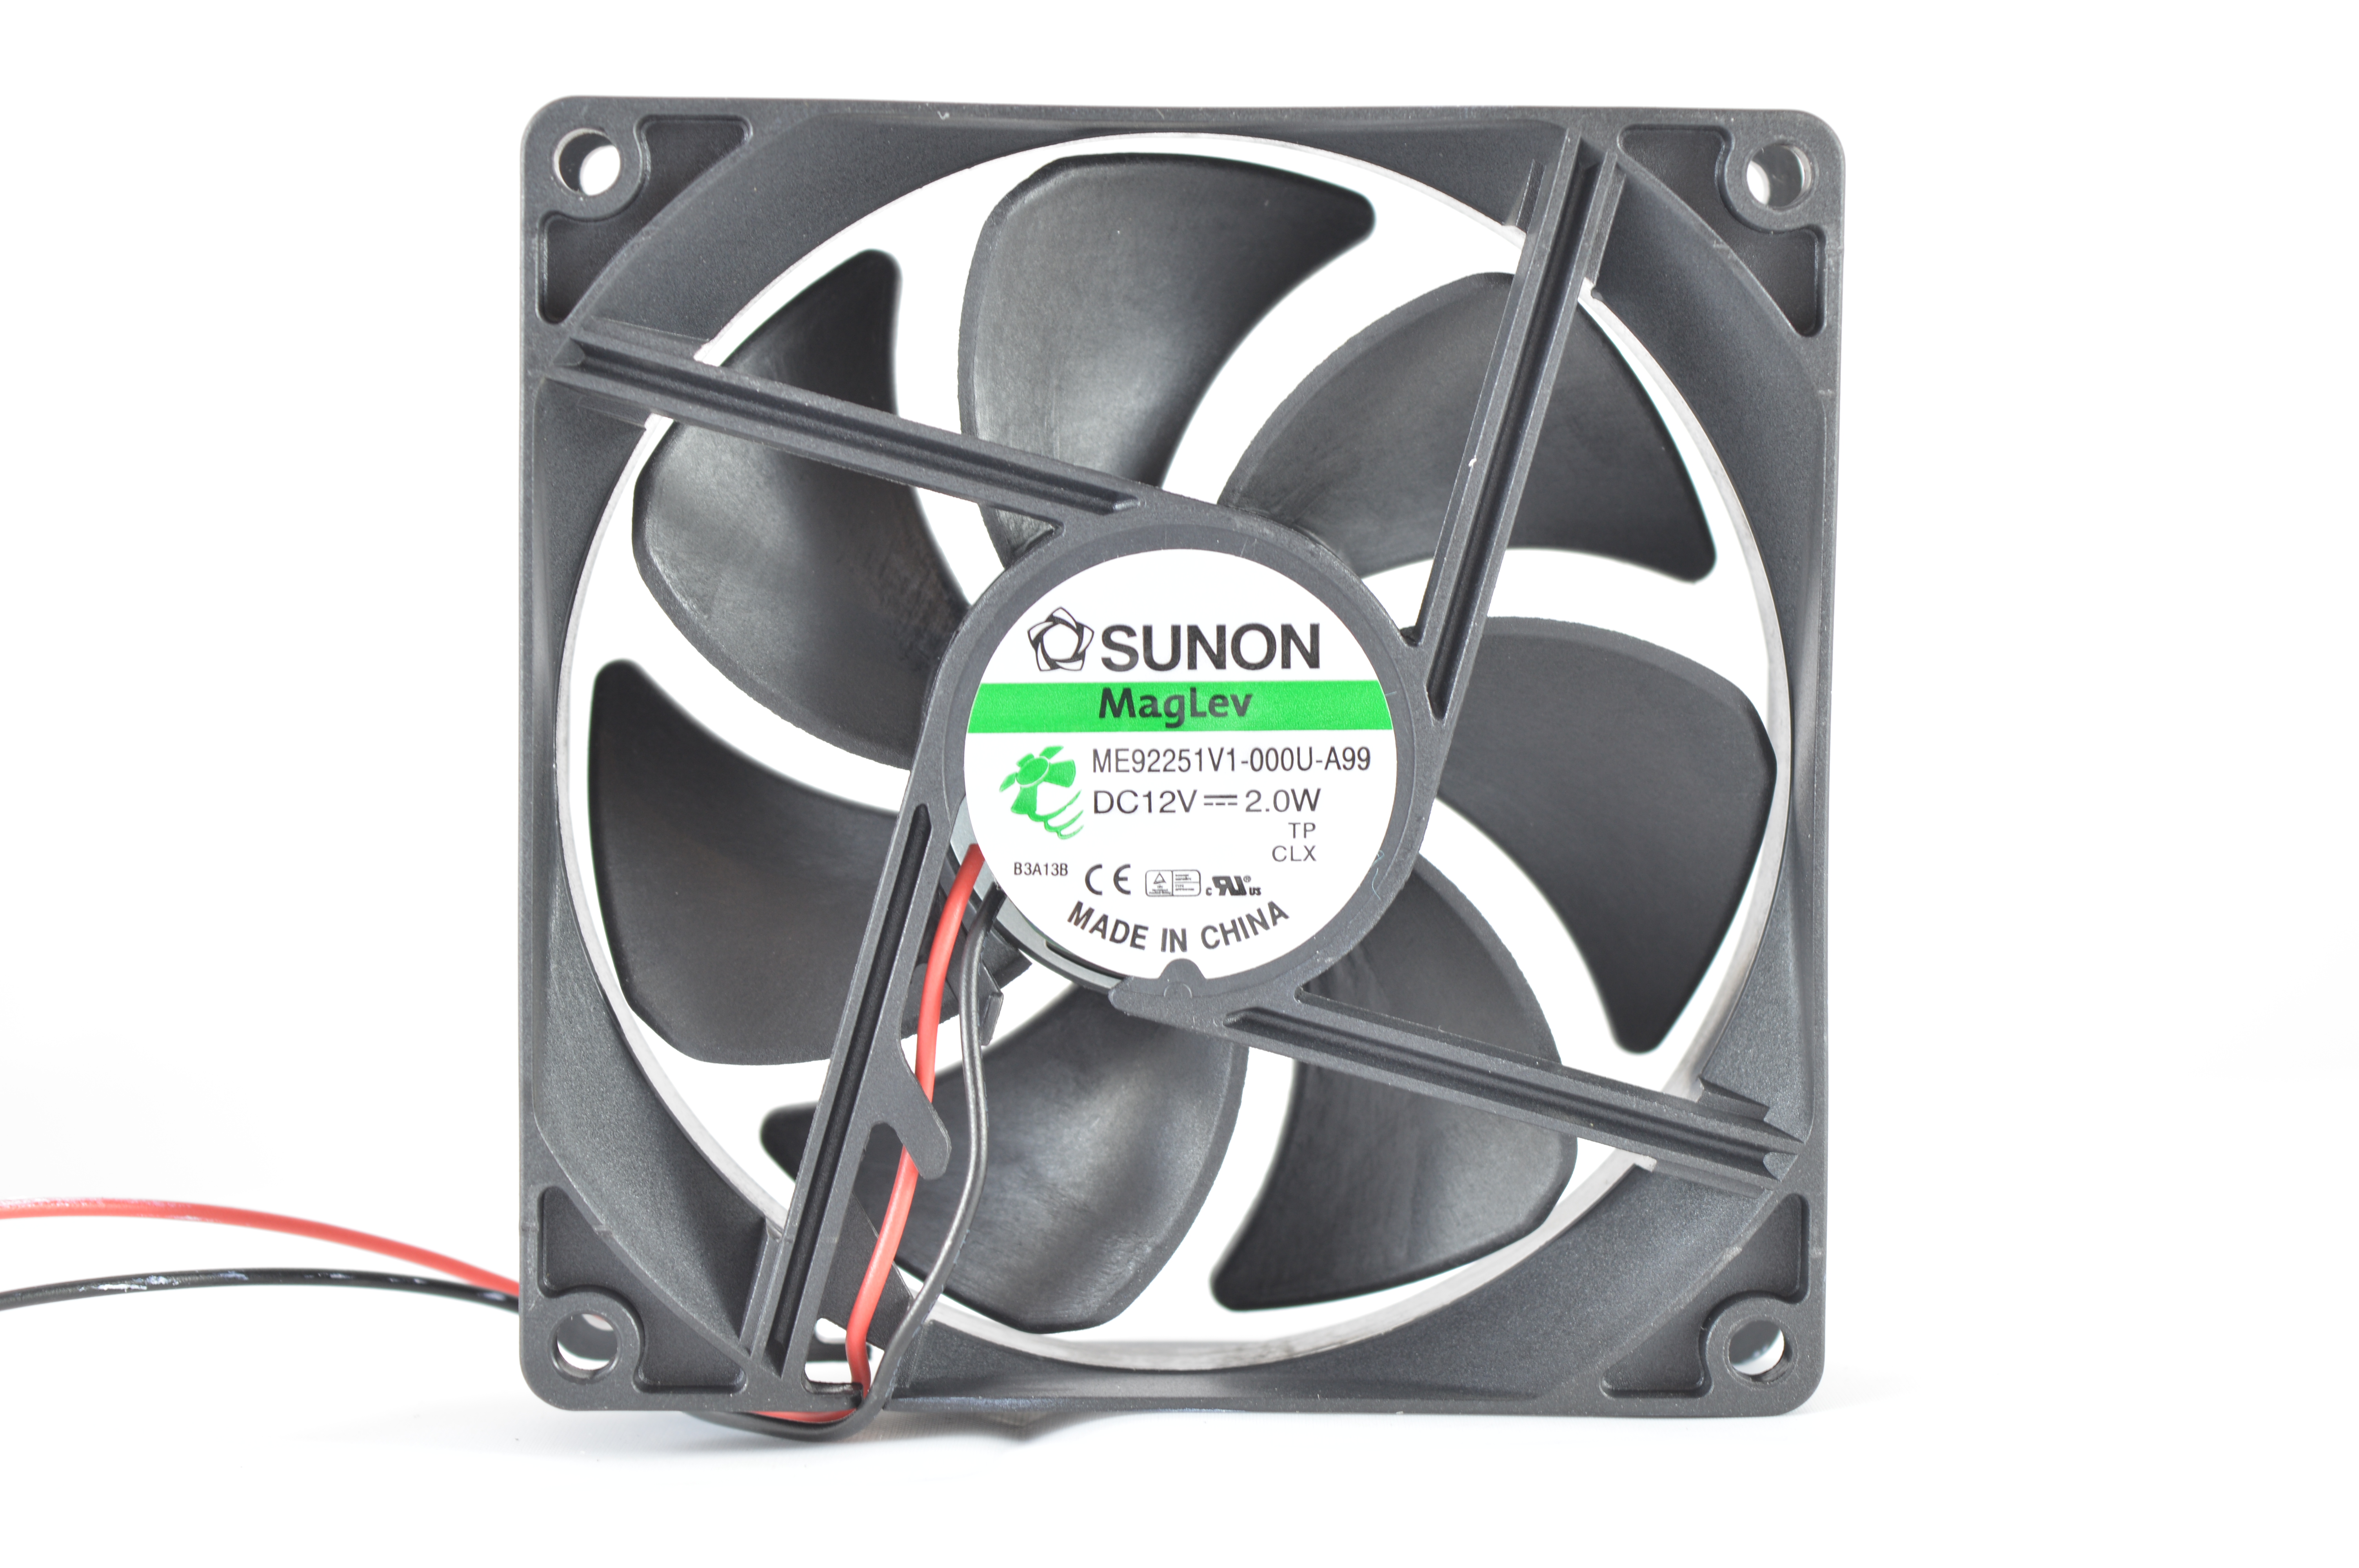
  2) Cooling (top) 2) Cooling (top)Mining boards come with one bottom side, oversize aluminium heatsink with a Sunon Maglev ME92251V1-000U-A99 92mm fan. Noise levels are very reasonable at 32 dBA while pushing 51.5 CFM.   3) Case (top) 3) Case (top)Technobit HEX16Bs are fully stackable and come with long standoffs. Dimensions of the blade mining card are 235 x 90 x 100 mm. 4a) Configuration (TL-MR3020) (top)An external controller is required which can be a TP-LINK TL-MR3020 router, a Raspberry Pi with Raspian or a Windows based PC. Using a modified TP Link MR3020- Power on as above.
- Plug in a USB to mini USB cable from the HEX8A1 to the TL-MR3020.
- Plug in a network cable from the TL-MR3020 to your router.
- Plug in your TL-MR3020's power cable - this can either be a USB to mini USB cable or mains to mini USB. ~0.3A @ 5V is required.
- Flash Technobit's custom WRT firmware (or purchase their preflashed TL-MR3020)
- Change your router's subnet to 0, ie 192.168.0.x. This is just temporary. If this is not possible, see below indented steps.
- Plug in a network cable from the TL-MR3020 to your computer.
- Navigate to Control Panel -> Network and Sharing Centre -> Change Adapter Settings
- (If applicable) Right click on your wifi adapter -> Disable.
- Right click on your ethernet adapter -> Properties
- Click on "Internet Protocol Version 4" and click properties
- Select "Use the following IP address" and enter the following:
- IP Address: 192.168.0.1, Subnet Mask: 255.255.255.0, Default Gateway: 192.168.0.99
- Resume normal steps.
- Navigate to 192.168.0.99/ from a browser window.
- Login with default username "root" and NO password.
- Navigate to Network -> Interfaces and click edit.
- Change protocol to DHCP client, click Save and Apply.
- (If applicable)At this point you can plug the TL-MR3020 back into your router and reset your computer settings.
- Navigate to your router and look up list of clients. Find the IP the TL-MR3020 has now been assigned and navigate to that with a browser window.
- Login if prompted and navigate to Status -> Cgminer Configuration.
- Enter pool information and miner details as in the format below.
- Click save and apply, then navigate to Status -> Cgminer Status to check mining has started.
Antpool Register!Servers : stratum.antpool.com:3333
User : username.worker or username_worker - auto creates workers!
Password: anypassword
Servers : stratum.btcguild.com:3333
User : username_worker
Password: anypassword
Servers : us1.ghash.io:3333
User : username.worker - auto creates workers!
Password: anypassword
- Plug in a USB to mini USB cable from the HEX8A1 to your Windows based PC/laptop.
- Windows will try and install its own drivers. Wait until it finishes.
- Download the Zadig tool and run it.
- Choose the HEX8A1 and "WinUSB". Click install driver.
- Once installed, you may have to restart.
- Download this specific version of cgminer and extract it.
- Edit cgminer.conf using notepad, with your pool and miner information in it, an example as below.
- Run cgminer.exe to start mining.
{
"pools" : [
{
"url" : "stratum.btcguild.com:3333",
"user" : "dogie_HEX8A1",
"pass" : "123"
},
{
"url" : "eu-stratum.btcguild.com:3333",
"user" : "dogie_HEX8A1",
"pass" : "123"
}
]
,
"expiry" : "120",
"hotplug" : "5",
"log" : "5",
"no-pool-disable" : true,
"queue" : "1",
"scan-time" : "60",
"set_default_to_c" : false,
"set_default_to_b" : false,
"set_default_to_8" : false,
"hexminera-voltage" : "1340",
"hexminera-options" : "16:450",
"hexminerb-voltage" : "900",
"hexminerb-options" : "16:540",
"hexminerc-voltage" : "1020",
"hexminerc-options" : "16:1300",
"hexminer8-set-diff-to-one" : "0",
"hexminer8-chip-mask" : "255",
"hexminer8-voltage" : "1000",
"hexminer8-options" : "8:260",
"kernel-path" : "/usr/local/bin"
}
Servers : stratum.antpool.com:3333
User    : username.worker or username_worker - auto creates workers!
Password: anypassword
Servers : stratum.btcguild.com:3333
User    : username_worker
Password: anypassword
Servers : us1.ghash.io:3333
User    : username.worker  - auto creates workers!
Password: anypassword
You will need the following: - Power on as above.
- Put SD card into another computer.
- Download Raspbian OS
- Download Win32 Disk Imager and use it to flash SD card with Raspbian.
- Put the SD card into the Raspbery Pi.
- Plug in the following:
- An ethernet cable from the Raspberry Pi to your router.
- A HDMI to DVI / HDMI to HDMI cable from the Raspberry Pi to your monitor.
- An external USB hub to Raspberry Pi.
- A USB mouse and keyboard into the USB hub.
- A micro USB power adapter into Raspberry Pi - this will boot it up.
- Once booted, a first time config will pop up
- Run expand_rootfs
- Run configure_keyboard to put your local layout on (it defaults to UK).
- Run update to get the latest files.
- Boot to desktop.
- Open "LX Terminal". Type the following commands, one line at a time. Press enter after each one.
sudo apt-get update
sudo apt-get install libusb-1.0-0-dev libusb-1.0-0 libcurl4-openssl-dev libncurses5-dev libudev-dev
wget http://ck.kolivas.org/apps/cgminer/4.2/cgminer-4.2.2.tar.bz2
tar xvf cgminer-4.2.2.tar.bz2
mv /home/pi/cgminer-4.2.2/ /home/pi/cgminer/
cd cgminer
wget https://www.dropbox.com/s/1kspms3gw0336du/5ed45a0d7a3bd71ed1b8726e5f1cdac55bf68196.patch
patch -p1 < 5ed45a0d7a3bd71ed1b8726e5f1cdac55bf68196.patch
./configure --enable-hexminera --enable-hexminerb --enable-hexminerc --enable-hexminer8 --hexminer8-set-diff-to-one 0 --hexminer8-chip-mask 255 --hexminer8-voltage 1000 --hexminer8-options 8:260 --hexminera-voltage 1340 --hexminera-options 16:450 --hexminerb-voltage 900 --hexminerb-options 16:1300 hexminerc-voltage 1020 --hexminerc-options 16:1300
sudo make
- Now enter 'sudo shutdown now' to turn the Pi off.
- Plug in a USB to mini USB cable from the HEX8A1 to an externally powered USB hub.
- Plug in the USB hub to the Pi and plug in its power supply.
- Turn on your power supply with its rear switch. Your power supply's fan should turn on gently.
- Turn the Pi back on (unplug and plug in its power cable).
- When back on desktop, reopen "LX Terminal".
- Enter the following code and click enter to start mining.
sudo nohup /home/pi/cgminer/cgminer -c /home/pi/cgminer/cgminer.conf - If cgminer comes up and works fine, let it run for 5 minutes and check your hardware.
- Then reboot again with "sudo restart".
- Once booted up, enter the following command into "LX Terminal".
sudo nano /etc/xdg/lxsession/LXDE/autostart - This line will open up a file editor. Enter the line below to the end of the code in the file.
- Once finished, press Ctrl + x to exit, Y to confirm and enter to save.
@/usr/bin/lxterminal --geometry=90x35 -e sudo ./cgminer/cgminer -c /home/pi/cgminer/cgminer.conf - cgminer will now auto start when the Pi turns on, hurrah!
- Now run the following commands one by one to install the equivalent of Teamviewer.
sudo apt-get install x11vnc
x11vnc -storepasswd
****enter a password****
cd .config
mkdir autostart
cd autostart
nano x11vnc.desktop - Same as last time, enter the below text at the end, then click Ctrl + X, Y and enter.
[Desktop Entry]
Encoding=UTF-8
Type=Application
Name=X11VNC
Comment=
Exec=x11vnc -forever -usepw -display :0 -ultrafilexfer
StartupNotify=false
Terminal=false
Hidden=false - Now enter "nano /boot/config.txt"
- Scroll down until you find the line "#hdmi_force_hotplug=1" and delete the "#".
- Ctrl + X, Y and enter to save.
- You can now connect to your Pi externally by downloading TightVNC on your Windows PC and installing. You only need the viewer.
- Open it and enter the IP of your Pi, followed by two colons and then port 5900, ie "192.168.1.85::5900"
- This will auto start whenever the Pi is on.
- Turn off Pi with 'sudo shutdown now'. Unplug monitor, keyboard and mouse and put the Pi along with your miner where you want it to live long term.
The Pi only requires wired internet and micro usb power. You can connect remotely from now on and don't need a monitor etc.
5) Troubleshooting (top)| Problem | Solution | | My.power.supply's.cables.are.braided.or.aren't.color.coded | - See below diagram for pin-outs.
 |
Legal disclaimer: This information is for general guidance and does not constitute expert advice. We are not responsible if you, your property or a third party is injured or damaged as a result of any interaction with this information, and no warranty is provided. All text and images are covered by copyright. 6) Where to buy (top)   
|
|
|
|
|
Their B2 will be shipping relatively soon, I'll let you know if I receive anything.
|
|
|
|
|
Cycle delayed one week due to imminent product releases.
|
|
|
|
It still looks as if ~ 50% of all shares are lost? am i wrong?
73,000 of 1,300,000 = 5%. Its just on slush's that its bad, its a bad pool. |
|
|
|
hey i just wondered, on bitmain's website under the S1 specifications appears that it can be connected via WiFi. how come? do we need to buy some sort of antenna?
You can probably get away with not running an antennae, but wifi instructions are in the OP. |
|
|
|
|