Dogie's Miner Setup Guides:Nicely formatted version available at dogiecoin.com!
 Contents
:
0a) What to Expect0b) What You Need1) Powering2a) Cooling2b) Cooling mod (optional)3) Case4a) Configuration (TL-WR703N)4b) Configuration (Raspberry Pi)5) Troubleshooting6) Where to buy 0) What to Expect (top)
The Canaan Creative team have continued to focus on keeping their design modular, and as such their mining units can be arranged into larger units.
Each Avalon 2 units can be run at 100GH and consume ~350W or combined in a 2U rack mountable case that includes a PSU. A external controller is
required for both full systems and individual modules. You can use a modified
WR703N router like in gen 1 Avalons or a
Raspberry Pi.
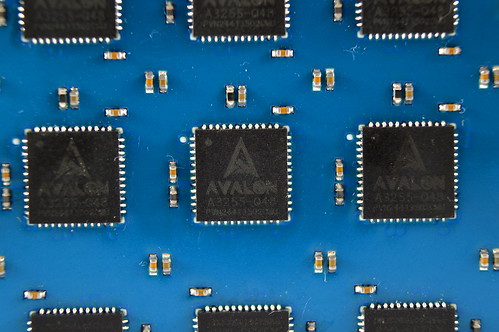
| Chips | 70x 55nm Avalon 2 A3255 |
| Hashrate | ~105GH |
| Rated Voltage | 12V |
| Rated Current | 28A |
| Power.Consumption | ~340W |


 0b) What You Need (top)
You will need a few accessories and a power supply to get started. I recommend buying the controller directly from Avalon as they will preflash it with the
correct firmware.
Click your flag to find everything you need to get started at Amazon! 


 1) Powering (top)
Full units come with two
Delta Electronics DPS-500YB-F PSUs that provide a combined 1KW of continuous power at extremely high efficiency. Only one
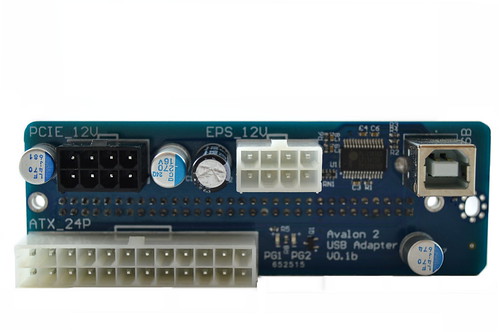
mains power cable is required as the PSUs are internally bridged. Replacement PSUs combined require 2x24pin ATX, 2x4pin ATX, 2x8 pin PCI-E connectors
and can be purchased
here. Individual modules require a typical computer PSU with 1x24 pin ATX, 1x8 pin ATX, 1x8 pin PCI-E connectors.


 2a) Cooling (top)
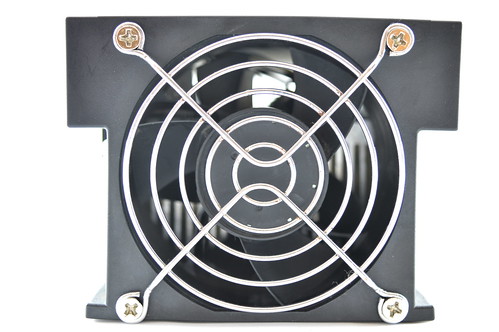
Both the full units and individual modules are cooled using the same fan layout. Each module has its own
80mm Delta GFB0812SHG fan that sucks air
through the sealed heatsink and across the back of the module. These are premium high pressure, expensive fans that utilise two independent rotors.
Cooling is power efficient but noisy and designed with data centres in mind.
At stock, the fan runs at 90% and temperatures reach 53C. Documentation suggests that this sensor temperature should not be allowed to run for long
periods of time above 60C. Dropping the fan to 80% immediately puts us up to 59C. I've tested a mod below to allow individual modules to run silently,
while providing more cooling than the original system. The trades are that it prevents the module fitting in a 2U case, increases the space required and
removes the one directional airflow. At 90%, noise levels are similar to generation 1 Avalons while at around 40-45%, the fan becomes essentially inaudible.


 2b) Cooling mod (optional) (top)
Remove the heatsink shroud by removing two small screws. Place 3x 120mm fans, mid range rpm on a fan controller, blowing into the heatsink. Ambient
remained at 25C and test results are provided below. A fan speed of 45% is recommended as we get maximum cooling with the fan remaining silent. You
will need a
fan controller and 3x120mm PWM controllable fans per module to perform the mod.
| Settings | Temps |
| Stock | 53C |
| @80% | 59C |
| @80%+.mod.... | 47C |
| @70%+ mod | 48C |
| @60%+ mod | 49C |
| @50%+ mod | 50C |
| @40%+ mod | 51C |
| @30%+ mod | 53C |

 3) Case (top)
Avalon2 cases are designed to be 2U rackmountable, or stackable. Individual modules are well protected although the interface PCBs are exposed.


 4a) Configuration (TL-WR703N) (top)
The same configuration steps are required for both the full unit and individual modules.
Wiring:
- Plug in a usb cable from the Avalon2/module to the WR703N.
- Plug in a network cable from the WR703N to your router, and power it on.
Configuration:
- Power on the power supply using its switch at the back.
- Make sure or your router's subnet is 0, ie 192.168.0.x. If not then change it to 0, this is just temporary. ***If this is not possible, see below***
- Using a browser, navigate to 192.168.0.100 - this goes to the WR703N's configuration page.
- Login using "root" as the username.
- Navigate to Network -> Interfaces -> WAN -> Edit.
- Change protocol to DHCP and click "Save & Apply".
- Using a browser, navigate to your router and find the IP it has assigned the WR703N and navigate to that IP.
- Navigate to the page Status -> Miner Configuration. Enter your pool information in the below format.
- Navigate to the page "Miner Status" to check mining has started.
- You can then change your router subnet back to whatever you are used to using.
Alternative Subnet Change:
- Unplug your computer from all internet sources.
- Plug in an ethernet cable from the WR703N to your computer.
- Navigate to Control Panel -> Network and Sharing Centre -> Change Adapter Settings.
- Right click on your ethernet adapter -> Properties.
- Click on "Internet Protocol Version 4" and click properties.
- Select "Use the following IP address" and enter the following:
- IP Address: 192.168.0.1, Subnet Mask: 255.255.255.0, Default Gateway: 192.168.0.100.
- Plug in an ethernet cable from the WR703N to you router.
- Restart the configuration instructions as above.
Antpool Register!Servers : stratum+tcp://stratum.antpool.com:3333
User : username.worker or username_worker - auto creates workers!
Password: anypassword
Servers : stratum+tcp://stratum.btcguild.com:3333
User    : username_worker
Password: anypassword
Servers : stratum+tcp://us1.ghash.io:3333
User    : username.worker  - auto creates workers!
Password: anypassword
 4b) Configuration (RaspberryPi) (top)
The same configuration steps are required for both the full unit and individual modules.
Wiring:
- Plug in a usb cable from the Avalon2/module to the Raspberry Pi.
- Plug in a network cable from the Raspberry Pi to your router, and power it on.
Configuration:
- Put the SD card into another computer.
- Download the RasperryPi Avalon 2 OS
- Download the Win32 Disk Imager and use it to flash SD card with this image.
- Put SD card into RaspPi and power it on.
- Power on the power supply using its switch at the back.
- Make sure or your router's subnet is 0, ie 192.168.0.x. If not then change it to 0, this is just temporary. ***If this is not possible, see below***
- Using a browser, navigate to 192.168.0.100 - this goes to the Raspberry Pi's configuration page.
- Login using "root" as the username.
- Navigate to Network -> Interfaces -> WAN -> Edit.
- Change protocol to DHCP and click "Save & Apply".
- Using a browser, navigate to your router and find the IP it has assigned the Raspberry Pi and navigate to that IP.
- Navigate to the page Status -> Miner Configuration. Enter your pool information in the below format.
- Navigate to the page "Miner Status" to check mining has started.
- You can then change your router subnet back to whatever you are used to using.
Alternative Subnet Change:
- Unplug your computer from all internet sources.
- Plug in an ethernet cable from the Raspberry Pi to your computer.
- Navigate to Control Panel -> Network and Sharing Centre -> Change Adapter Settings.
- Right click on your ethernet adapter -> Properties.
- Click on "Internet Protocol Version 4" and click properties.
- Select "Use the following IP address" and enter the following:
- IP Address: 192.168.0.1, Subnet Mask: 255.255.255.0, Default Gateway: 192.168.0.100.
- Plug in an ethernet cable from the Raspberry Pi to you router.
- Restart the configuration instructions as above.
Bitcoin Digger Register!Servers : stratum+tcp://geo.bitcoindigger.com:3333
User : username.worker - auto creates workers!
Password: anypassword
Servers : stratum+tcp://stratum.btcguild.com:3333
User    : username_worker
Password: anypassword
Servers : stratum+tcp://us1.ghash.io:3333
User    : username.worker  - auto creates workers!
Password: anypassword

 5) Troubleshooting
| Problem | Solution |
| What temperatures should I aim for? | - Try to achieve <60C for long lifetimes. Temperatures should not be let to rise above 65C. |
| How can I tell what firmware version I have now? | - Navigate to System -> Cgminer API Log and look at "Firmware Version". |
| Where.can.I.find.the.latest.firmware.for.the.WR703N? | - Download the latest firmware from here (the WR703N.bin). |
| Where.can.I.find.the.latest.firmware.for.the.Pi? | - Download the latest firmware from here (the sdcard-vfat-ext4.img). |
| How do I install the latest firmware? | - Download firmware as above. Navigate to System -> Upgrade and click "browse". Select the
downloaded file and click "Flash image". Do NOT interrupt this process or you will brick the unit. |


Legal disclaimer: This information is for general guidance and does not constitute expert advice. We are not responsible if you, your property or a third
party is injured or damaged as a result of any interaction with this information, and no warranty is provided. All text and images are covered by copyright.
 6) Where to buy (top)


